Using PostMan to call the SOAP version of Catalina API for Dynamics SL
Often, when you are writing code to integrate your app or web solution to Dynamics SL using Catalina’s SOAP version of their API, you may not want to spend the time to write a client to do this. The RESTful version of the API is pretty straight forward. But what if you want to do this with SOAP? Normally you would have to write .NET or PHP code to do all the work to send the data. But Postman can do this quite nicely without having to write any code.
PostMan
PostMan is a tool that allows you to send data to a server and get a response. It is normally used in testing and interfacing with RESTful API, but is pretty easy to use for SOAP as well.
You can download Postman here: https://www.getpostman.com/ (NOTE: this works with Google Chrome, so Chrome will be required as well. This will work on all of your favorite OS platforms – Windows, Mac, Linux, etc.)
PostMan works on the following:
Below is an example of the server URL endpoint of one of my web services (http://myserver.com/ctDynamicsSL/customers.asmx?wsdl) and in this example, I am going to do a method of “POST” since I am going to be sending data to the web service in the body of the POST

- Content-Type Header: You should have this set to text/xml. You can edit headers by clicking on the Headers tab and making sure you have a header called Content-Type with a value of text/xml

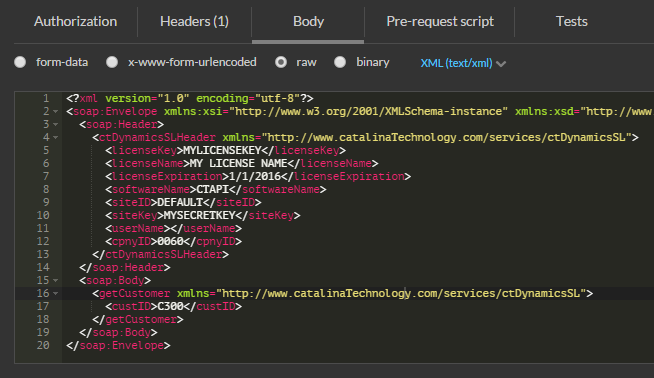
4. Body: This is the SOAP envelope that you are going to be sending to the API to do your bidding. A soap envelope is nothing more than the XML, in a particular format that is understood by SOAP based API’s. You can edit the body by going into the “Body” tab. You Need to make sure that the dropdown for content type is text/xml (see the blue dropdown in the image below). And set it to “Raw” radio button.

- Send it: When you hit the send button, it will either succeed or fail. Below is an example of the response of a successful retrieval of a customer

Determining the XML format of your Catalina API Web Services
So, how do you figure out what the soap element is supposed to be? You will need to know where your web services are. If you are writing apps that integrate to the Catalina web services, you should already know this. In my case above, my URL endpoint for the web service for customers is:
http://myserver.com/ctDynamicsSL/customers.asmx
If you pull your web service into a browser, you should see something like this:

The above shows you all the methods in a particular web service. What you would then do is find the method you want to call and click on it.
In my example, I want to retrieve customers. So, I scrolled down to the “getCustomer” method and clicked on it and I get this

You can then see that the SOAP envelope is the following XML.
<?xml version=”1.0″ encoding=”utf-8″?>
<soap:Envelope xmlns:xsi=”http://www.w3.org/2001/XMLSchema-instance” xmlns:xsd=”http://www.w3.org/2001/XMLSchema” xmlns:soap=”http://schemas.xmlsoap.org/soap/envelope/”>
<soap:Header>
<ctDynamicsSLHeader xmlns=”http://www.catalinaTechnology.com/services/ctDynamicsSL”>
<licenseKey>string</licenseKey>
<licenseName>string</licenseName>
<licenseExpiration>string</licenseExpiration>
<softwareName>string</softwareName>
<siteID>string</siteID>
<siteKey>string</siteKey>
<userName>string</userName>
<cpnyID>string</cpnyID>
</ctDynamicsSLHeader>
</soap:Header>
<soap:Body>
<getCustomer xmlns=”http://www.catalinaTechnology.com/services/ctDynamicsSL”>
<custID>string</custID>
</getCustomer>
</soap:Body>
</soap:Envelope>
Now that you have the SOAP envelope, you can now change it to your needs. You will need to do the following:
- Change the soap:Header values to match your license keys
- Change any soap:Body data to match what you want to pass to the web service
In the example, I have changed the appropriate data to match what I wanted to do:
<?xml version=”1.0″ encoding=”utf-8″?>
<soap:Envelope xmlns:xsi=”http://www.w3.org/2001/XMLSchema-instance” xmlns:xsd=”http://www.w3.org/2001/XMLSchema” xmlns:soap=”http://schemas.xmlsoap.org/soap/envelope/”>
<soap:Header>
<ctDynamicsSLHeader xmlns=”http://www.catalinaTechnology.com/services/ctDynamicsSL”>
<licenseKey>MYLICENSEKEY</licenseKey>
<licenseName>MY LICENSE NAME</licenseName>
<licenseExpiration>1/1/2016</licenseExpiration>
<softwareName>CTAPI</softwareName>
<siteID>DEFAULT</siteID>
<siteKey>MYSECRETKEY</siteKey>
<userName></userName>
<cpnyID>0060</cpnyID>
</ctDynamicsSLHeader>
</soap:Header>
<soap:Body>
<getCustomer xmlns=”http://www.catalinaTechnology.com/services/ctDynamicsSL”>
<custID>C300</custID>
</getCustomer>
</soap:Body>
</soap:Envelope>
You can see that I changed the licenseKey, licenseName, licenseExpiration, softwareName, and siteKey to match my license information given to me by Catalina Technology. I have also set my cpnyID to match my company ID and the siteID to match my config file so that the API knows which database configuration to point to.
In the soap:Body, this is dependent on the type of method we are calling. In this case, we only need to pass the custID. I am setting it to a customer ID that I want to send to the web service so that it retrieves that customer information.
For further information, you can visit the Catalina Technology website: https://blog.catalinatechnology.com
