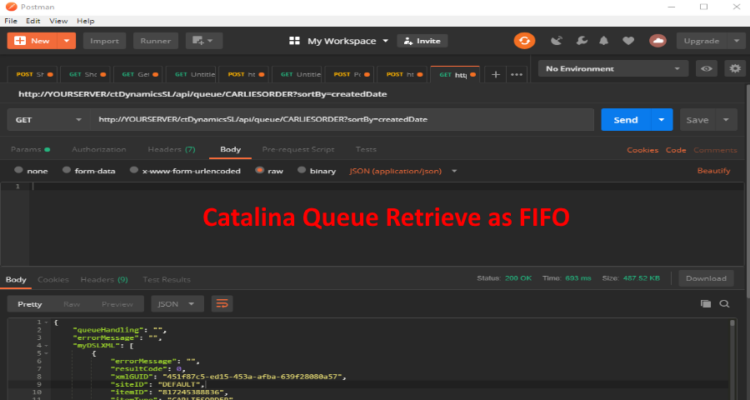
If you use the Catalina Queue Engine for queuing records, you might want to retrieve data in a FIFO (First In First Out) method. This means you want to grab the oldest records first. This is easily accomplished by calling the Catalina Queue API with the parameter sortBy in the query string.
Example, if you are retrieving the queue ORDERS, you would format your URL, for the Queue API, like this:
If you are going to use our userMaintenance web service, to manage SL user logins, it will also need: db_securityadmin db_accessadmin
Also note that by default, we normally install our scripts under the dbo schema. So, you also have to give the user, we are connecting as, execute on that schema.
eg. grant execute on schema :: [dbo] to usernamehere
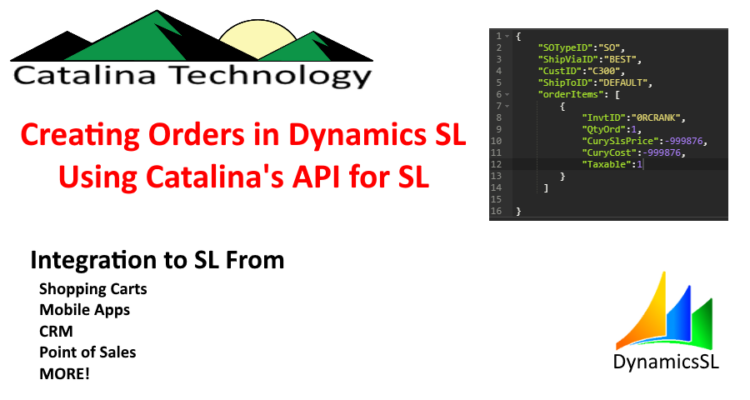
We often get requests to integrate ecommerce or other systems to Dynamic SL’s Order Management module. Basically creating sales orders from shopping carts, CRM’s, Point of Sales, Mobile Apps, etc.
It is pretty easy to create sales orders in SL using Catalina’s API with a minimal amount of work. I am going to focus on the REST version of the API and show how you can create a sales order using Postman. From there, you can apply that to whatever client application you may be developing in.
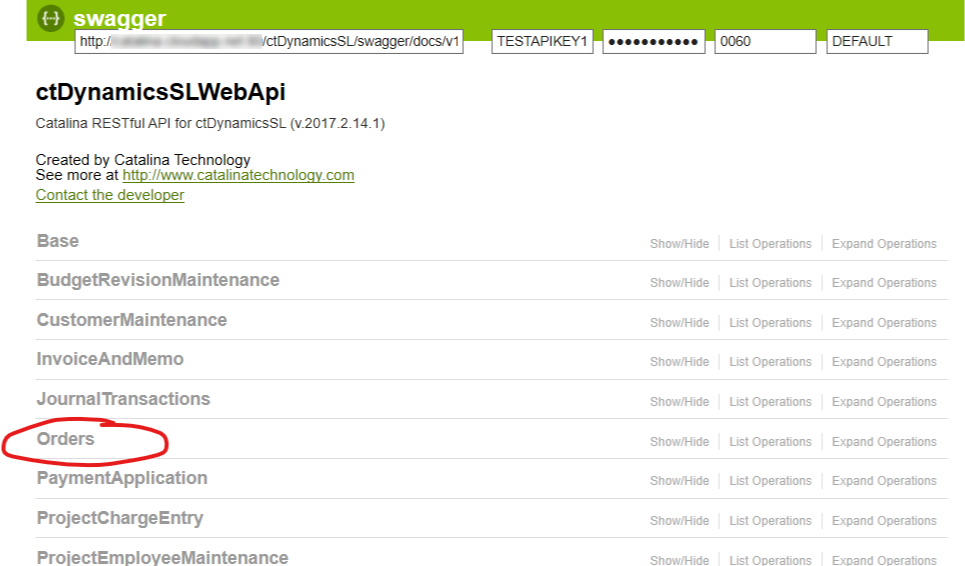
The first thing that you do is look in Swagger to determine how to use the API. The swagger documentation, for the API, is located:
http://yourservername/ctDynamicsSL/swagger
Where “yourservername” is the server that the Catalina API is installed on.
NOTE: ctDynamicsSL may be located in a different virtual path. Check with your server administrator.
Below you can see an example of the swagger documentation. You will need to enter your API key and password, CpnyID, and SiteID in the top navigation bar if you want to use the swagger tools to test code. In this example, we are just getting the usage information on how to save an order.
Clicking on the Orders resource of the API you can then look at the POST method. This is the method that allows you to save new orders. It also gives you the format of the order object you would pass to the API.
Now you have this information, you now know how to send data to the API. Below is an example of one of the most simplest orders to create. There is very little required. You would replace the values with the values that match what your SL system accommodates.
NOTE: notice the CurySlsPrice and CuryCost. If you put either of those to the secret number of -999876, this will tell the Catalina API to have Dynamics SL calculate the pricing. If you put any other number, your number will be what is saved in the line item as the price.
Here is how you can put it together in a curl code. This gives you the information on how to use the URL (NOTE: you will have to replace yourservername with your actual server) and change the authorization to what your authorization is setup on your server.
And below, you can see how you can enter it into Postman. NOTE how the API passes back the order object to you once it is created. If there is an error, the order object will be passed back mostly blank with the field errorString as not empty (meaning the error will be stored in the field errorString)
So many times, as a programmer, I get a 3rd party solution that asks me to provide them a quick “webhook” so that they can post back data. Normally this requires me to write some type of web API to receive this data.
Catalina’s Integrator Toolkit allows you to quickly create webhooks with a custom endpoint path without having to do any programming.
I did a quick demo on this here
Basically, What we can do is create a custom endpoint and define the path that it will go to. The payload passed can then be pushed through a script and redirected to other API’s, databases, etc. without doing any major programming.
Plus, if you just need to get something up quick, all you have to do is create it in our toolkit and it will just pass back the original data that was posted to it. Great for quick testing of your callback functionality of whatever is calling the webhook.
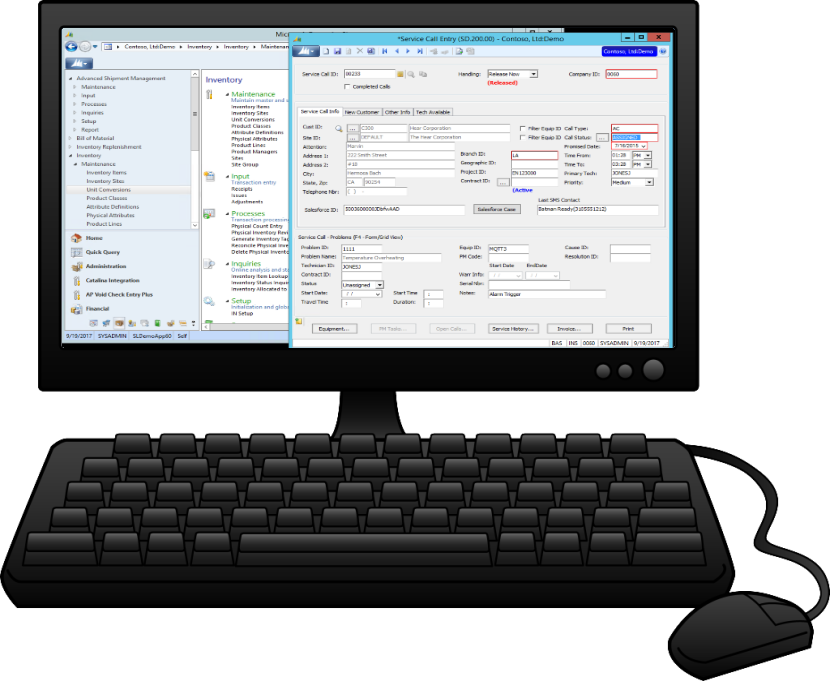
There are many times where someone out in the field doesn’t have access to a field service app. Or doesn’t need one. SMS is one of the easiest ways for relaying information.
Catalina Technology’s SMS Central now automates communication between systems like help desks, dispatch, CRM, service, and others by giving two-way communication between the technician or sales guy, in the field, and your back-office system.
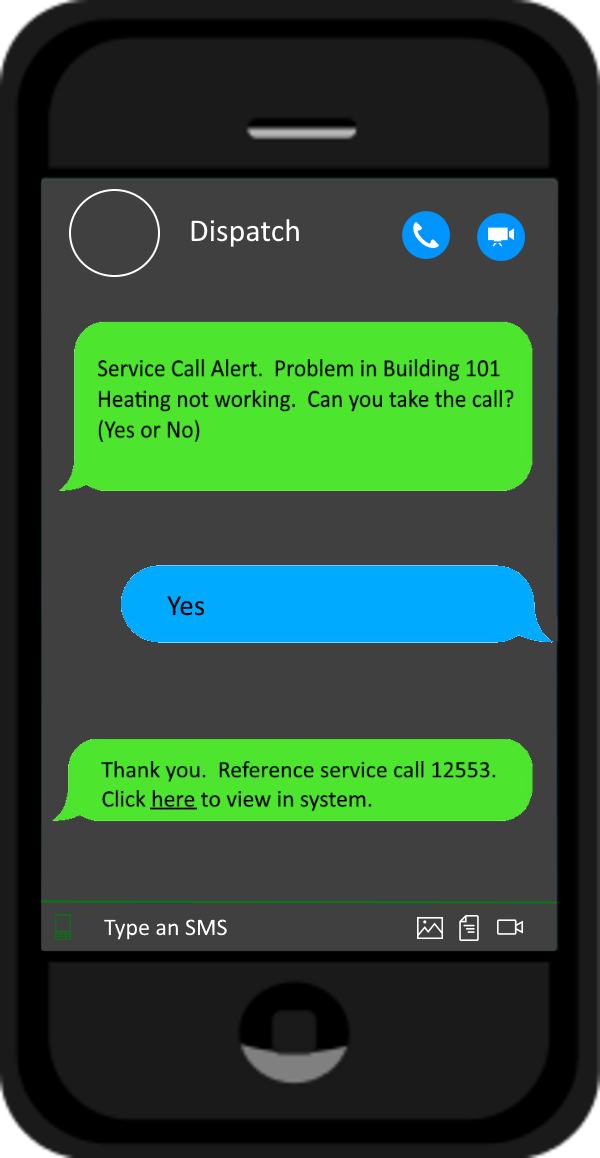
This means that you can send dispatch SMS notifications and the person receiving those SMS messages can then respond to them by simply replying to the text message. SMS Central will update the back-office system based on the mobile user’s SMS reply. All without any special app.
1. Create a service call in your dispatch or other system
Create a service call, sales opportunity, customer service case, etc. in your back-office system system like you always do.
Assign it to one or more people.
SMS Central will automatically pick this up, from your system, and send as an SMS Text Message to the assigned people.
2. SMS Central then automatically sends an SMS message, from your back-office system, to the assigned person
Send to any phone with SMS (even including old flip phones).
Can be done hands free with Siri, Cortana, or Google Assistant to do voice response of texts!
Customize the messages that are sent out.
Your field personnel can actually respond to the SMS message with customizable acceptable responses like “Yes”, “No”, “In route”, “can’t make it”, or any other response you want.
If the person doesn’t respond to the message, SMS central has routing and escalation capability to send to others.
Responses can even include pictures, files, video, GPS coordinates, or other attachments. SMS Central will save this for you.
3. SMS Replies are automatically routed back to your system!
Your system is automatically updated based on the response that was sent back.
Any additional replies to this SMS text thread will be logged as notes or history in your system.
Attachments such as pictures, files, video, voice, and GPS coordinates will be stored and tied to the service call.
Many of us still have customers, vendors, employees, etc. who require printed invoices, checks, letters, or other documents to be mailed to them. This is a hassle to do. Extracting and formatting the data, mail-merging, printing, folding, stuffing envelopes, postage, and mailing takes time and costs money.
Catalina Technologies’ Cloud based printing and mailing solution automates this process and merges data from your ERP, CRM, helpdesk, or other system and prints and mails these documents for you.
How does this work? We merge your data into a customizable template, print it, and mail it. All on the Cloud! It is just that simple!
(NOTE: You can jump to the end of this post to see a demo of this in action!)
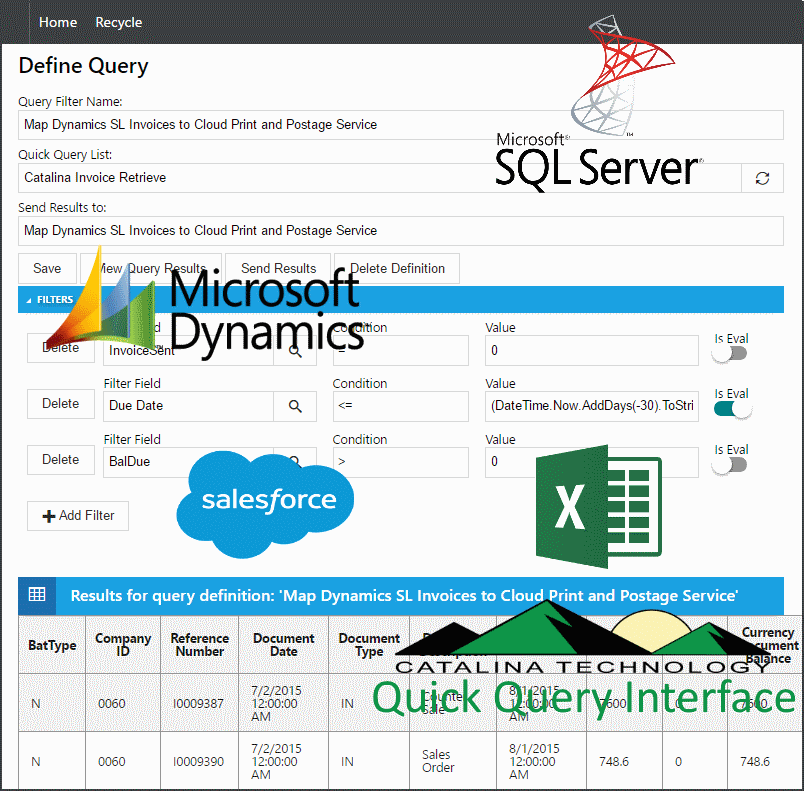
Data Integration
To make life easier, you want your ERP, helpdesk, CRM, or other system to automatically feed the cloud printing and postage so that you don’t have to do manual steps to get your data out of your back office, merged, printed, and mailed. Catalina Technology has a full set of integration tools that allows you to integrate from most ERP’s, CRM systems, Helpdesk, or SQL Query, Excel spreadsheet, CSV, etc. Catalina also has a front-end to Quick Query that allows you to define Quick Query filter definitions that can have custom mapping rules. These Quick Query filter definitions can then be saved and scheduled as automated jobs.
Dynamics SL, GP, and CRM
Salesforce.com
Any SQL Query
Excel spreadsheets
.CSV files
You can call our API from your system
Custom integration
Templating
Templating is an important part of a printing solution. This allows you to be able to customize how data is merged into the output document to any format you want.
These can then be printed as:
Invoices
Letters
Postcards
Holiday cards
Checks
Anything you would normally send to a customer, vendor, employee, business associate, etc!
Demo
Here is a quick demo we did on one of our recent webinars showing how we can receive data from Dynamics SL, merge it into invoices, and then send it out to be printed and mailed to your customers.
[youtube https://www.youtube.com/watch?v=kJGuq5id7pM]
There are many times where you want to be able to import sales orders into Dynamics SL and have SL automatically price the order items for you (instead of you manually setting it). This is easy to do in REST, because you can omit fields like CurySlsPrice and then the RESTful API will see that as a null and then ask SL to price for you. But SOAP isn’t as simple since passing nulls isn’t as easy.
We have a simple way of handling this by a secret number. Yes, I said that right. We use a secret number (-999876 to be exact). This is a very unlikely number to ever have a price set as in SL. So, if you set the sales price of a line item to -999876, the Catalina API will then ask SL to automatically price it for you. If you pass any other number, the Catalina API will use that number for pricing override.
Here is an example: (NOTE: see the setting of the orderItems array, both the CurySlsPrice and CuryCost is getting set to -999876. This tells the Catalina API that it is to use the SL sales price for the customer and follow all pricing rules setup against the customer, price class, quantity ordered, etc.
// Test placing an order with the bare minimum
ctDynamicsSL.orders.order oOrder = new ctDynamicsSL.orders.order
{
	SOTypeID = "SO", // set your order type (must be a valid soTypeID)
	CustID = "C300", // which customer are you creating an order for (must be a valid CustID)
	ShipViaID = "BEST", // how are you shipping it (ust be a valid shipViaID)
	ShiptoID = "DEFAULT", // Which ShipToID for the customer are you shipping to (must be a valid shipto address for the customer)
	AdminHold = true, // for kicks, we are going to put it on admin hold
};

// create an array of orderItems with the bare minimum (this allows SL to price)
List<ctDynamicsSL.orders.orderItem> orderItems = new List<ctDynamicsSL.orders.orderItem>();
orderItems.Add(new ctDynamicsSL.orders.orderItem
{
	InvtID = "0RCRANK", // which invtID are you sending this to? (must be a valid InvtID)
	CurySlsPrice = -999876, // -999876 is a secret number that will tell the web services to allow SL to price the item
	CuryCost = -999876, // if you want to price this yourself, just put in the amount you want to price
	Taxable = 1
});
oOrder.orderItems = orderItems.ToArray();

// lets place the order using placeOrder()
var placedOrder = OrderService.placeOrder(oOrder);

// if there is a value in the errorString property of the returned object, then there was an error
if (placedOrder.errorString.Trim() != "")
{
	Console.WriteLine("An Error Occurred: " + placedOrder.errorString.Trim());
}
else
{
	Console.WriteLine("Order Created: " + placedOrder.OrdNbr);
}
Catalina Technology has an API that allows you to integrate with Dynamics SL’s Quick Query through both SOAP and REST interfaces. This example shows you how to make a call to Quick Query using RESTful API.
If you want to learn about the SOAP methods, you can see an earlier blog post here:


 So many times, as a programmer, I get a 3rd party solution that asks me to provide them a quick “webhook” so that they can post back data. Normally this requires me to write some type of web API to receive this data.