If you are getting a timeout from the server (not the client) when calling Catalina’s APIs, what we generally recommend for our services is leaving the webservice debug flag set.
Often, there is a problem when accessing the DMG’s, in Solomon, where you get an error “Missing Database information.” This is generally caused by a missing or invalid Solomon.ini file.
Step 1:
Validate that you have a good solomon.ini. Contact Catalina for a good solomon.ini file.
Looking at this, there are several things that are important
This is because Catalina’s API has security where you need to create a hash and pass that hash of the name of the stored procedure (using the same APIKey setup in ctDynamicsSL) so that when the API retrieves your request for the SQL call, it is using the same shared key for the hash encryption.
If you don’t want to do this, you can look at your DSLConfigFile.xml file. Look in the XML block denoted by the SiteID you are using in your header and make sure that this line is there (with the value = TRUE — All Caps). This will disable that checksum check.
Catalina’s RESTful API for Dynamics SL uses BASIC authentication. You can manage your authentication using Catalina’s ctConfigEditor.exe tool. This is normally installed on the API Web server in the c:\inetpub\xctFiles\ctConfigEditor folder. It may be different on your server so you may need to contact your IT administrator. The executable is ctConfigEditor.exe.
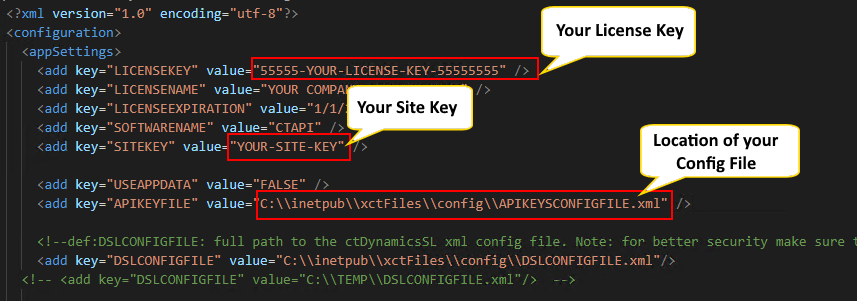
You will first need a few pieces of information from the web.config file of your ctDynamicsSL folder (the location where Catalina’s web services/API resides). The folder is normally located at: c:\inetpub\xctFiles\web\ctDynamicsSL. But could be in another location based on your server setup. You may need to contact your IT administrator to find out where it is.
Looking in the web.config, you should see several keys in the appSettings section that is required for ctConfigEditor to be able to read your authentication file:
LICENSEKEY
SITEKEY
APIKEYFILE
Once you have your licensekey, sitekey, and apikeyfile, you can run the ctConfigEditor tool.
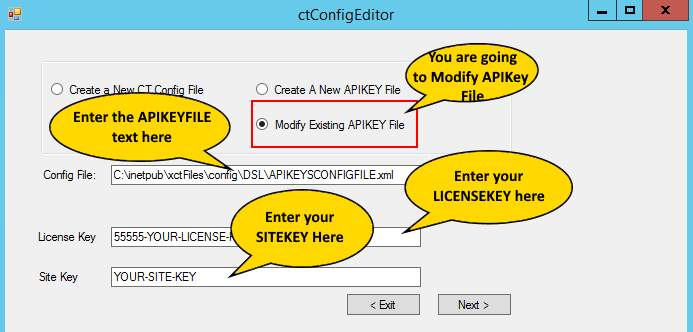
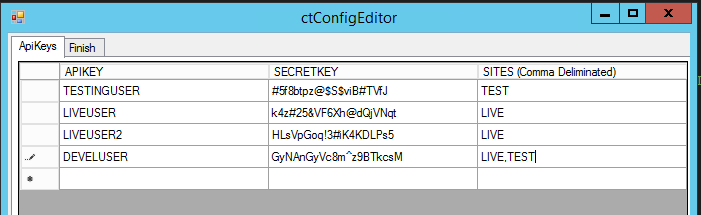
Make sure you have the radio button “Modify Existing APIKEY File” as shown above. Then enter the APIKEYFILE in the Config File text box, the LICENSEKEY in the License Key text box, and the SITEKEY in the Site Key text box. Then you can press the “Next” button to be able to enter your API Keys for BASIC authentication.You can now edit/add/delete users for access to the system. There are 3 fields for each user:
APIKEY: this is the username that the user would be using in the RESTful API basic authentication
SECRETKEY: this is the password that the user would be using in the RESTful API basic authentication
SITES: This is a comma delimited list of sites the user can access
So, in the above example, I have 4 users
TESTINGUSER: This user can only access the TEST site
LIVEUSER and LIVEUSER2: These users can only access the LIVE site
DEVELUSER: this user can access both the LIVE and the TEST site
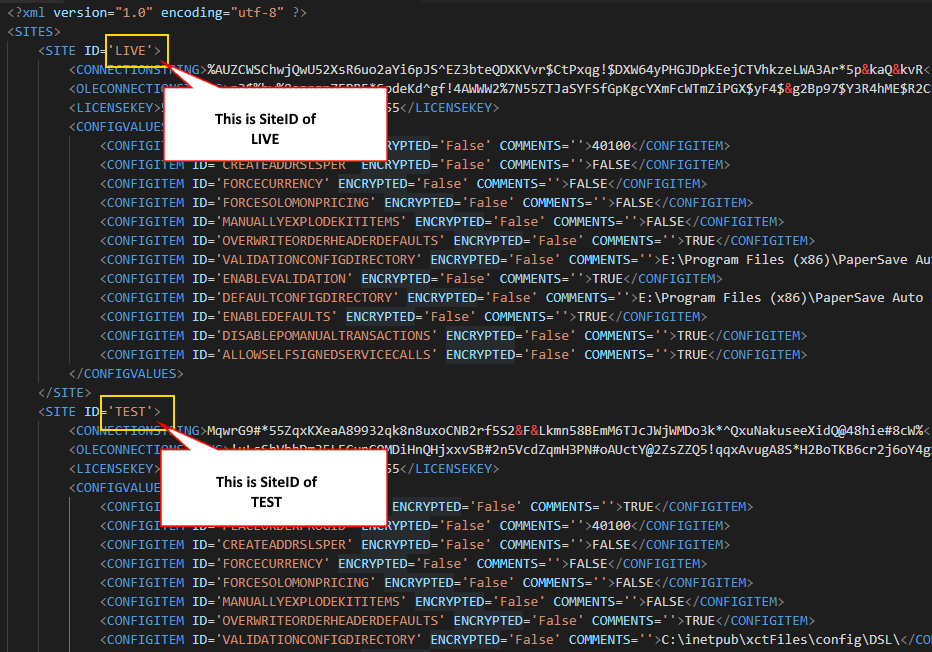
NOTE: Sites are basically configurations in Catalina’s API that point to different database strings and configurations. If you look in your web.config file, of the ctDynamicsSL folder, you can see an appSettings key called DSLCONFIGFILE. This is the location of a configuration file that has all the different sites setup. Below is an example of what a DSLCONFIGFILE would look like. You can see that there are 2 separate sites. Each with their own connection strings and configurations.
NOTE: Do not change your DSLCONFIGFILE unless you intend to change settings. This tutorial is NOT about DSLCONFIGFILE but about your API Keys.
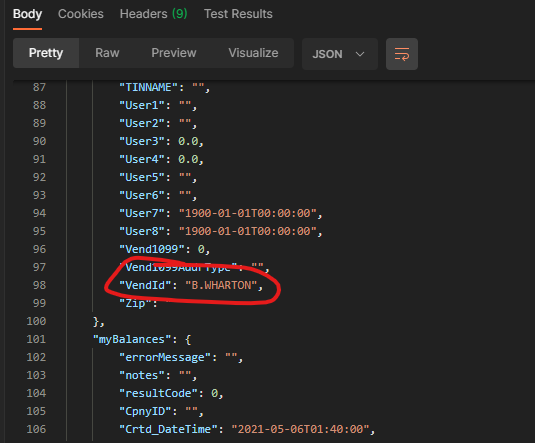
So, now that we have our API Keys setup, lets do an example. If we want to use the following:
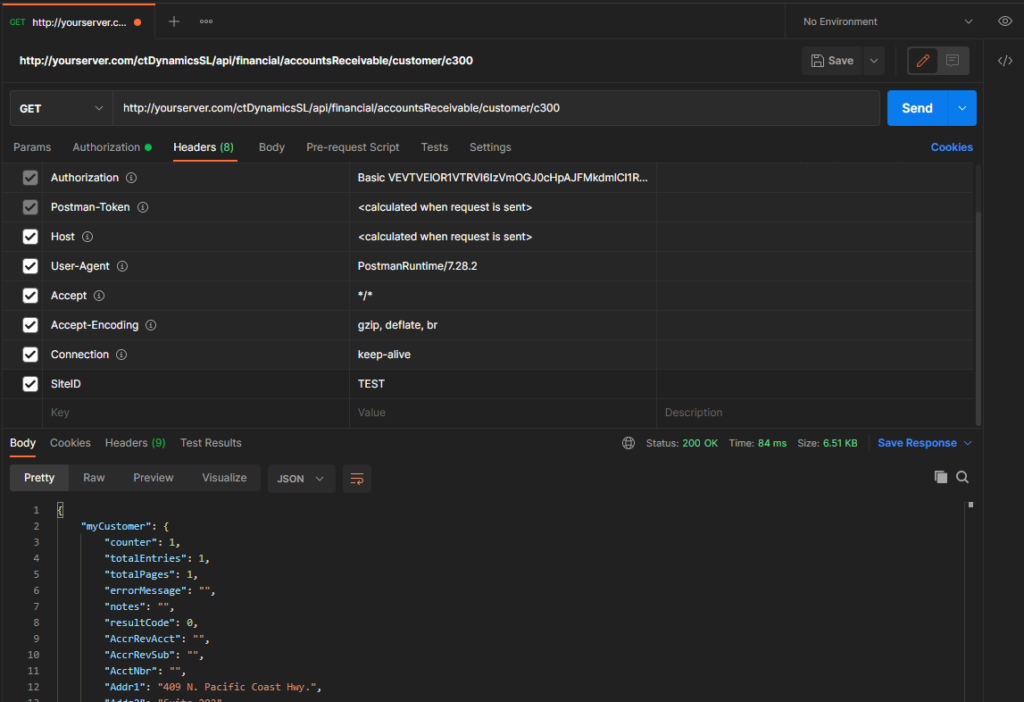
Use the TESTINGUSER API Key (with it’s password of “#5f8btpz@$S$viB#TVfJ”)
We are going to use the TEST SiteID
We will have a server name of yourserver.com
We want to retrieve the Customer “C300” from SL using the customer endpoint
NOTE: to create the authorization string, you would take the username and the password and create a string like this: “TESTINGUSER|#5f8btpz@$S$viB#TVfJ” and then base64 encode it. You will get the following value: VEVTVElOR1VTRVJ8IzVmOGJ0cHpAJFMkdmlCI1RWZko=
To create the header for “Authorization.” Take the base 64 encoded value and put “Basic” in front of it. Your end result would be the following: “Basic VEVTVElOR1VTRVJ8IzVmOGJ0cHpAJFMkdmlCI1RWZko=”
Looking at it in Postman looks like the following:
When creating a purchase order using Catalina’s API for Dynamics SL and you get the following error:
“The create voucher flag cannot be changed once the document has been changed”
This is getting fired off because of a business rule violation. There is a work around. If you look in your DSLCONFIGFILE.xml, you should look for the following.
Make sure that the value of that CONFIGITEM is “TRUE”. If you don’t have this CONFIGITEM, add it to the site you are using via the SiteID. If you still have the problem after making this change, contact Catalina support to see if there is an update for your version of the API.
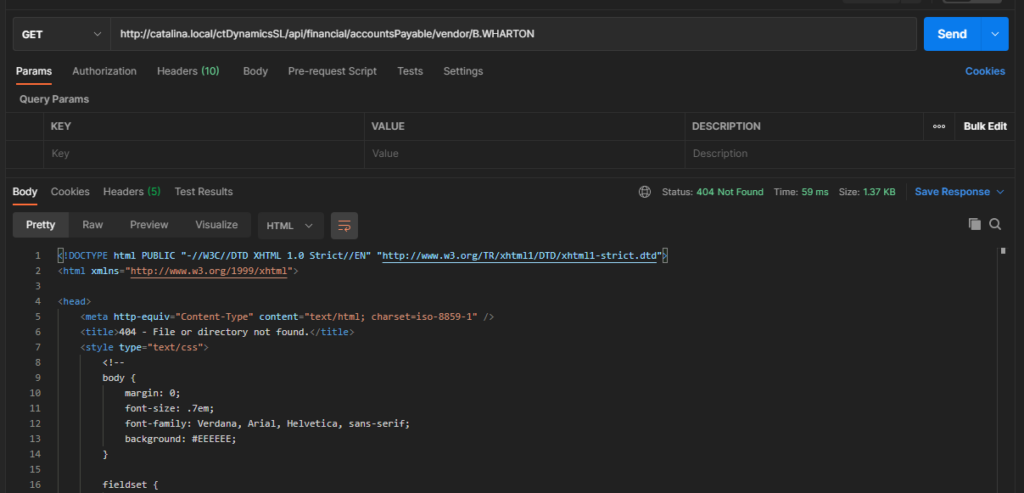
What happens if you are using Catalina’s API for Dynamics SL and your ID you are searching for (example a CustID, Vendor ID, etc) has a period in it? It will fail with standard installation. This is because the .NET web application is looking for a period in the final parameter so that it can route.
You will get a return that looks something like this with a 404 status and HTML coming back:
This can be solved by changing the web.config.
NOTE: if you make this change, then you wont be able to run SOAP and REST in the same application. SOAP will stop working and you would need to install a separate instance with it’s won web.config to make this work.
If you look in the Web.config, you will see the following line:
You will then need to change your sql connection strings
Which Connection String
What to Add
.NET Connection String
;Trusted_Connection=True;
ODBC Connection String
;Integrated Security=SSPI;
For both of these strings, you would remove the username and password from the strings and add the trusted_connection=True for the .NET connection string. And you would add the Integrated Security=SSPI for the ODBC connection string.
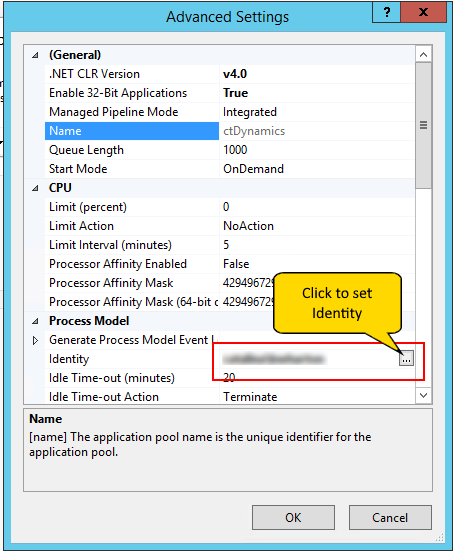
Configure the IIS Application Pool for the Identity
Next, you would go into IIS manager and click on Advanced Settings, look at “Identity” and click on the 3 dots button.
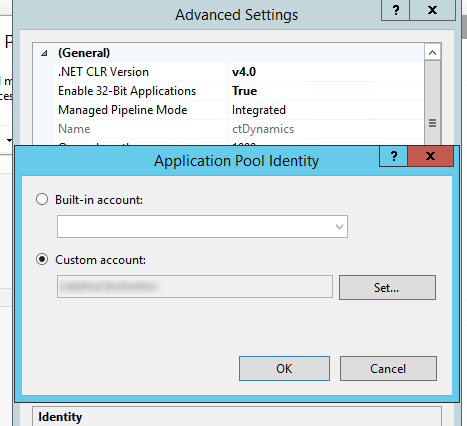
Then choose the “Custom Account” radio button and press the “Set” button.
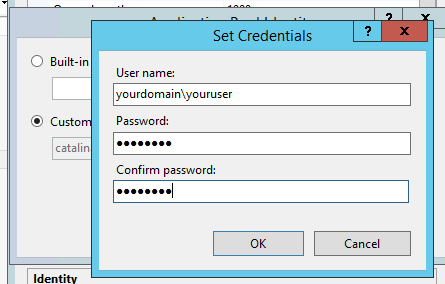
Another popup will be displayed and you are then able to put in the username (replace the example below with your domain\username) and password. After you press OK, the system will tell you whether it is valid or not. NOTE: You will need to make sure that the user has access to the SQL objects in SQL server.
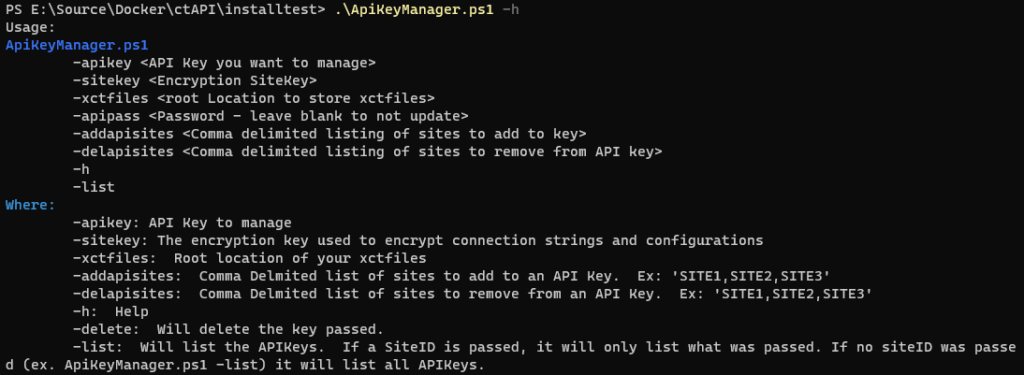
I did a demo on how to manage API Keys, for our RESTful API for Dynamics SL, using PowerScript. We are rolling out PowerScript management and installation tools for our products. Please contact us ([email protected]) if you are interested in receiving an early release.
sitekey: The encryption key used to encrypt connection strings and configurations
xctfiles: Root location of your xctfiles
addapisites: Comma Delmited list of sites to add to an API Key. Ex: ‘SITE1,SITE2,SITE3’
delapisites: Comma Delmited list of sites to remove from an API Key. Ex: ‘SITE1,SITE2,SITE3’
h: Help
delete: Will delete the key passed.
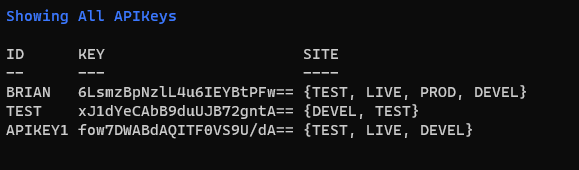
list: Will list the APIKeys. If a SiteID is passed, it will only list what was passed. If no siteID was passed (ex. ApiKeyManager.ps1 -list) it will list all APIKeys.
Examples
If you want to get a listing, you would enter: ./ApiKeyManager.ps1 -h
Passing the -list parameter will get you something similar to this
If you want to create a new API Key with the username = “APIKEY1”, password = “Passw0rd1”, give access to 3 sites (“TEST”, “LIVE”, “DEVEL”), your SiteKey (encryption key) is “1234567”, and the location of your xctfiles is c:\inetpub\xctFiles, you would enter the below:
There are several settings that you can set to log messages to a log file for Catalina’s API for Dynamics SL.
Look in your web.config (normally in c:\inetpub\xctFiles\web\ctDynamicsSL or c:\inetpub\wwwroot\ctDynamicsSL — but could be located in a different location based on your installation). There will be 3 variables that are important:
<!--def:DEBUGMODE: TRUE/FALSE default:FALSE-->
<add key="DEBUGMODE" value="TRUE" />
<add key="DEBUGLEVEL" value="VERBOSE" /><!--BASIC,VERBOSE-->
<!--def:ERRORLOGFILE: full path to the txt file to writeout error and status messages-->
<add key="ERRORLOGFILE" value="C:\\inetpub\\xctFiles\\errorLogs\\DSLerrorLogFile.txt"/>
DEBUGMODE: There are 2 different settings for this
TRUE if you want to have messages saved to a logfile.
FALSE if you don’t want to have messages saved to a logfile. Normally DEBUGMODE would be set to FALSE for performance reasons.
DEBUGLEVEL: There are 2 different levels that you can set
VERBOSE: This will save extra information to the logfile. This will create a larger file but will store more information about what is going on in the service.
BASIC: This generally stores just errors and less information
ERRORLOGFILE: This is the location of the logfile. NOTE: You need to make sure you “escape” this value. So, when you have a backslash (\), make sure you do 2 backslashes (\\) so that it wont create an invalid XML string.