EVO merchant services integrates seamlessly to PayFabric +QuickCollectto provide you a secure and convenient PCI compliant service without the need of a 3rd party gateway provider.
Free Cost-Savings Analysisof your merchant services: As your trusted advisor and expert in payment processing, EVO is happy to provide you a complimentary Summary of Savings report.
Simply provide us the last 3 months of your merchant service statements, and we’ll return to you a Summary of Savings report. This enables you to see the cost-savings benefit that you’ll achieve on your credit card payment processing fees.
EVO B2B Merchant Services is the only business payments solution with Interchange Management® technology that automates cost reduction on transactions for the lowest overall cost on payment acceptance – every time. This technology identifies cost reduction opportunities in the lowest interchange rates the card brands (Visa, MasterCard, Discover and American Express) apply to each payment transaction.
A major advantage of doing business with EVO B2B is our Level 2 and 3 processing solutions, which ensure the best rate for every transaction whether through terminals or card not present scenario.
Our system automates your client’s transactions to qualify for the lowest rate possible based on card type and transaction parameters, providing significant cost-saving on processing fees. We identify payment solutions and process improvements, which result in time savings and cost reduction, increasing cash flow back to your bottom line.
EVO removes the need for using a 3rd party gateway, which eliminates these unnecessary fees.
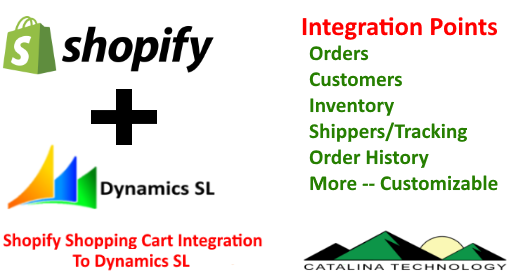
Many companies don’t want to go through the effort of building a customer eCommerce system to sell online. There are many cloud based eCommerce systems that they can use to minimize support, hosting, and development time. Catalina has integrated with many of these such as: Shopify, Magento, BigCommerce, WooCommerce, Square, and others.
One of the most popular eCommerce systems is Shopify. Catalina’s Dynamics SL integration to Shopify includes:
Order Creation: When an order is created in Shopify, it is automatically transferred to Dynamics SL and created as a Sales order in SL.
Order Acknowledgement: When an order is created in Dynamics SL, Catalina will update Shopify with the SL order number and other information.
Shipper Notification: When an order has shipped (partial or complete), Catalina will send shipper information to Shopify notifying which items have shipped and any tracking numbers that were created.
Order Complete: Once an order is completed, Catalina will notify Shopify that the order is completed so that Shopify can then archive that order.
Inventory updating: Catalina can send inventory information to Shopify which will allow Shopify to know quantity on hand, backorders, out of stock, and other information regarding products for sale on the site. Catalina can also add or remove products from the shopping cart site based on inventory levels and custom rules.
Custom integration points: There are many integration points in Shopify that can be utilized such as synchronizing of customers, logins, invoices, pricing, and more.
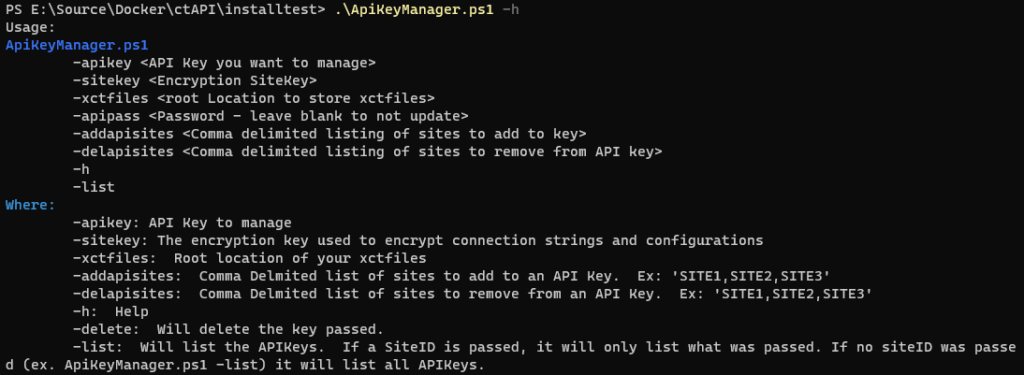
I did a demo on how to manage API Keys, for our RESTful API for Dynamics SL, using PowerScript. We are rolling out PowerScript management and installation tools for our products. Please contact us ([email protected]) if you are interested in receiving an early release.
sitekey: The encryption key used to encrypt connection strings and configurations
xctfiles: Root location of your xctfiles
addapisites: Comma Delmited list of sites to add to an API Key. Ex: ‘SITE1,SITE2,SITE3’
delapisites: Comma Delmited list of sites to remove from an API Key. Ex: ‘SITE1,SITE2,SITE3’
h: Help
delete: Will delete the key passed.
list: Will list the APIKeys. If a SiteID is passed, it will only list what was passed. If no siteID was passed (ex. ApiKeyManager.ps1 -list) it will list all APIKeys.
Examples
If you want to get a listing, you would enter: ./ApiKeyManager.ps1 -h
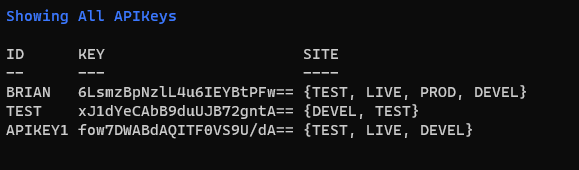
Passing the -list parameter will get you something similar to this
If you want to create a new API Key with the username = “APIKEY1”, password = “Passw0rd1”, give access to 3 sites (“TEST”, “LIVE”, “DEVEL”), your SiteKey (encryption key) is “1234567”, and the location of your xctfiles is c:\inetpub\xctFiles, you would enter the below:
There are several settings that you can set to log messages to a log file for Catalina’s API for Dynamics SL.
Look in your web.config (normally in c:\inetpub\xctFiles\web\ctDynamicsSL or c:\inetpub\wwwroot\ctDynamicsSL — but could be located in a different location based on your installation). There will be 3 variables that are important:
<!--def:DEBUGMODE: TRUE/FALSE default:FALSE-->
<add key="DEBUGMODE" value="TRUE" />
<add key="DEBUGLEVEL" value="VERBOSE" /><!--BASIC,VERBOSE-->
<!--def:ERRORLOGFILE: full path to the txt file to writeout error and status messages-->
<add key="ERRORLOGFILE" value="C:\\inetpub\\xctFiles\\errorLogs\\DSLerrorLogFile.txt"/>
DEBUGMODE: There are 2 different settings for this
TRUE if you want to have messages saved to a logfile.
FALSE if you don’t want to have messages saved to a logfile. Normally DEBUGMODE would be set to FALSE for performance reasons.
DEBUGLEVEL: There are 2 different levels that you can set
VERBOSE: This will save extra information to the logfile. This will create a larger file but will store more information about what is going on in the service.
BASIC: This generally stores just errors and less information
ERRORLOGFILE: This is the location of the logfile. NOTE: You need to make sure you “escape” this value. So, when you have a backslash (\), make sure you do 2 backslashes (\\) so that it wont create an invalid XML string.
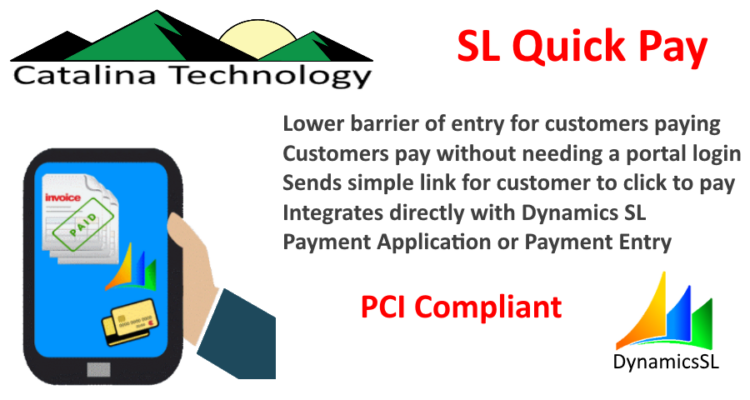
SLQuickCollect is Catalina’s solution that allows you to email or SMS message out a simple link to your customer as a request for payment.
Custom properties are a way to personalize the emails that go out to the customer. As well as the payment page and receipts they see. You can have an unlimited number of parameters with whatever text you want to send to the customer. And you can place it anywhere you want on the email and page templates.
Here is a quick demo on how you can do this via a RESTful API. And how to modify the templates to display the parameters.
Below is an example of a payload that you would send to the SLQuickCollect API.
CustID: The Customer ID of the customer you are sending the payment request to.
Amount: The amount you want to collect
PaymentEmailList: A delimited list of emails that the request is going to go to.
Properties: This is a list of properties as Name/Value pairs. You can create as many of these properties as you want. And then you can display them in the email, payment page, receipt email, and receipt page templates any way you want.
When you want to display a custom property on a template page, you use this ASP.NET format:
<%=getProperty(“PropertyName“)%>
So, if the property name is “COMMENTS”, you would use this:
We have been busy adding new features to SLQuickCollect. SLQuickCollect is Catalina’s solution that allows you to email or SMS message out a simple link to your customer as a request for payment. The customer can then click on the link and are sent to a payment page without any portal login required. This lowers the barrier of entry for you to collect from your customers and get paid faster.
Below are a few of the new features we have added to SLQuickCollect over the last month.
Ability to create payment requests via web page: This is a way to quickly send out SLQuickCollect links from a simple to use web page.
Send attachments: You can send any type of attachment with the quick link email. This could include the invoice PDF, a work order document, pictures, or any other type of document you would want to send to the customer as information about the payment request.
Add custom properties to the requests: Custom properties are a way for you to send custom information to the SLQuickCollect link so that the customer knows what they are paying for. These custom properties are unlimited and can be whatever you want. They could include: notes, order number, work order number, or anything you can think of. These properties can then be displayed to the customer on the SLQuickCollect link email, payment page, receipt page, and receipt email templates.
More multi-site/config options: This allows you to create different email templates, config options, payment methods, branding, etc. By doing this, you can have a completely different setup for different companies, marketing campaigns, storefronts, and more.
L2/L3 fields: SLQuickCollect (and Account Central) can capture level 2 and level 3 fields such as PO Number, extended address information, line item information, etc. This allows for savings on credit card transaction fees.
Payment entry requests: Not only can you create payment requests that would apply against invoices (payment applications), but now you can create payment requests for “payment entries” in SL. These are payments that aren’t directly applied to an invoice. But just captured against the customer account.
It is simple to call a stored procedure through a RESTful API call if you have Catalina’s API for Dynamics SL. You can call any stored procedure and pass parameters and retrieve data.
This is a demo on how to call a stored procedure using Postman and Catalina’s API for Dynamics SL.
First, to do this demo, you need to download and install Postman. Postman is a developer tool that allows you to interact with API’s easily so that you can test API calls to see how you call them and what data is returned. You can get Postman here: https://www.postman.com/
In the demo, we are going to call the stored procedure SOHeader_all. This stored procedure retrieves all Sales Order Headers (SOHeader) for a particular CpnyID and OrdNbr. NOTE: this is just an example. With Catalina’s API, you can call any stored procedure.
SOHeader_all has 2 parameters: – @parm1: This parameter is for the CpnyID – @parm2: This parameter is for the OrdNbr (can use a wildcard like ‘O000%’ which will bring back all orders that start with O000.
You can see what the procedure looks like here:
PROCEDURE [dbo].[SOHeader_all]
	@parm1 varchar( 10 ),
	@parm2 varchar( 15 )
AS
	SELECT *
	FROM SOHeader
	WHERE CpnyID = @parm1
	   AND OrdNbr LIKE @parm2
	ORDER BY CpnyID,
	   OrdNbr DESC
So, if you wanted to retrieve all orders that started with “O000” for CpnyID = “0060” you would call the stored procedure like this:
exec SOHeader_all @parm1='0060', @parm2='O000%'
So, now how to call this using Postman through Catalina’s API for SL?
First you need to know where your Catalina API is installed. I am going to use the server name yourserver.com as the domain name. So, for this example, we would look at the endpoint as the following:
As you can see above, you would replace yourServer.com with wherever your server is. And you can see <ProcedureName> in the URL. this would be replaced with the actual stored procedure name you want to call (in this example, we are going to replace it with SOHeader_all). So, the new URL for the endpoint would look like the following:
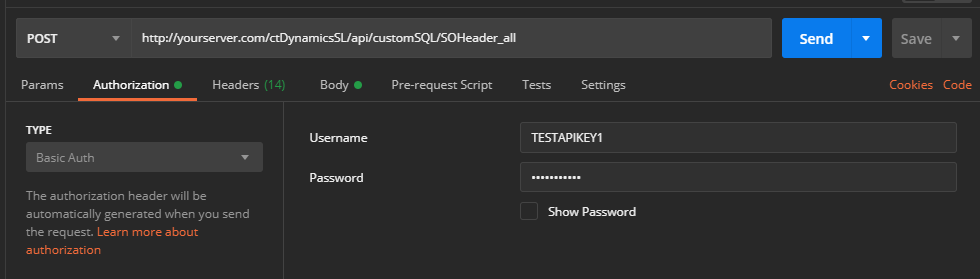
In Postman, you would make it look like below. NOTE: when calling a customSQL stored procedure, you must use the action type of “POST”
Next, you need to set the authentication. This is done on the “Authorization” tab. Catalina’s API uses “Basic Auth”. So, make sure that you set the type for “Basic Auth” in the dropdown. And then enter the username and password that was given to you from your installer.
After that, you will have been given a SiteID from your installer. You will need to create a Header for that SiteID. You do this on the headers tab. You should enter that SiteID (in my example it is “DEFAULT”, but you would use the SiteID given to you by your installer) and the default CpnyID (in my example that is “0060”, but you would use your CpnyID of your database)
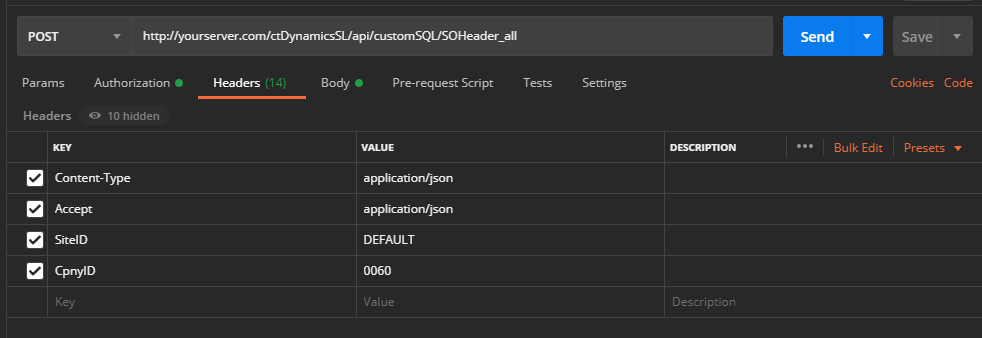
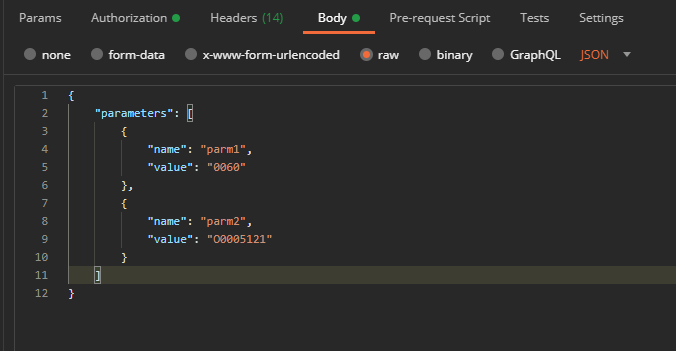
Finally, you will want to enter the body of the parameters that are being passed. There are 2 parameters for SOHeader_all (@parm1 and @parm2). The format of the body that you would set is below.
So, your Body tab in Postman would look like this (NOTE: make sure you select the “raw” radio button as shown below)
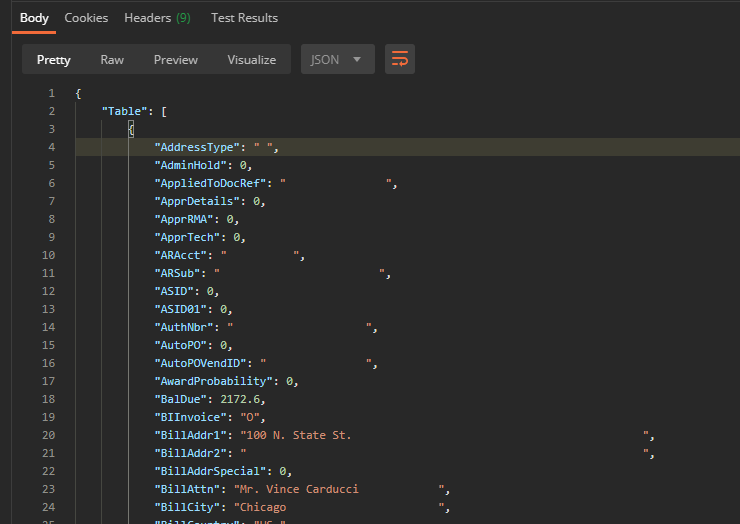
Then all you have to do is simply hit the “Send” button and the system should retrieve the results from your stored procedure call. In my example, it looks like below
This is a demo that shows you how to create a mobile app to interact with Dynamics SL to provide a “Contact Free” payment solution to help protect your employees and customers during COVID 19. The intended user of this example app would be a customer service rep, sales person, or field service rep who needs to collect payment from a customer (handy for collecting a deposit or down payment before delivery, installation, or service work to be done).
This demo uses Catalina’s API to search customers in SL and then lets the user to request a payment from a customer by generating a link and emailing it to the chosen customer. That customer then can click on the link and pay the amount which automatically creates a payment in SL’s AR.
Check out the video of the demo on our Youtube channel here:
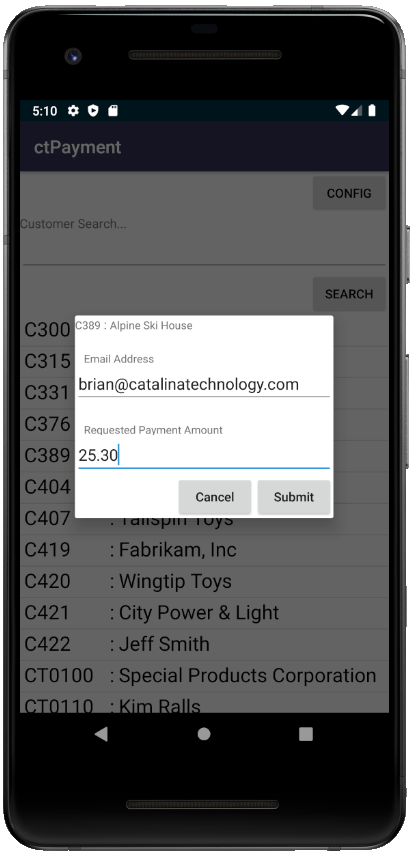
Below is a screenshot of the Android app from the above demo. First you can search for a customer by a keyword. That search will then bring back a list of results. You can then click on the customer you want to request funds for. The app will automatically fill in the email address of the customer (from the Customer record in Dynamics SL). You can change the email address if you want. You then enter a requested payment amount and hit submit. Once you do this, Catalina’s SLQuickCollect will send off an email to the customer with a link which will then allow them to make a PCI compliant secure payment. Once authorization occurs, SLQuickCollect will then create a payment in Dynamics SL automatically.
As mentioned below, if you want to have starter code on creating an Android App (with Visual Studio and Xamarin), you can check out an example on our Github here (NOTE: I would only consider this a starter. This is in no means something finished but enough to get you started)
Getting paid by your customers can sometimes be difficult. Catalina’s payment portal allows users to login and manage their account and pay their invoices. But customers still need to login.
To reduce the barrier of entry for customers to pay, Catalina has come up with SLQuickCollect. SLQuickCollect allows you to send out a link via email or SMS which the customer clicks on. They are then sent to a payment page without any login required. They simply pay (Credit Card or ACH). Once that payment is authorized and captured, SLQuickCollect creates the payment in Dynamics SL.
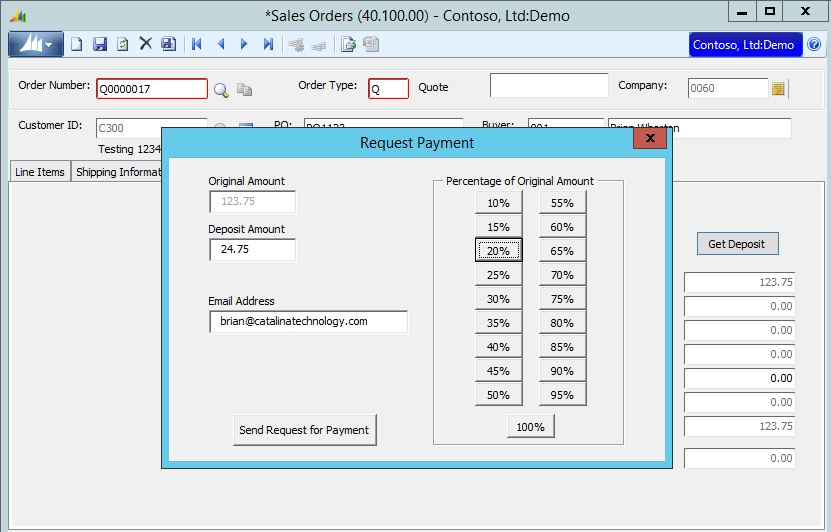
The above shows how you can request for an amount not tied to any invoice. This is especially handy if you need to capture a deposit against a sales order, service call, etc. This payment would go into the SL “Payment Entry” screen.
The demo shows how you can request a payment from the sales order screen for a deposit amount. This would then send a link to the user via email. The user would click on the link and pay.
The request payment allows you to decide an amount to charge for a deposit for the order. It also has a handy percentage calculator to take out the guess work.
NOTE: SLQuickCollect also has the ability to send out a simple link to pay for an invoice and have that payment applied to one or more invoices through the “Payment Application Screen”
Catalina’s SLQuickCollect is a way to send a request for payment to your customer as an email with a link to click to pay. Your customer simply clicks on it and pays (no need for a portal login or anything). The payment works through a PCI compliant payment processor and is automatically integrated back into Dynamic SL’s AR.
There are many ways to create SLQuickCollect links. One of which is calling a stored procedure by passing a few parameters.
The stored procedure is called: xct_spSLPaddInvoicePaymentRequest
The parameters to this proc is:
@batNbr: The batch number of the invoice you want to send
@refNbr: The invoice number you want to send
@CustID: The customer who the link is going to be going to
@paymentEmailList: A delimited list of email addresses the link will be sent to
@siteID: (optional) For which configuration site to use (defaults to ‘SLPAY’)
@setupID: (optional) The PayFabric setupID you are to send. If not passed, the default will be used from SLQuickCollect’s configuration
@deviceID: (optional) The PayFabric deviceID you are to send. If not passed, the default will be used from SLQuickCollect’s configuration
You can call this stored procedure from most anything. You could call it from a trigger when an invoice is created. You can call it from a SL screen. Or even another application all together (like maybe excel that has a list of invoices to send)
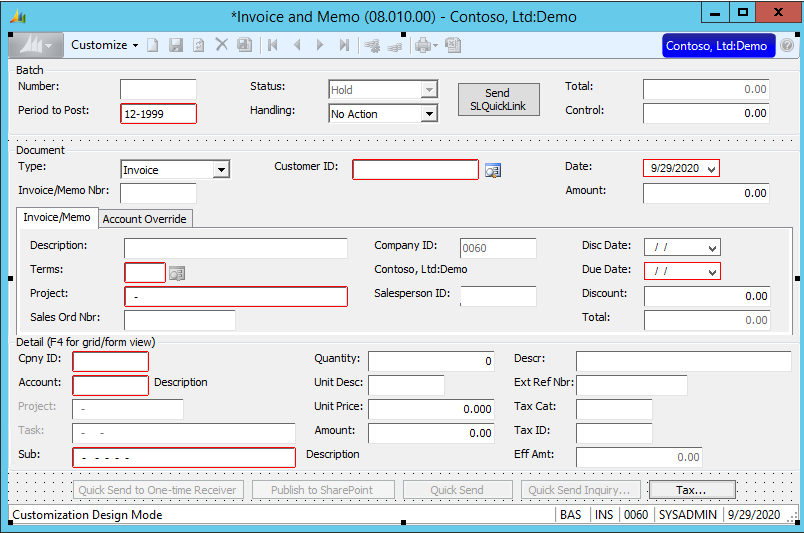
Here is an example of how I added a button on the Invoice and Memo screen to send a SLQuickCollect link for a particular invoice.
Below, you can see where I created a button “Send SLQuickLink” that will take the current invoice on the screen and send a payment request link to the customer.
Below is the code behind the click event of the button. This will look at the current batNbr, refNbr (invoice number), custID, and get the email tied to the customer to send the link to that customer’s email.
Private Sub bPayLink_Click()
    Dim SQLStr As String
    Dim Csr_temp As Integer
    Dim sCustID As String

    Dim recfound As Integer
    Dim maintflg As Integer

    sCustID = GetObjectValue("ccustid")

    SQLStr = "Customer_All " + SParm(sCustID)
    serr = SqlFetch1(Csr_temp, SQLStr, bCustomer, LenB(bCustomer))

    Dim lsSQL As String
    Dim liCursor As Integer

    lsSQL = "xct_spSLPaddInvoicePaymentRequest" & SParm(ThisScreen.cbatnbr.Text) & SParm(ThisScreen.crefnbr.Text) & SParm(ThisScreen.ccustid.Text) & SParm(bCustomer.EMailAddr) & SParm("SLPAY")

    Call sql(liCursor, lsSQL)
    Call SqlFree(liCursor)

    MsgBox ("SLQuickLink Sent to CustID " + ThisScreen.ccustid.Text + " for invoice " + ThisScreen.crefnbr.Text)
End Sub