It is easy to retrieve most any data from SL using Catalina’s API for Quick Query. Below is an example of how you can use SOAP and .NET to do this. This example shows yow you can retrieve subaccounts
First, you can also call the QuickQuery API via Postman (using the RESTful API) via below (NOTE: this should bring back all sub accounts since we arent filtering for anything.
Below is .NET code using SOAP. I had registered the SOAP web service quickQuery.ASMX and named it ctAPI.QuickQuery. This code shows you how you can retrieve subaccounts in 2 different ways
The first one just brings back all sub accounts
The second call brings back just sub accounts that contain the word “admin” in the Description
public void RunIt()
{
       // call the web service, requesting the “QQ_SubAccount” quick query to be run. We will pass an empty filter array so that it will get everything
       var returnWithoutFiltering = QuickQueryService.getScreen("QQ_SubAccount", new ctAPI.QuickQuery.queryFilter[0]);
       {
              // I like to convert to a JArray so that I can do other things with it.  but lets loop through each row
              Newtonsoft.Json.Linq.JArray myArry = Newtonsoft.Json.Linq.JArray.FromObject(returnWithoutFiltering.myQueryResults.Tables[0]);
              foreach (var myVal in myArry)
              {
                     Console.WriteLine($"SubAcct: {myVal["Subaccount"].ToString().Trim()}, Descr: {myVal["Description"].ToString().Trim()}");
              }
       }
       Console.WriteLine();
       // lets filter all sub accounts that contain the word "admin" in the description
       var myFilters = new List<ctAPI.QuickQuery.queryFilter>
       {
              new ctAPI.QuickQuery.queryFilter {name = "Description", comparisonType = "LIKE", value="%admin%" }
       };
       // call the web service, requesting the “QQ_SubAccount” quick query to be run. Passing the myFilters array for filtering
       var returnWithFiltering = QuickQueryService.getScreen("QQ_SubAccount", myFilters.ToArray());
       {
              // I like to convert to a JArray so that I can do other things with it.  but lets loop through each row
              Newtonsoft.Json.Linq.JArray myArry = Newtonsoft.Json.Linq.JArray.FromObject(returnWithFiltering.myQueryResults.Tables[0]);
              foreach (var myVal in myArry)
              {
                     Console.WriteLine($"SubAcct: {myVal["Subaccount"].ToString().Trim()}, Descr: {myVal["Description"].ToString().Trim()}");
              }
       }
}


private ctAPI.QuickQuery.quickQuery _quickQueryService = null;
public ctAPI.QuickQuery.quickQuery QuickQueryService
{
       get
       {
              if (this._quickQueryService == null)
              {
                     this._quickQueryService = new ctAPI.QuickQuery.quickQuery
                     {
                           Timeout = 300000,
                           ctDynamicsSLHeaderValue = new ctAPI.QuickQuery.ctDynamicsSLHeader
                           {
                                  siteID = "YOURSITEID",
                                  cpnyID = "YOURCPNYID",
                                  licenseKey = "YOURLICENSEKEY",
                                  licenseName = "YOUR LICENSE NAME",
                                  licenseExpiration = "1/1/1900",
                                  siteKey = "YOURSITEKEY",
                                  softwareName = "CTAPI"
                           }
                     };
              }
              return this._quickQueryService;
       }
       set
       {
              this._quickQueryService = value;
       }
}
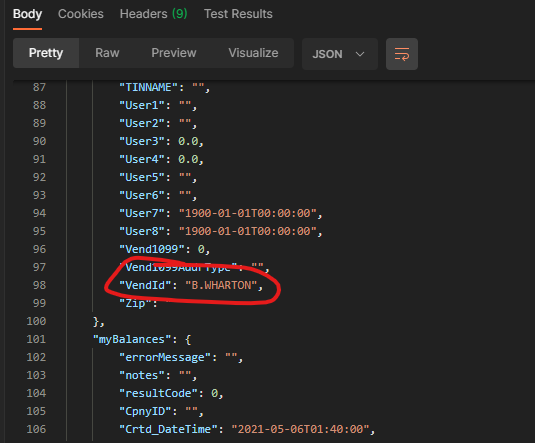
Below here is the data structure of a subaccount from the Quick Query QQ_SubAccount
If you are connecting to one of Catalina’s API endpoints (either REST or SOAP) and you are using https://, if you get an error saying the “Connection was Forcibly Closed,” this is normally because the web server requires a specific TLS version and your client isn’t using that.
If you are writing this in .NET, this can be easily overcome by adding this statement before you make a call to our API (it is normally fine to put it in the constructor or in some startup routine):
Catalina’s RESTful API for Dynamics SL uses BASIC authentication. You can manage your authentication using Catalina’s ctConfigEditor.exe tool. This is normally installed on the API Web server in the c:\inetpub\xctFiles\ctConfigEditor folder. It may be different on your server so you may need to contact your IT administrator. The executable is ctConfigEditor.exe.
You will first need a few pieces of information from the web.config file of your ctDynamicsSL folder (the location where Catalina’s web services/API resides). The folder is normally located at: c:\inetpub\xctFiles\web\ctDynamicsSL. But could be in another location based on your server setup. You may need to contact your IT administrator to find out where it is.
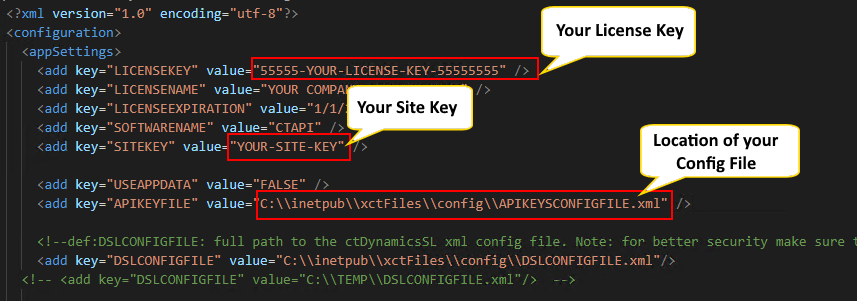
Looking in the web.config, you should see several keys in the appSettings section that is required for ctConfigEditor to be able to read your authentication file:
LICENSEKEY
SITEKEY
APIKEYFILE
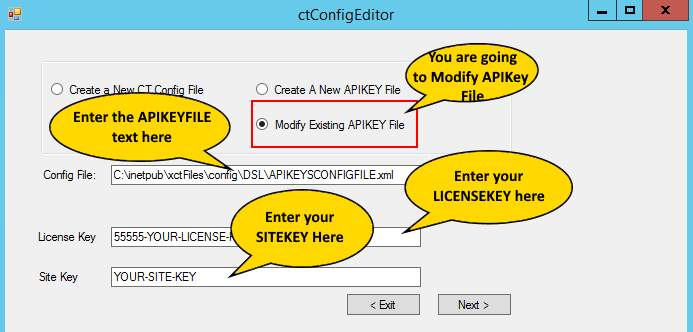
Once you have your licensekey, sitekey, and apikeyfile, you can run the ctConfigEditor tool.
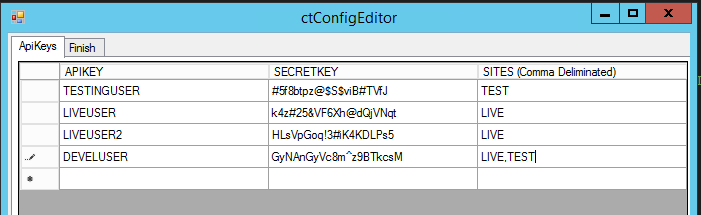
Make sure you have the radio button “Modify Existing APIKEY File” as shown above. Then enter the APIKEYFILE in the Config File text box, the LICENSEKEY in the License Key text box, and the SITEKEY in the Site Key text box. Then you can press the “Next” button to be able to enter your API Keys for BASIC authentication.You can now edit/add/delete users for access to the system. There are 3 fields for each user:
APIKEY: this is the username that the user would be using in the RESTful API basic authentication
SECRETKEY: this is the password that the user would be using in the RESTful API basic authentication
SITES: This is a comma delimited list of sites the user can access
So, in the above example, I have 4 users
TESTINGUSER: This user can only access the TEST site
LIVEUSER and LIVEUSER2: These users can only access the LIVE site
DEVELUSER: this user can access both the LIVE and the TEST site
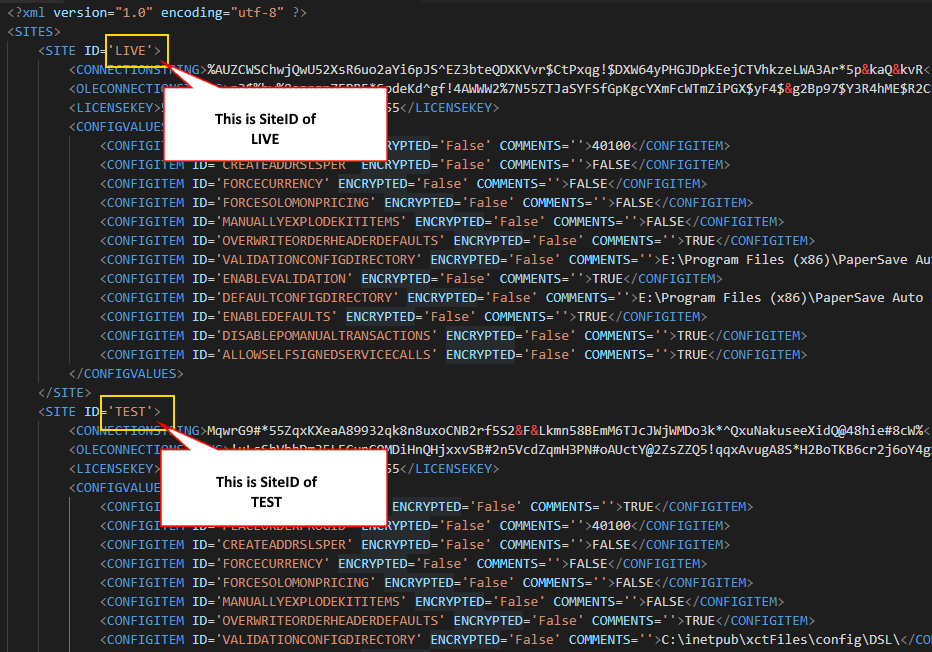
NOTE: Sites are basically configurations in Catalina’s API that point to different database strings and configurations. If you look in your web.config file, of the ctDynamicsSL folder, you can see an appSettings key called DSLCONFIGFILE. This is the location of a configuration file that has all the different sites setup. Below is an example of what a DSLCONFIGFILE would look like. You can see that there are 2 separate sites. Each with their own connection strings and configurations.
NOTE: Do not change your DSLCONFIGFILE unless you intend to change settings. This tutorial is NOT about DSLCONFIGFILE but about your API Keys.
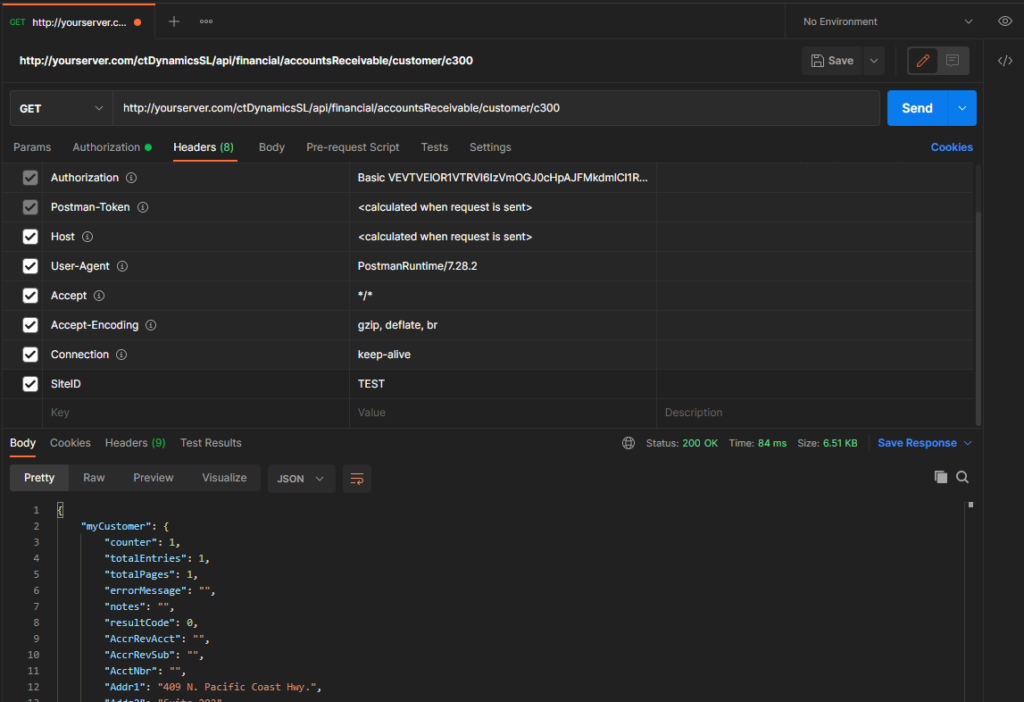
So, now that we have our API Keys setup, lets do an example. If we want to use the following:
Use the TESTINGUSER API Key (with it’s password of “#5f8btpz@$S$viB#TVfJ”)
We are going to use the TEST SiteID
We will have a server name of yourserver.com
We want to retrieve the Customer “C300” from SL using the customer endpoint
NOTE: to create the authorization string, you would take the username and the password and create a string like this: “TESTINGUSER|#5f8btpz@$S$viB#TVfJ” and then base64 encode it. You will get the following value: VEVTVElOR1VTRVJ8IzVmOGJ0cHpAJFMkdmlCI1RWZko=
To create the header for “Authorization.” Take the base 64 encoded value and put “Basic” in front of it. Your end result would be the following: “Basic VEVTVElOR1VTRVJ8IzVmOGJ0cHpAJFMkdmlCI1RWZko=”
Looking at it in Postman looks like the following:
When creating a purchase order using Catalina’s API for Dynamics SL and you get the following error:
“The create voucher flag cannot be changed once the document has been changed”
This is getting fired off because of a business rule violation. There is a work around. If you look in your DSLCONFIGFILE.xml, you should look for the following.
Make sure that the value of that CONFIGITEM is “TRUE”. If you don’t have this CONFIGITEM, add it to the site you are using via the SiteID. If you still have the problem after making this change, contact Catalina support to see if there is an update for your version of the API.
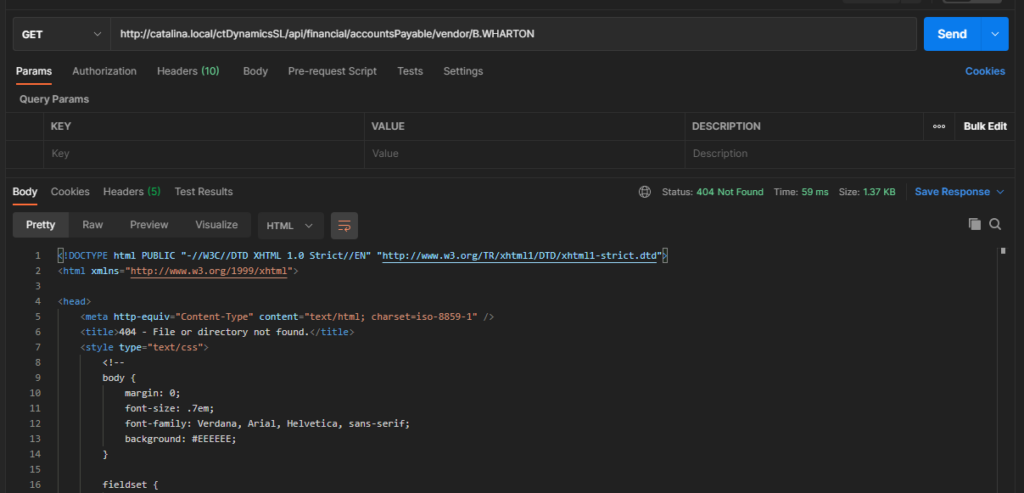
What happens if you are using Catalina’s API for Dynamics SL and your ID you are searching for (example a CustID, Vendor ID, etc) has a period in it? It will fail with standard installation. This is because the .NET web application is looking for a period in the final parameter so that it can route.
You will get a return that looks something like this with a 404 status and HTML coming back:
This can be solved by changing the web.config.
NOTE: if you make this change, then you wont be able to run SOAP and REST in the same application. SOAP will stop working and you would need to install a separate instance with it’s won web.config to make this work.
If you look in the Web.config, you will see the following line:
Ok, so using Catalina’s API for Dynamics SL makes it easy to get data out of SL through it’s quick query endpoint (/ctDynamicsSL/api/quickQuery). But what if you really don’t actually use QuickQuery in SL. But you still want to use it in Catalina’s API? Easy, just create your view and then add a reference to it in QVCatalog table in your System Database.
Step 1: Creating the View
What I first am going to do is create a view in my Application Database. This will be a simple view that will retrieve customers. And only retrieve the CustID and Customer Name. Below is the SQL code to create my view named QQ_Brian.
/****** Object:  View [dbo].[QQ_Brian]  ******/
SET ANSI_NULLS ON
GO
SET QUOTED_IDENTIFIER OFF
GO
CREATE VIEW [dbo].[QQ_Brian]
AS
SELECT
     CustId AS [Customer ID],  Name AS [Customer Name]
FROM	Customer with (nolock)

GO
Step 2: Create a Reference to the View in QVCatalog
Next step is to insert a record into the QVCatalog table to reference the view. This table will be in your System Database. Below is what my insert looked like
Looking at the above insert statement, you see where I am using the name of my view (QQ_Brian) for SQLView, BaseQueryView, and QueryViewName. I am also using QQBRIAN as my number. You would change these values to what your view name is. I also entered a description (“Your Description Here”). Set that value to something that will allow you to remember what this view does.
Testing it!!!
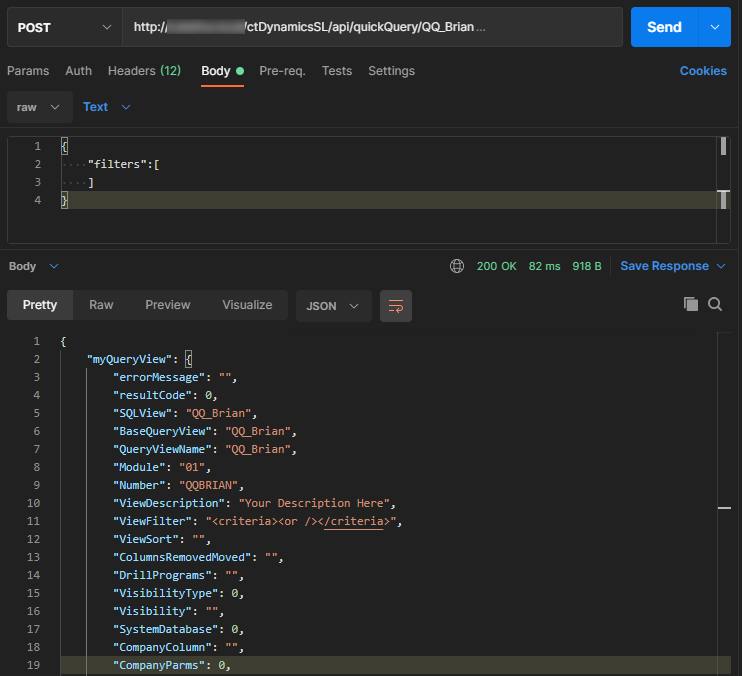
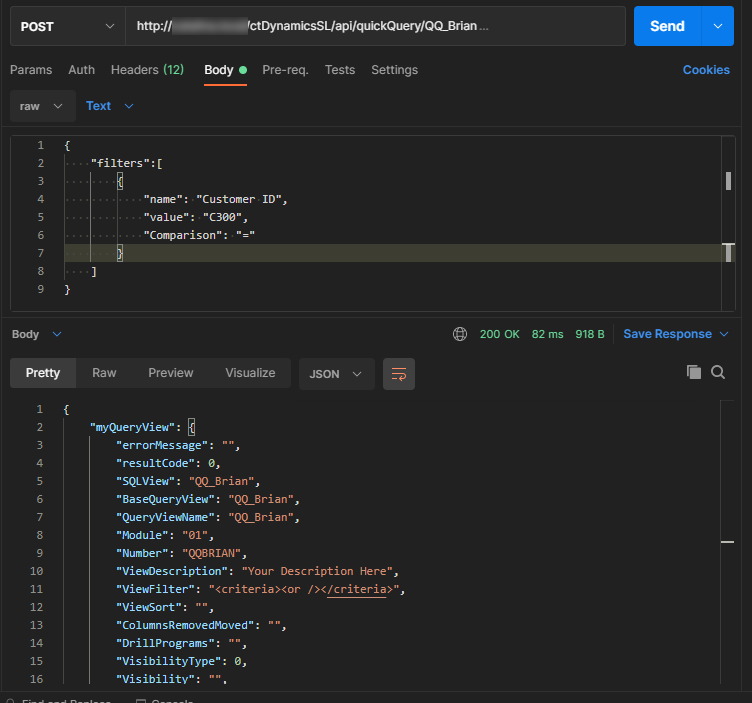
Now all you have to do is test it. here is some curl code that shows you what I did to test my view in the Catalina’s API for SL, using Postman and our RESTful API for SL.
The above curl code will bring back all records that have the “Customer ID” field equal to “C300” (in my case, There Can be Only One). You can see what it would look like in Postman here:
The easier you make it for your customers to pay, the easier you can collect.
SL QuickCollect is payment solution for Dynamics SL that allows you to email or SMS message out a simple link to your customer as a request for payment. The customer can then click on the link and are sent to a PCI compliant payment page without any portal login required. Everything integrated directly with Dynamics SL.
EVO merchant services integrates seamlessly to PayFabric +QuickCollectto provide you a secure and convenient PCI compliant service without the need of a 3rd party gateway provider.
Free Cost-Savings Analysisof your merchant services: As your trusted advisor and expert in payment processing, EVO is happy to provide you a complimentary Summary of Savings report.
Simply provide us the last 3 months of your merchant service statements, and we’ll return to you a Summary of Savings report. This enables you to see the cost-savings benefit that you’ll achieve on your credit card payment processing fees.
EVO B2B Merchant Services is the only business payments solution with Interchange Management® technology that automates cost reduction on transactions for the lowest overall cost on payment acceptance – every time. This technology identifies cost reduction opportunities in the lowest interchange rates the card brands (Visa, MasterCard, Discover and American Express) apply to each payment transaction.
A major advantage of doing business with EVO B2B is our Level 2 and 3 processing solutions, which ensure the best rate for every transaction whether through terminals or card not present scenario.
Our system automates your client’s transactions to qualify for the lowest rate possible based on card type and transaction parameters, providing significant cost-saving on processing fees. We identify payment solutions and process improvements, which result in time savings and cost reduction, increasing cash flow back to your bottom line.
EVO removes the need for using a 3rd party gateway, which eliminates these unnecessary fees.
You will then need to change your sql connection strings
Which Connection String
What to Add
.NET Connection String
;Trusted_Connection=True;
ODBC Connection String
;Integrated Security=SSPI;
For both of these strings, you would remove the username and password from the strings and add the trusted_connection=True for the .NET connection string. And you would add the Integrated Security=SSPI for the ODBC connection string.
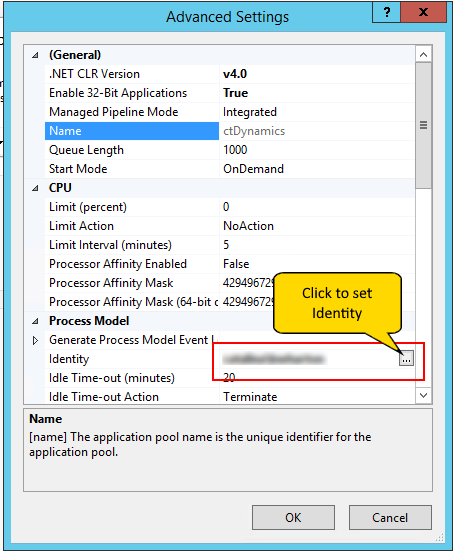
Configure the IIS Application Pool for the Identity
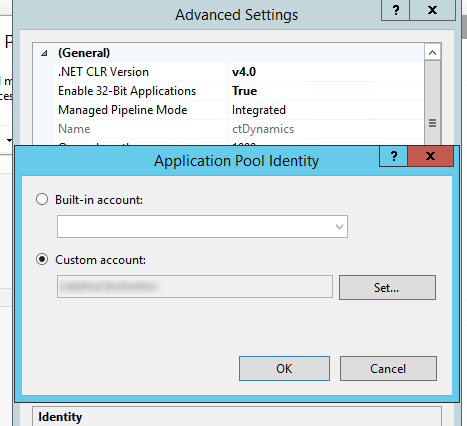
Next, you would go into IIS manager and click on Advanced Settings, look at “Identity” and click on the 3 dots button.
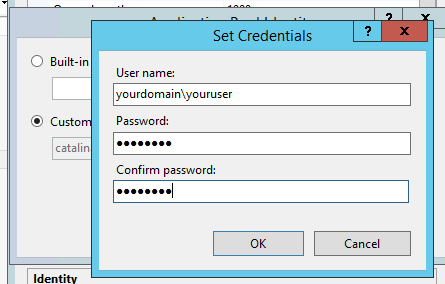
Then choose the “Custom Account” radio button and press the “Set” button.
Another popup will be displayed and you are then able to put in the username (replace the example below with your domain\username) and password. After you press OK, the system will tell you whether it is valid or not. NOTE: You will need to make sure that the user has access to the SQL objects in SQL server.
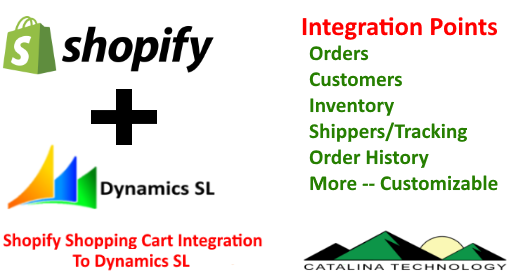
Many companies don’t want to go through the effort of building a customer eCommerce system to sell online. There are many cloud based eCommerce systems that they can use to minimize support, hosting, and development time. Catalina has integrated with many of these such as: Shopify, Magento, BigCommerce, WooCommerce, Square, and others.
One of the most popular eCommerce systems is Shopify. Catalina’s Dynamics SL integration to Shopify includes:
Order Creation: When an order is created in Shopify, it is automatically transferred to Dynamics SL and created as a Sales order in SL.
Order Acknowledgement: When an order is created in Dynamics SL, Catalina will update Shopify with the SL order number and other information.
Shipper Notification: When an order has shipped (partial or complete), Catalina will send shipper information to Shopify notifying which items have shipped and any tracking numbers that were created.
Order Complete: Once an order is completed, Catalina will notify Shopify that the order is completed so that Shopify can then archive that order.
Inventory updating: Catalina can send inventory information to Shopify which will allow Shopify to know quantity on hand, backorders, out of stock, and other information regarding products for sale on the site. Catalina can also add or remove products from the shopping cart site based on inventory levels and custom rules.
Custom integration points: There are many integration points in Shopify that can be utilized such as synchronizing of customers, logins, invoices, pricing, and more.