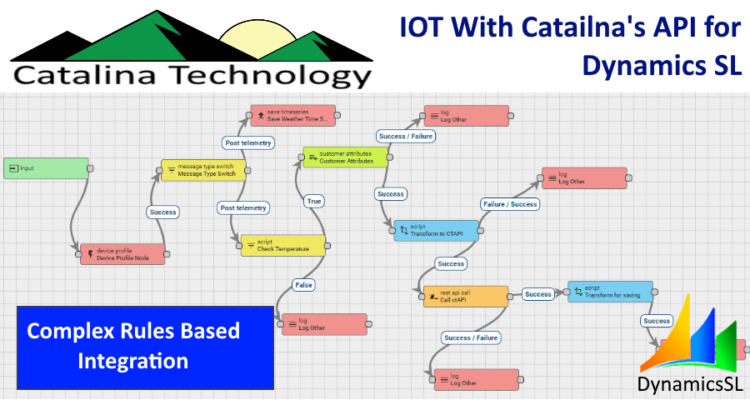
Catalina’s API for Dynamics SL can be used for many things. We can retrieve all types of data from SL. We can also save transactions to SL. In this demo I did for several folks, I am taking sensor data and pushing it through an advanced rules based engine to create Service Calls in Dynamics SL.
While this demo highlights Dynamics SL, we could just as easily use these same types of rules based development to integrate with other systems like CRM, helpdesk, field service, etc. We can monitor all types of things like temperature, barometric pressure, vibrations (helpful if you an HVAC company and need to monitor your customer’s properties for problems), humidity, ambient light, flooding, and more.
When I run the script to install Catalina’s stored procedures, I get several messages like this:
The module ‘xct_spDSLXXXXXXXXX‘ depends on the missing object ‘xct_spDSLYYYYYYYYY‘. The module will still be created; however, it cannot run successfully until the object exists.
Don’t worry, those are not errors. They are just warnings that the stored procedure is referencing another stored procedure that hasn’t been created yet. It will get created later in the script.
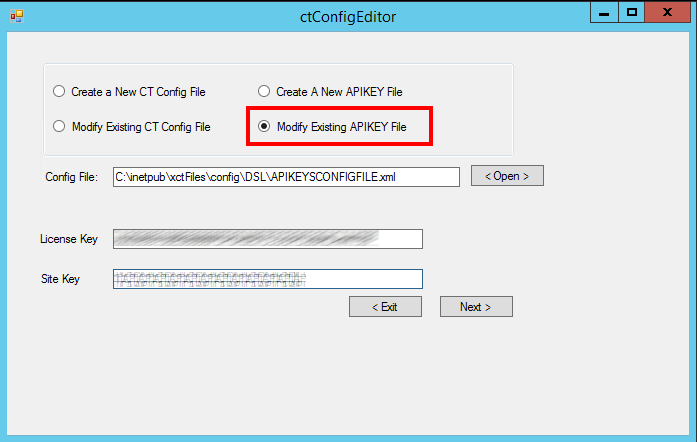
You may want multiple users access Catalina’s API for Dynamics SL. When using the RESTful version of Catalina’s API, you can do this by managing the APIKEYSCONFIGFILE.xml (usually located on the web server at c:\inetpub\xctFiles\config — But could be somewhere else depending on the installation. Check with your installer)
NOTE: before doing any changes to Catalina configuration, make sure you backup the files you are updating first.
The APIKEYSCONFIGFILE.xml can be managed by a Catalina management tool called ctConfigEditor. (Normally located in C:\inetpub\xctFiles\ctConfigEditor — but could be in a different location based on installation). Once the ctConfigEditor is loaded, you will see a screen similar to this:
You will need to get your License Key and Site Key (found in the web.config file of the Catalina API for SL. — usually located c:\inetpub\xctFiles\web\ctDynamicsSL or c:\inetpub\wwwroot\ctDynamicsSL but could be located somewhere else based on installation). You will also need to point to the proper Config File.
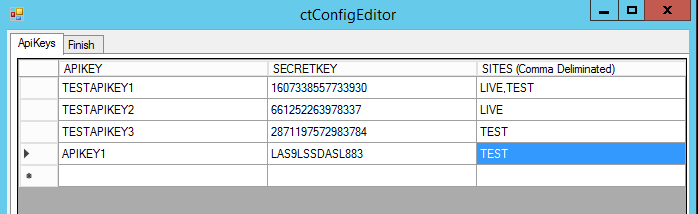
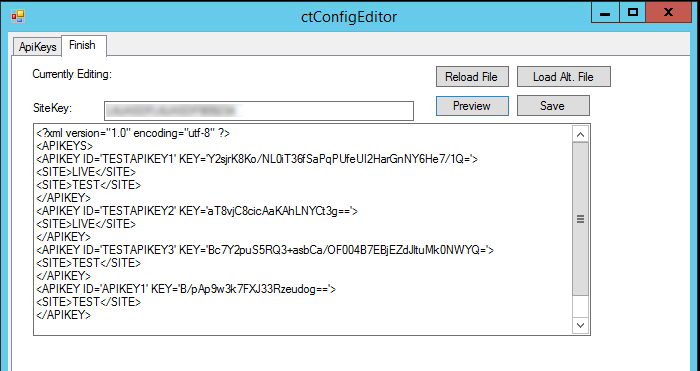
Once you have loaded the APIKEYSCONFIGFILE.xml with the proper license key and site key, you will see a screen similar to this:
Here you can manage Authentication logins for the RESTful API. In the above example, there are 4 different keys. You can add new ones by just adding a line. and you can delete keys by clicking on the line item and hitting the delete key.
The columns of these API Keys are defined:
APIKey: the username of the authentication
SECRETKEY: The password of the authentication
SITES: a comma delimited list of sites the user has access to
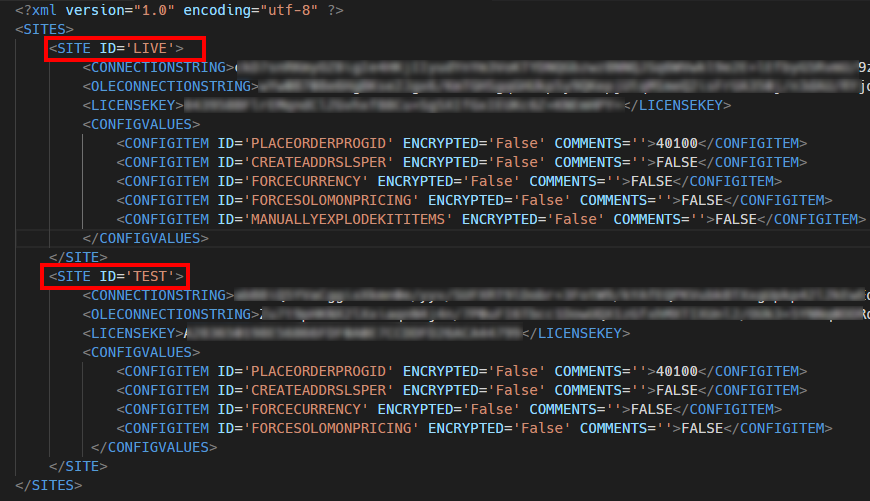
(NOTE: A site is a configuration pointer. If you look at your DSLCONFIGFILE.XML file — usually in the same location as the APIKEYSCONFIGFILE.xml — you will see different Sites and SiteID’s. It is that SITE ID that you would put in the SITES column. If you want to give a user access to more than one site, you would then list all the sites comma delimited. Below is an example of what a DSLCONFIGFILE.XML looks like. You can see that there are two sites: LIVE and TEST.
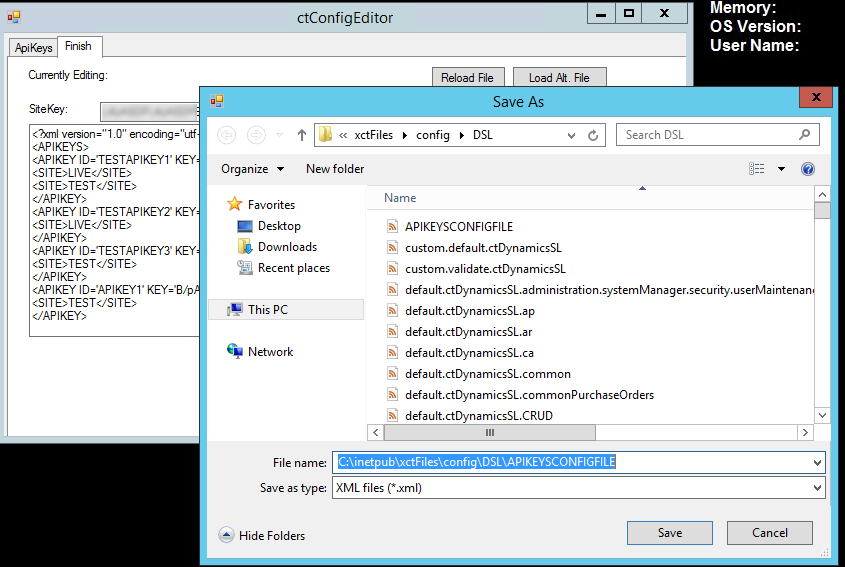
Once you have finished editing your API Keys in the ctConfigEditor tool, you can then finish it and save by clicking on the “Finish” tab. You can click the Preview button to see what your APIKeys file will look like. You can also Save your file by clicking on the Save button.
Clicking on the save button will allow you to save to a file. You will need to save it on top of the existing APIKEYSCONFIGFILE.XML (NOTE: make sure you have this file backed up before overwriting it).
After you save the file, you will also need to reload your Application Pool in IIS to make the change stick.
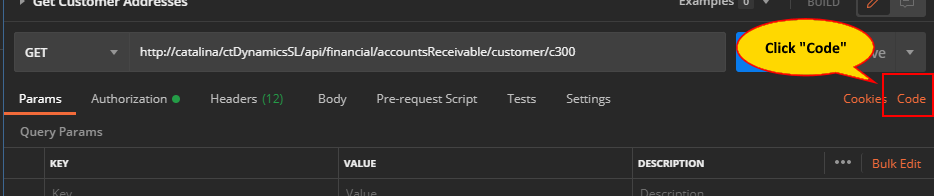
There are times that you might have questions or problems when developing using an API. You contact support and they will ask you to send you the “payload” you are using when communicating with the Catalina API for Dynamics SL. The easiest way to do this, if you are using Postman as your testing environment, is to export the code. This is done in these simple steps
Step 1: Got to your postman tab you are making the API call from and click on the “Code” link on the right of the screen
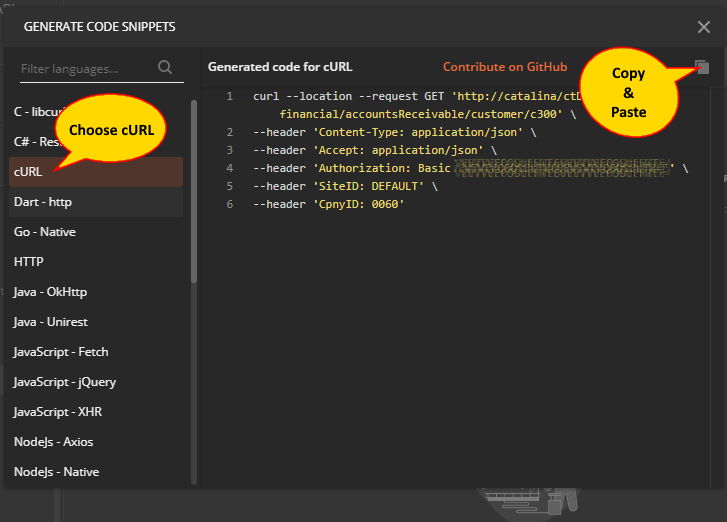
Step 2: On the popup, click on cURL and then copy the text provided, paste it into an email, and send to Support.
There are several settings that you can set to log messages to a log file for Catalina’s API for Dynamics SL.
Look in your web.config (normally in c:\inetpub\xctFiles\web\ctDynamicsSL or c:\inetpub\wwwroot\ctDynamicsSL — but could be located in a different location based on your installation). There will be 3 variables that are important:
<!--def:DEBUGMODE: TRUE/FALSE default:FALSE-->
<add key="DEBUGMODE" value="TRUE" />
<add key="DEBUGLEVEL" value="VERBOSE" /><!--BASIC,VERBOSE-->
<!--def:ERRORLOGFILE: full path to the txt file to writeout error and status messages-->
<add key="ERRORLOGFILE" value="C:\\inetpub\\xctFiles\\errorLogs\\DSLerrorLogFile.txt"/>
DEBUGMODE: There are 2 different settings for this
TRUE if you want to have messages saved to a logfile.
FALSE if you don’t want to have messages saved to a logfile. Normally DEBUGMODE would be set to FALSE for performance reasons.
DEBUGLEVEL: There are 2 different levels that you can set
VERBOSE: This will save extra information to the logfile. This will create a larger file but will store more information about what is going on in the service.
BASIC: This generally stores just errors and less information
ERRORLOGFILE: This is the location of the logfile. NOTE: You need to make sure you “escape” this value. So, when you have a backslash (\), make sure you do 2 backslashes (\\) so that it wont create an invalid XML string.
Catalina’s API for Dynamics SL wraps saving of data into transactions which allows for “rollback” if there is an error. Meaning if there are multiple tables/records that are in a transaction, and an error occurs, everything will get rolled back as if nothing happened.
There are some times when there are problems with this. Mainly when some type of external force (like a trigger) updates the same data that Catalina is trying to save. This could cause table locking and not allow transactions to save properly. One way to get around this is to turn transactional processing off.
NOTE: Only do this in a test environment first. This should be done if other methods don’t work.
This is done easily by changing the web.config of ctDynamics SL. Search for the keyword “DISABLETRANSACTIONS”.
Once you have found the keyword, make sure that the value=”TRUE” and that will turn off transactions.
<add key="DISABLETRANSACTIONS" value="TRUE"/>
If you only want to disable the transactions on a single web service and not all of Catalina’s API, Keep the value of DISABLETRANSACTIONS to FALSE. But add a key to web.config similar to this:
When you have an installation of Catalina’s API for Dynamics SL and you are receiving this error in your log files:
Err:Retrieving the COM class factory for component with CLSID {A440BD76-CFE1-4D46-AB1F-15F238437A3D}
This error is limited to SL7 installations and sometimes occurs during checkout or placing and order upon intial install of Catalina products; but usually after SL client updates or changes.
The problem is related to missing registry entry for: capicom.dll. This file is required by the the Microsoft Solomon components and used for database access. Capicom.dll is included in a variety of MS products and should already be located on the computer.
It is simple to call a stored procedure through a RESTful API call if you have Catalina’s API for Dynamics SL. You can call any stored procedure and pass parameters and retrieve data.
This is a demo on how to call a stored procedure using Postman and Catalina’s API for Dynamics SL.
First, to do this demo, you need to download and install Postman. Postman is a developer tool that allows you to interact with API’s easily so that you can test API calls to see how you call them and what data is returned. You can get Postman here: https://www.postman.com/
In the demo, we are going to call the stored procedure SOHeader_all. This stored procedure retrieves all Sales Order Headers (SOHeader) for a particular CpnyID and OrdNbr. NOTE: this is just an example. With Catalina’s API, you can call any stored procedure.
SOHeader_all has 2 parameters: – @parm1: This parameter is for the CpnyID – @parm2: This parameter is for the OrdNbr (can use a wildcard like ‘O000%’ which will bring back all orders that start with O000.
You can see what the procedure looks like here:
PROCEDURE [dbo].[SOHeader_all]
	@parm1 varchar( 10 ),
	@parm2 varchar( 15 )
AS
	SELECT *
	FROM SOHeader
	WHERE CpnyID = @parm1
	   AND OrdNbr LIKE @parm2
	ORDER BY CpnyID,
	   OrdNbr DESC
So, if you wanted to retrieve all orders that started with “O000” for CpnyID = “0060” you would call the stored procedure like this:
exec SOHeader_all @parm1='0060', @parm2='O000%'
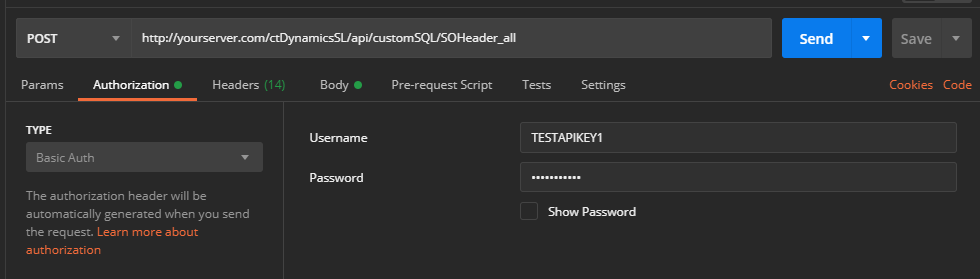
So, now how to call this using Postman through Catalina’s API for SL?
First you need to know where your Catalina API is installed. I am going to use the server name yourserver.com as the domain name. So, for this example, we would look at the endpoint as the following:
As you can see above, you would replace yourServer.com with wherever your server is. And you can see <ProcedureName> in the URL. this would be replaced with the actual stored procedure name you want to call (in this example, we are going to replace it with SOHeader_all). So, the new URL for the endpoint would look like the following:
In Postman, you would make it look like below. NOTE: when calling a customSQL stored procedure, you must use the action type of “POST”
Next, you need to set the authentication. This is done on the “Authorization” tab. Catalina’s API uses “Basic Auth”. So, make sure that you set the type for “Basic Auth” in the dropdown. And then enter the username and password that was given to you from your installer.
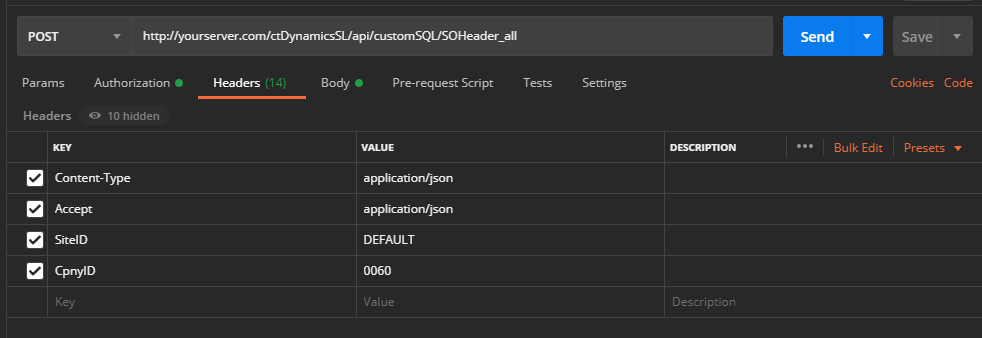
After that, you will have been given a SiteID from your installer. You will need to create a Header for that SiteID. You do this on the headers tab. You should enter that SiteID (in my example it is “DEFAULT”, but you would use the SiteID given to you by your installer) and the default CpnyID (in my example that is “0060”, but you would use your CpnyID of your database)
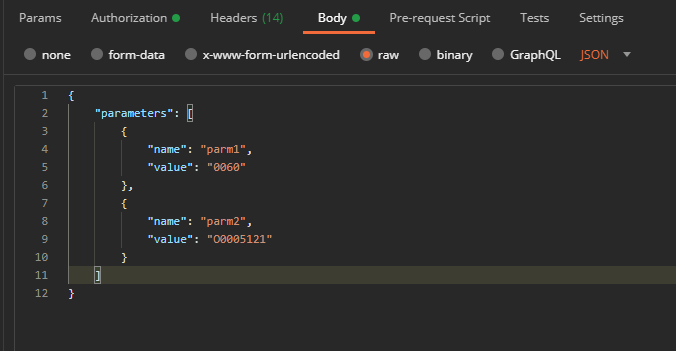
Finally, you will want to enter the body of the parameters that are being passed. There are 2 parameters for SOHeader_all (@parm1 and @parm2). The format of the body that you would set is below.
So, your Body tab in Postman would look like this (NOTE: make sure you select the “raw” radio button as shown below)
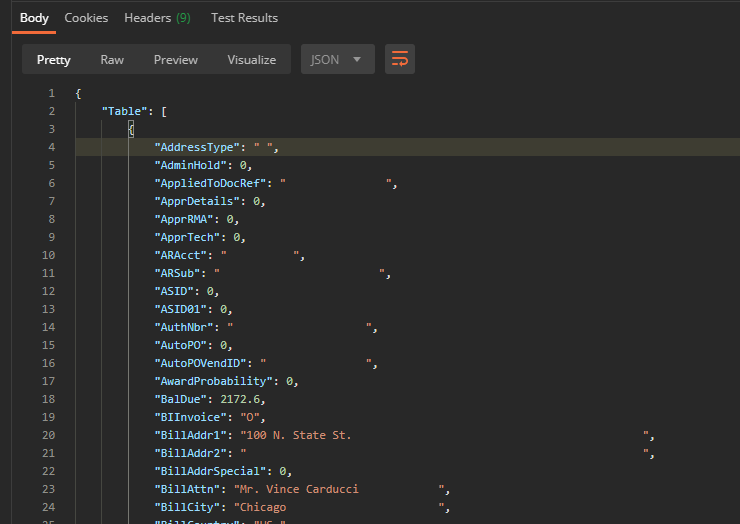
Then all you have to do is simply hit the “Send” button and the system should retrieve the results from your stored procedure call. In my example, it looks like below
This is a demo that shows you how to create a mobile app to interact with Dynamics SL to provide a “Contact Free” payment solution to help protect your employees and customers during COVID 19. The intended user of this example app would be a customer service rep, sales person, or field service rep who needs to collect payment from a customer (handy for collecting a deposit or down payment before delivery, installation, or service work to be done).
This demo uses Catalina’s API to search customers in SL and then lets the user to request a payment from a customer by generating a link and emailing it to the chosen customer. That customer then can click on the link and pay the amount which automatically creates a payment in SL’s AR.
Check out the video of the demo on our Youtube channel here:
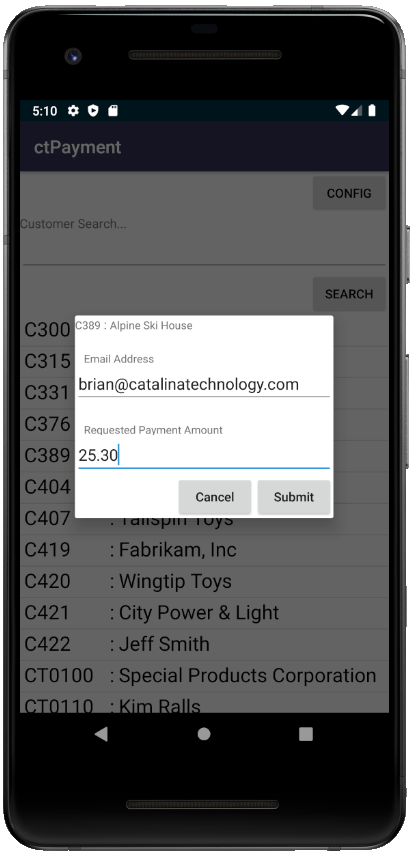
Below is a screenshot of the Android app from the above demo. First you can search for a customer by a keyword. That search will then bring back a list of results. You can then click on the customer you want to request funds for. The app will automatically fill in the email address of the customer (from the Customer record in Dynamics SL). You can change the email address if you want. You then enter a requested payment amount and hit submit. Once you do this, Catalina’s SLQuickCollect will send off an email to the customer with a link which will then allow them to make a PCI compliant secure payment. Once authorization occurs, SLQuickCollect will then create a payment in Dynamics SL automatically.
As mentioned below, if you want to have starter code on creating an Android App (with Visual Studio and Xamarin), you can check out an example on our Github here (NOTE: I would only consider this a starter. This is in no means something finished but enough to get you started)
ctConfigEditor is the stand-alone executable used to create and edit the custom XML documents used to configure our full line of web services. Our xml structure supports storing sql connection data and a range of name/value pairs. All data is easily encryptable for added security.
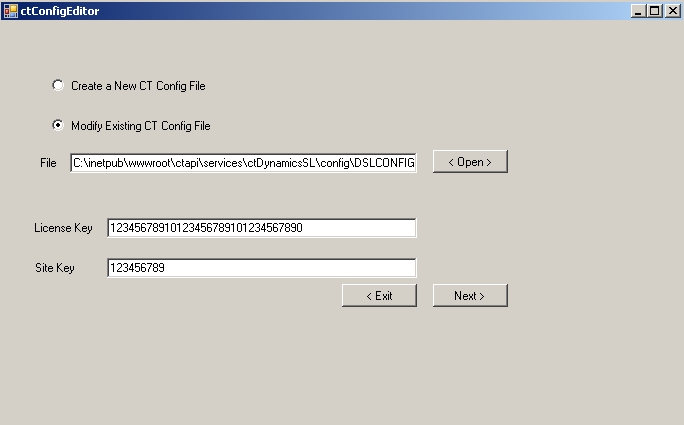
Step 1:
Choose whether you are editing an existing file or creating a new config file from scratch. If loading an existing config file, you will need to fill in your catalina software license key as well as your sitekey.
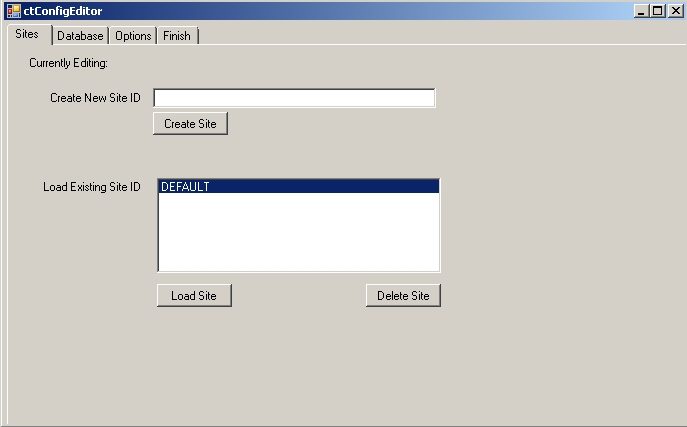
Step 2:
Either load an existing Site ID or create a new Site ID. You can identify which Site ID you are editing on all screens at the top of the screen where it says, “Currently Editing: SiteID“. If this value is blank, it means you are creating a new SiteID entry. Note: TO DEFAULT ALL KEYS: Load an existing Site ID, then enter a New Site ID and hit the “Create Site” button.
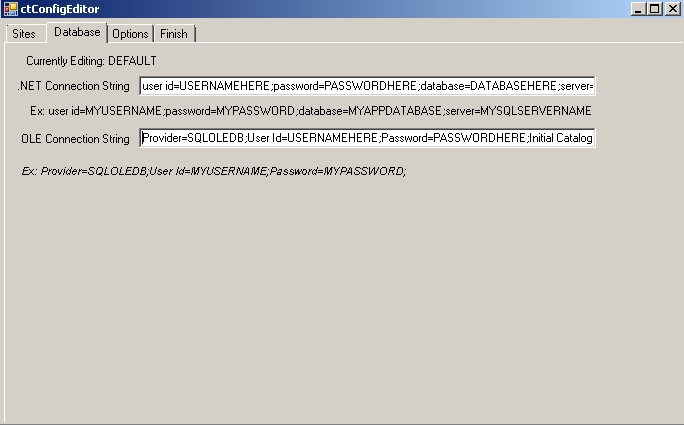
Step 3:
Set your Database connection strings. Both the .NET format and OLE String format. .NET Format: user id=USERNAMEHERE;password=PASSWORDHERE;database=DATABASENAMEHERE;server=SERVERNAMEHERE OLE Format: Provider=SQLOLEDB;User Id=USERNAMEHERE;Password=PASSWORDHERE;Initial Catalog=DATABASENAMEHERE;Data Source=SERVERNAMEHERE For more information on sql connection strings and other options available, we recommend reading at: http://www.connectionstrings.com/
Step 4:
Edit the config options available or create custom entries. Note: you can optionally encrypt any field by just checking the “encrypt” checkbox next to a key. We recommend only encrypting sensitive data.
Step 5:
On the “Finish” tab you will see the option to Preview the XML file or Save it to a file. Click the appropriate button. You can optionally change your siteKey/encryptKey by filling in the new key in the SiteKey text field. Note: You will need to remember to update any client applications to use the new siteKey.