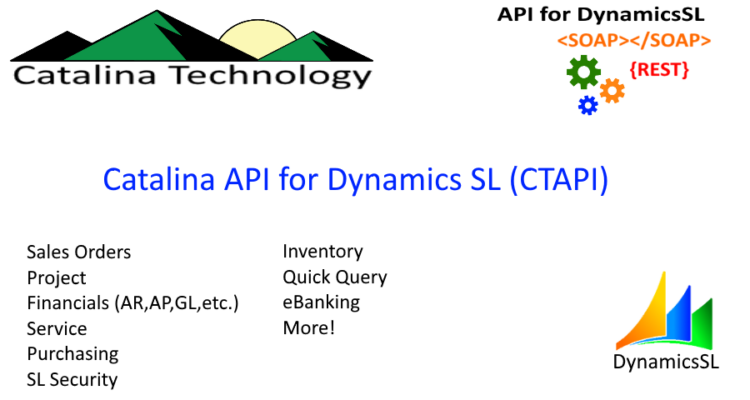
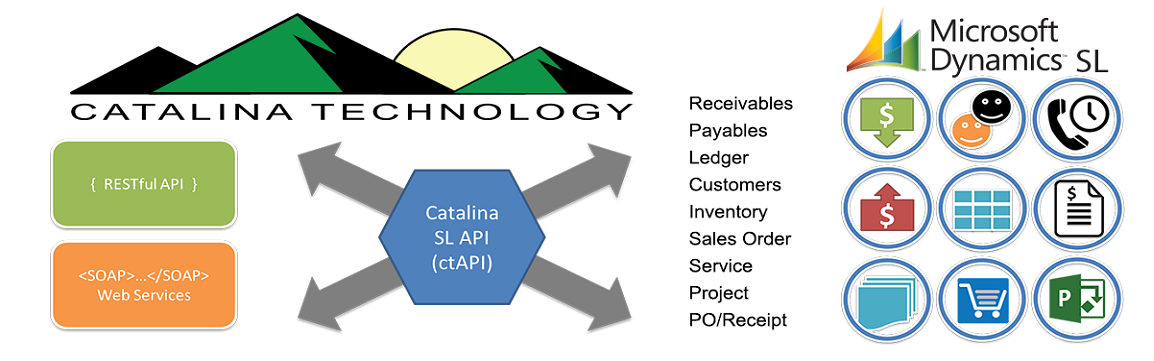
Catalina’s Ever Growing List of API’s for Dynamics SL
Catalina’s evergrowing list of API’s for Dynamics SL increases your capabilities to integrate other systems and apps to SL quickly and easily with modern API technology.
Continue Reading →
Catalina’s evergrowing list of API’s for Dynamics SL increases your capabilities to integrate other systems and apps to SL quickly and easily with modern API technology.
Continue Reading →
Tutorial on how to add and update ShipTo Addresses in Dynamics SL
Continue Reading →Earlier today, I was asked if I could come up with a query that would allow you to bring back line items for a sales order. But create a numbering scheme for the line items that re-start for each new order number. So, example:
You can see below, that ORD1234 has 3 items, indexed 1,2,3. and ORD5555 has 2 line items indexed 1,2
| OrdNbr | InvtID | LineIndex |
| ORD1234 | IN82344 | 1 |
| ORD1234 | IN82341 | 2 |
| ORD1234 | IN82344 | 3 |
| ORD5555 | IN089723 | 1 |
| ORD5555 | IN0123998 | 2 |
I accomplished this by using the DENSE_RANK().
Here is sample code:
[code language=”sql”]
SELECT DENSE_RANK() OVER (PARTITION BY OrdNbr ORDER BY OrdNbr, LineRef) * 10 AS LineIndex
, OrdNbr
, LineRef
, InvtID
, QtyOrd
FROM SOLine
ORDER BY OrdNbr, LineIndex
[/code]
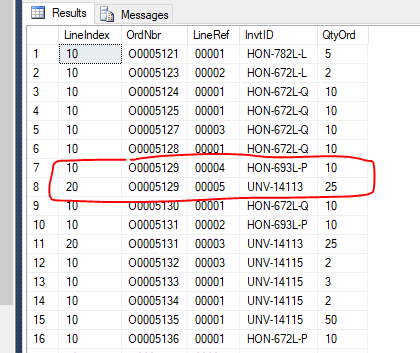
What I wanted to do in this was to show the order number, lineRef, invtID, and qtyOrd. But I wanted to show the LineIndex in increments of 10 that restarted for every time the OrdNbr changed. I have one of the orders that have multiple line items circled below.
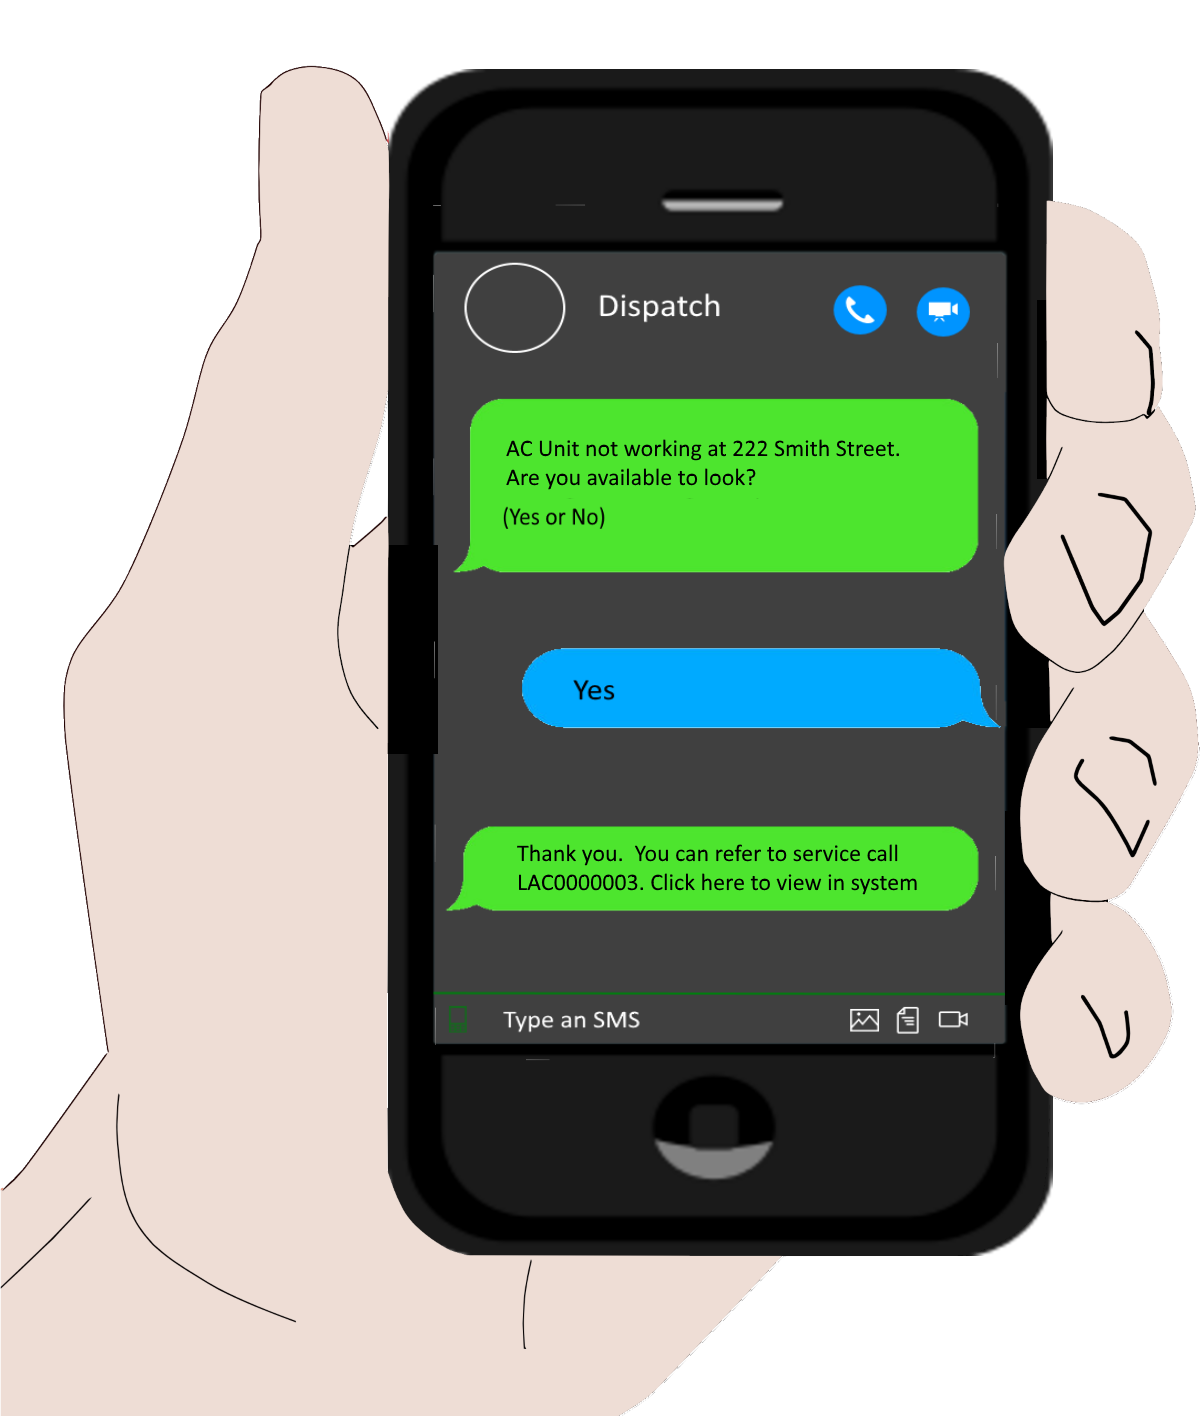
Catalina’s SMS Central allows you to easily dispatch your field techs, salespeople, and others straight from your Dynamics SL without any special mobile apps. All using SMS messaging. Nothing to deploy, works on any phone, and easy to maintain.
Your people in the field can send updates as replies that will get automatically updated in your back office. They can even send pictures, GPS coordinates, and other attachments which will automatically be attached to the service call, quote, invoice, timecard, or any other screen in Dynamics SL.
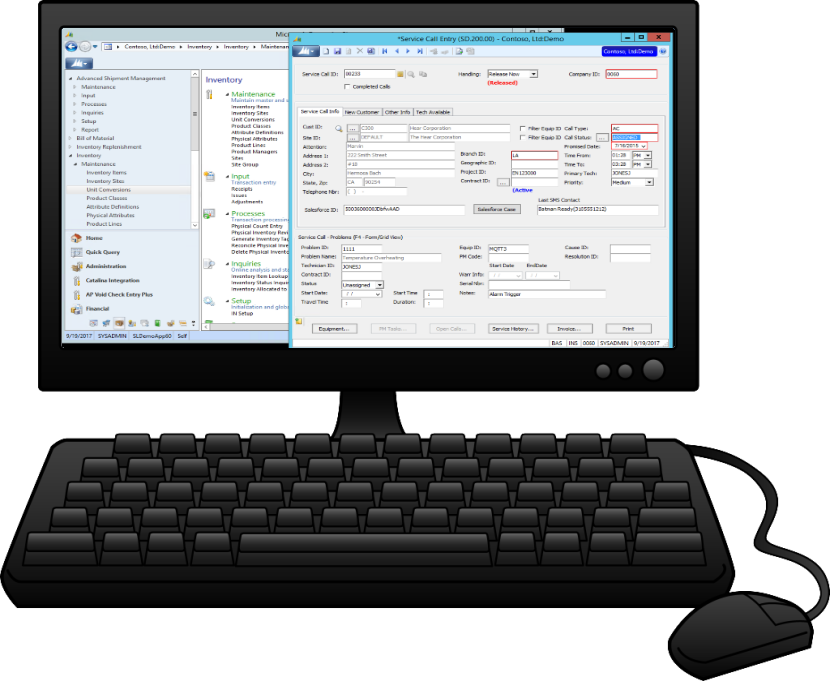


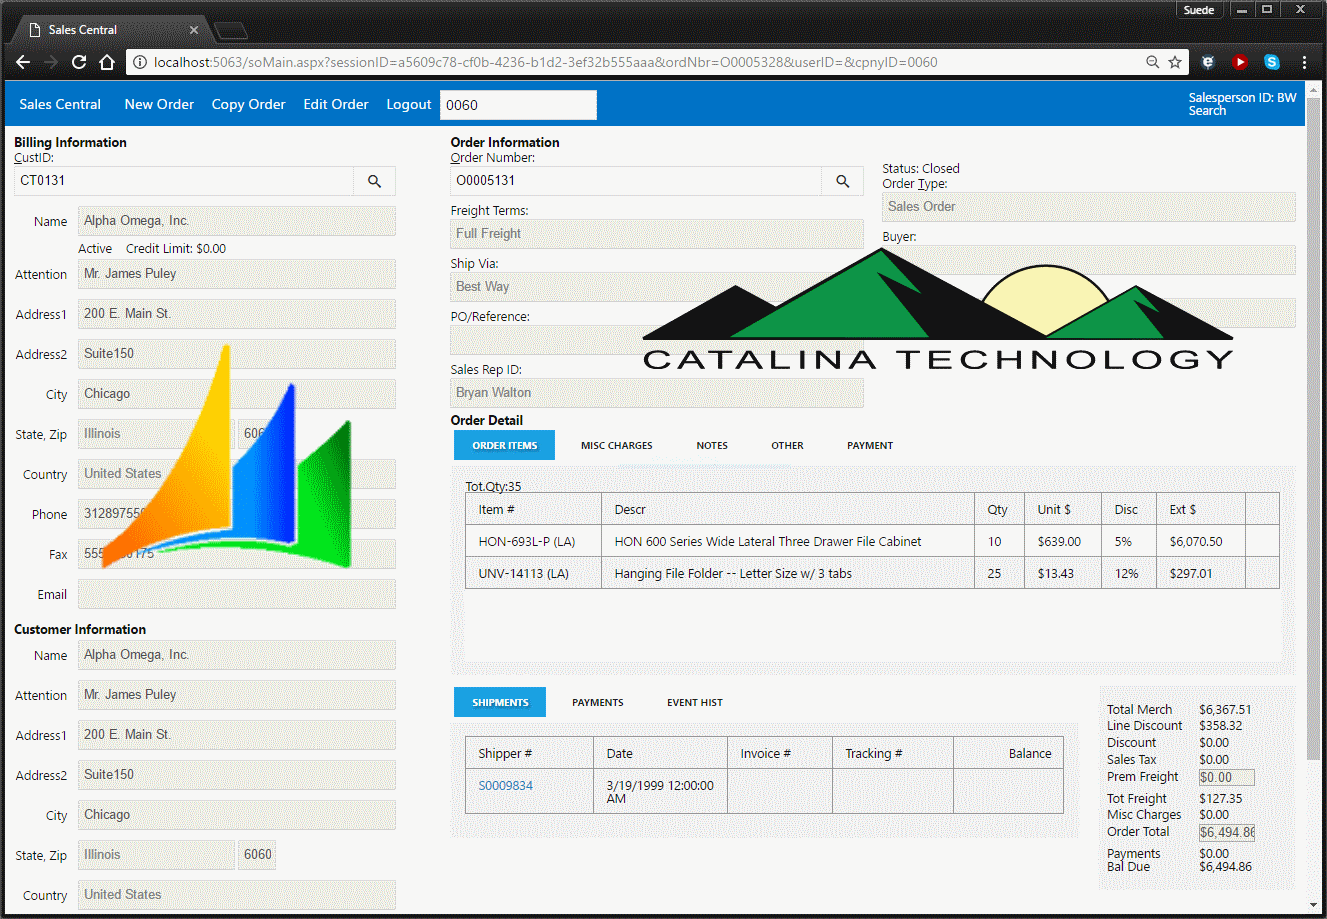
There are times when you just cant get RDP/Terminal server access to your servers to access the Dynamics SL thick client. Like when you are on a tablet or remote. That is where Catalina’s Sales Central for Dynamics SL comes into play. This allows you to access Dynamics SL Order Management, Customer Management, Inventory, and other modules through a cross-browser, mobile-enabled solution.
Sales Central allows you to do the following
Below is a demo we did at one of our webinars that does a brief walk-through of Sales Central. If you have further questions or would like to have a more in-depth demo, please contact us at [email protected].
[youtube https://www.youtube.com/watch?v=GCqwx2gvxKo]
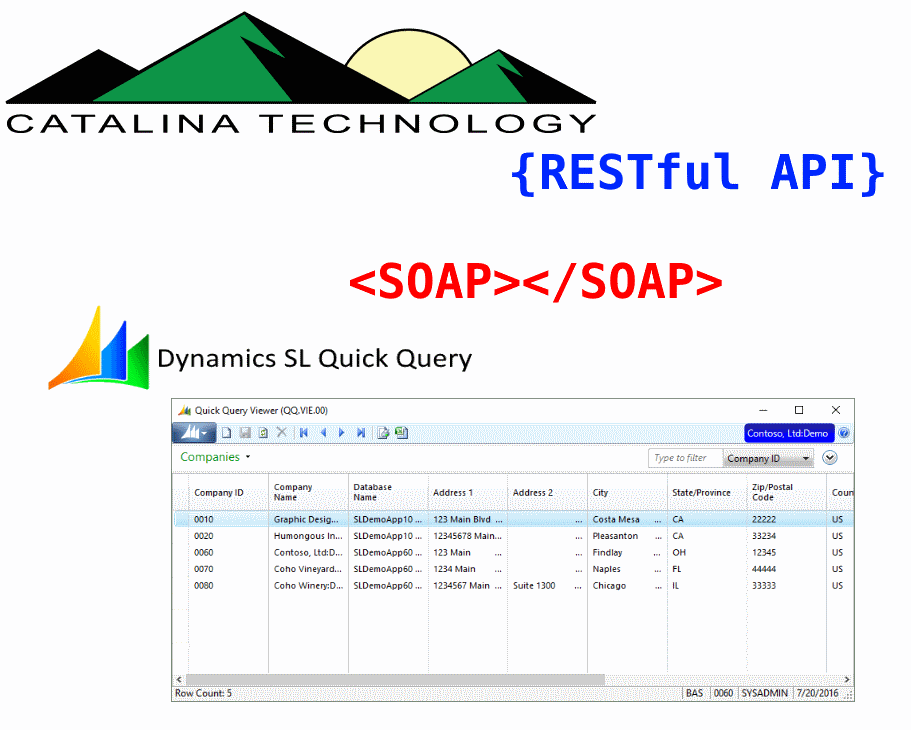
This is an example of how to use Quick Query as a data delivery tool for external systems using Catalina’s API for Dynamics SL. This example is for those who want to use a SOAP based interface.
For an example on how to retrieve Quick Query data through a REST interface, check out this article: Dynamics SL Quick Query through Catalina’s RESTful API
1. In Visual Studio, we select the Visual C# Template for a Windows Form Application. Our client will be named: client.ctDynamicsSL.quickQuery.

Note: you can call the Catalina web services from any type of client that is able to make http/https calls, but for this example, we will use a Form Application.
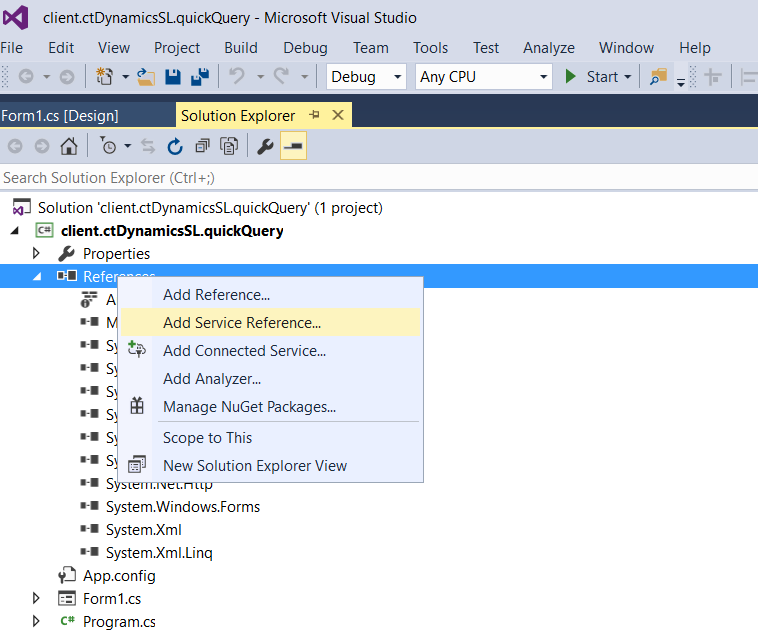
2. Add a reference to our Quick Query Web Service
a. Right click on “References” and select “Add Service Reference”
b. On the “Add Service Reference” screen, click the “Advanced” button in the bottom left. (Image: qqcclient3.png)
c. On the “Service Reference Settings” screen, click the “Add Web Reference” button. (Image: qqcclient4.png)
d. On the “Add Web Reference” screen, enter in the URL to the web service.
E.g.: http://localhost/ctDynamicsSL/quickQuery.asmx
Click the arrow button to discover the web service schema.
After the service definition loads, enter in a name to refer to this service in your client.
E.g.: ctDynamicsSL.quickQuery
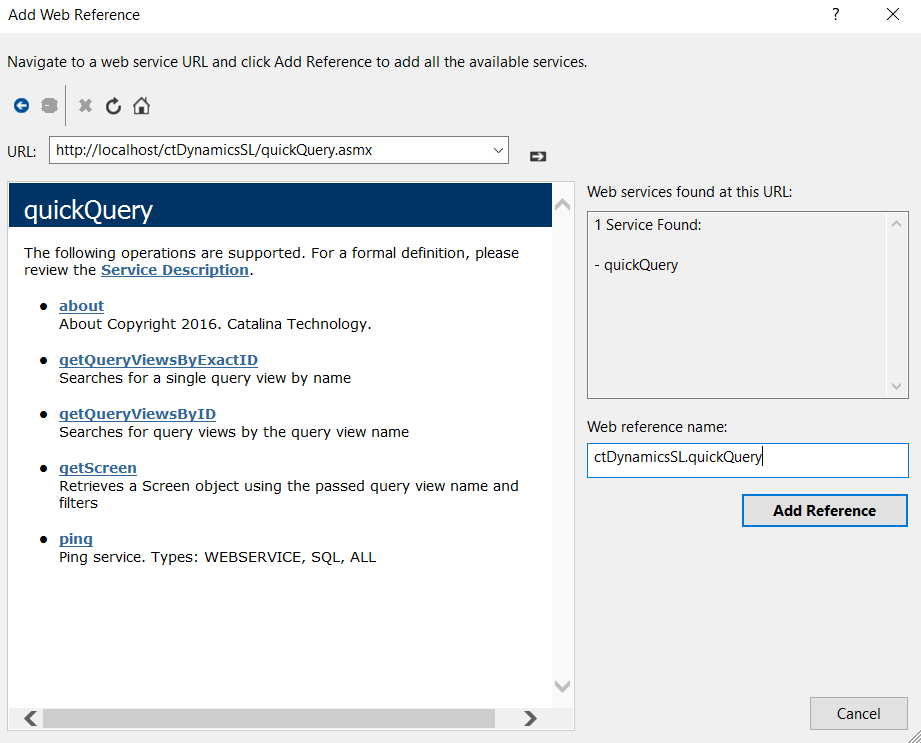
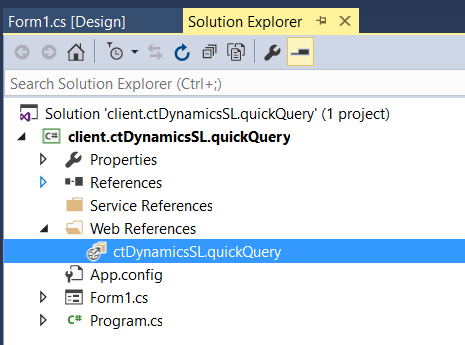
e. Click the “Add Reference” button.
f. The new web reference will show up in your project.
3. Create code to instantiate an object referencing our web service.
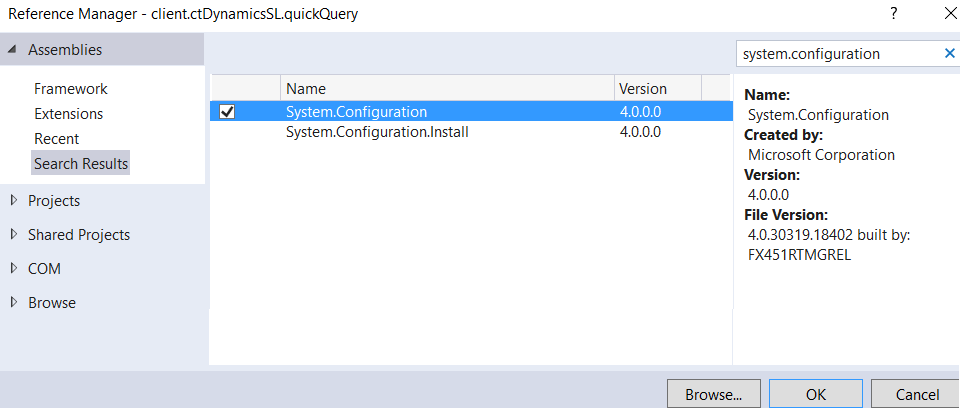
a. I like to store values that are required in the Soap Header in the app.config file using System.Configuration, so we will first add a reference to the System.Configuration assembly. References -> Add Reference -> System.Configuration
b. Create a private variable to store the actual object and a property to auto create the instance if the variable is null. This get{} property will pull the required header values from the app.config
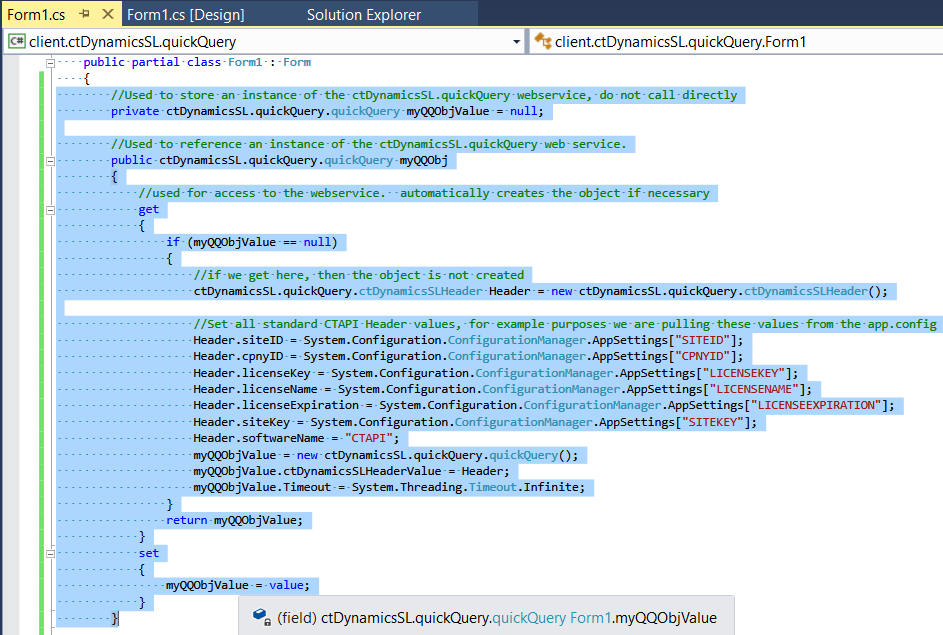
Now whenever we want to call a function in the web service, we just reference it like so: myQQObj.functionName().
4. Add the necessary elements for our main Form.
a. TextBox for typing in a QueryViewName (tbQueryViewName)
b. Button for a QueryViewName search (btnSearch)
c. Button for executing our search (btnGetQuery)
d. DataGridView for holding our search parameters (dgvFilters)
e. 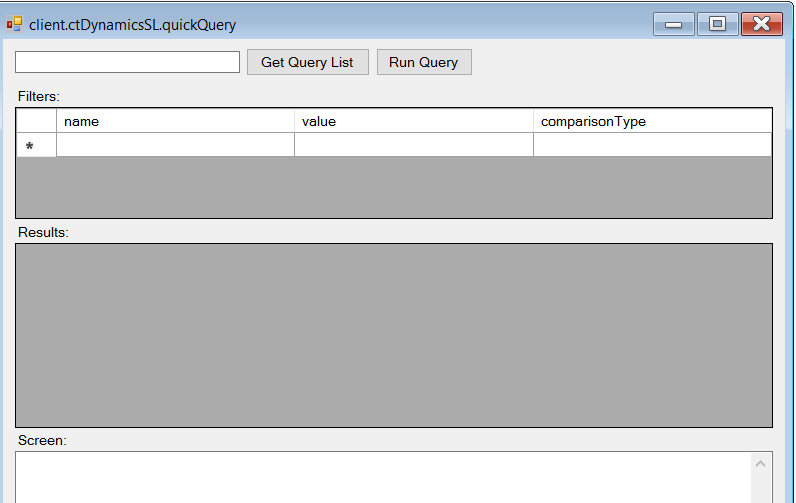 DataGridView for holding our search results (dgvQueryResults)
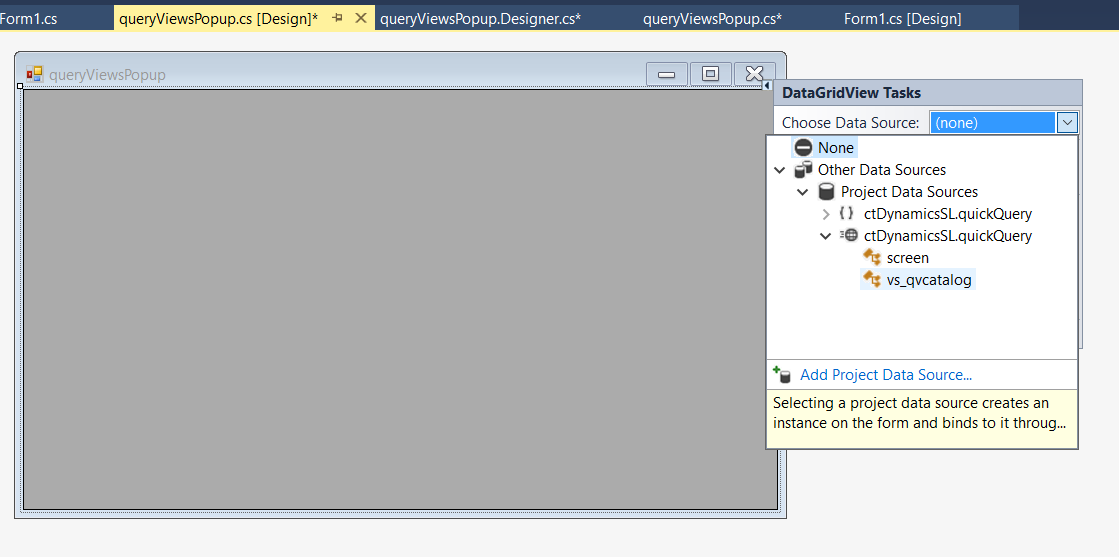
5. Add a popup form for QueryViewName searches.
a. The QueryViewName is the root of the Quick Query Service; they are names of SQL Views built in to SL. This is a required element, so let’s build an easy way to lookup them up.
b. Add another Form object to the project: queryViewsPopup.cs

c. Add a DataGridView to the new Form object.
d. Click on the little arrow at the top right of the Grid and add ctDynamicsSL.quickQuery.vs_qvcatalog as the Data Source.
e. For ease of use, edit the DataGridView Columns.

f. On our main Form, tie an EventHandler to open this form.
g. Add a CellDoubleClick Event Handler, to take the selected row and return the QueryViewName back to the tbQueryViewName on the main Form.

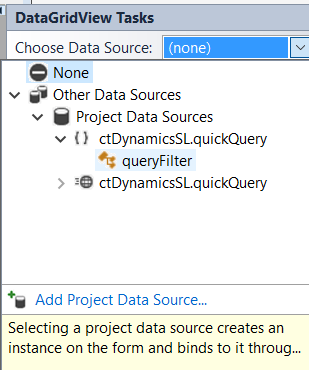
6. Setup Filters DataGridView
a. The Quick Query Service getScreen call requires 2 parameters: queryViewName, filters[]. The filters parameter is of type: ctDynamicsSL.quickQuery.queryFilter.
b. The Filters is an array of triplets holding 3 required fields:
c. Select the Data Source as ctDynamicsSL.quickQuery.queryFilter
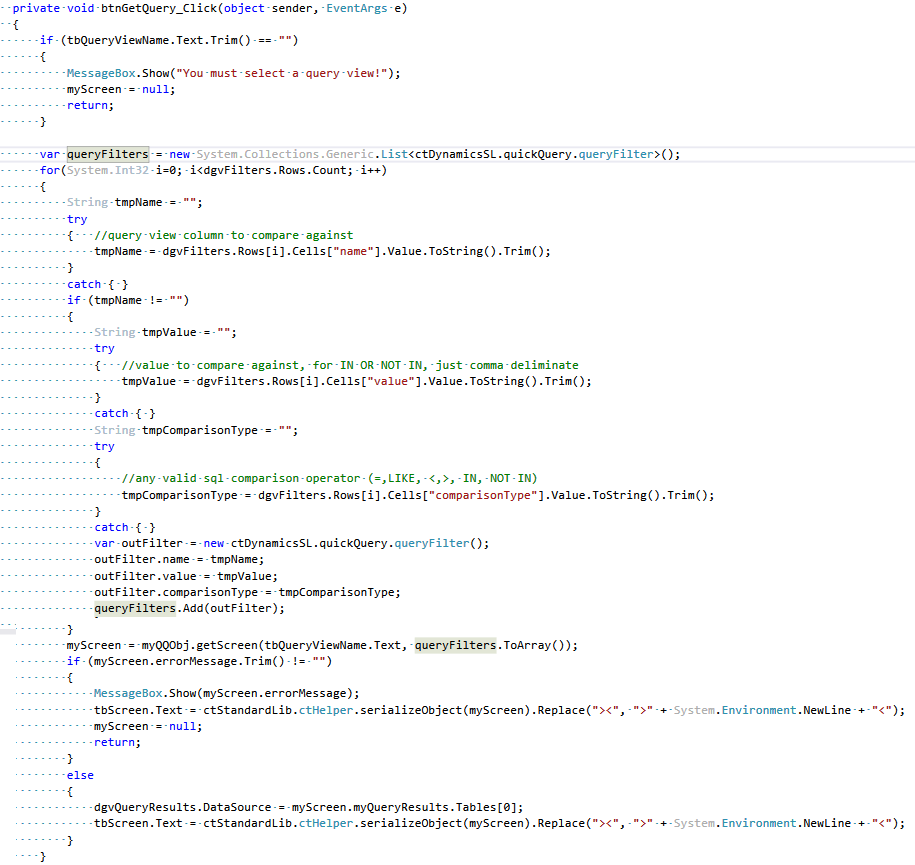
7. The Quick Query Service, is a V2 service by Catalina Technology and by design uses a screen() object for most calls that replicate the SL screen. Create a private variable to hold an instance of the screen object for all of our subsequent calls to the service.

8. Write the code to call the web service, pass the parameters and tie the results to the Result DataGridView (dgvQueryResults)
9. Test our Web Service Client:
a. Find a Query View with our popup.
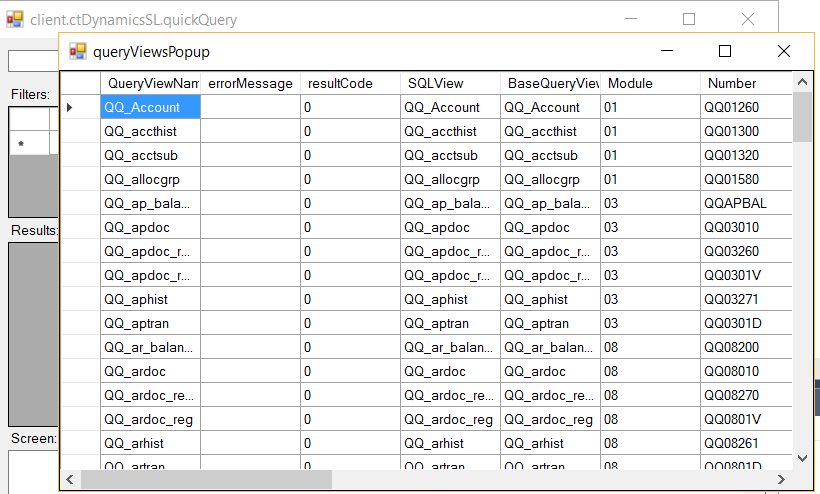
b. Enter in some filters then Search and View the Results

Note: You can download the sample client Visual Studio Project at the following link: https://github.com/CatalinaTechnology/ctAPIClientExamples/tree/master/client.quickQuery
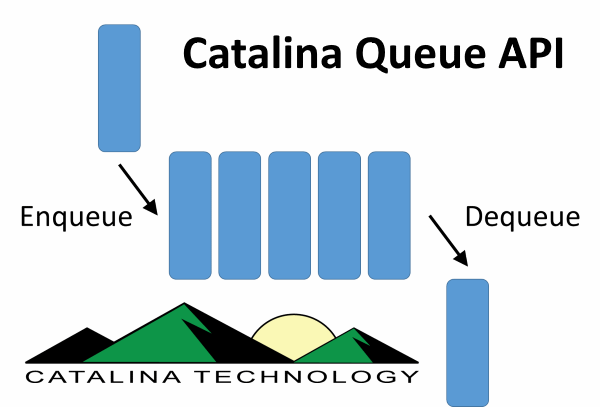
Catalina has a simple queuing engine that allows you to track changes on any table in SQL server. There is then an API that allows you to retrieve items that have been queued so that you can take action on them. This is mostly done when you need to send Dynamics SL data, that has changed, to an outside system.
Example: A customer in Dynamics SL is modified in the SL Customer Maintenance Screen. You want to make sure that the customer terms, class, and other information makes it out to Salesforce.com (or other CRM system). Continue Reading →
Catalina Technologies API for Dynamics SL allows you to create your own custom defaults and validations when sending data into SL through the API.
How to set Custom Defaults and Validations for web services in CTAPI. As of RELEASE builds post 2017/1/1, you are now able to overwrite defaults and validations in two single files. This is now the preferred place to make customizations, as it will avoid overwriting changes with new release builds of CTAPI.
The file for Defaults customizations is named: custom.default.ctDynamicsSL.xml and is located in your DEFAULTCONFIGDIRECTORY. (Path defined in your DSLCONFIGFILE, default: c:\inetpub\xctFiles\config\)
The file for Validations customizations is named: custom.validate.ctDynamicsSL.xml and is located in your VALIDATIONCONFIGDIRECTORY. (Path defined in your DSLCONFIGFILE, default: c:\inetpub\xctFiles\config\)
All customizations for defaults and validations for all CTAPI web services are contained in these two files.
Definition of the custom.default.ctDynamicsSL.xml file:
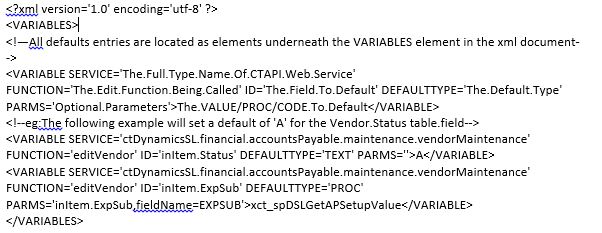
ID: (The field to set)
1. inItem – Always used to represent the Table/Object being defaulted. (not the field)
DEFAULTTYPE: (TEXT, PROC, CODE)
1. TEXT – sets the field value to the value listed in this xml element.
2 PROC – sets the field value to the value returned by the stored procedure listed in the xml element value. (optional: PARMS attribute listing stored procedure parameters)
3. CODE – sets the field value to the value returned by performing an eval on the code listed in the xml element value.
PARMS: (An optional, comma-delimitated list of parameters used for PROC Type defaults)
1. Variables from the inItem object that match stored procedure variable names.
e.g.: PARMS=’inItem.Status’
2. Rename an inItem object variable to a different stored procedure variable name.
e.g.: PARMS=’VendStatus=inItem.Status’
3. Hardcoded Stored procedure variable values.
e.g.: PARMS=’Active=1’
Definition of the custom.validate.ctDynamicsSL.xml file:

ID: (The field to set)
1. inItem – Always used to represent the Table/Object being defaulted. (not the field)
VALIDATETYPE: (LIST, PROC, NUMBERRANGE, DATERANGE, CODE)
1. LIST – a comma delimitated list of text values that are valid.
2. PROC – validates based on returnValue returned by the stored procedure listed in the xml element value. (optional: PARMS attribute listing stored procedure parameters)
3. NUMBERRANGE – a comma delimitated range of doubles.
e.g.: 1,5
4. DATERANGE – a comma delimitated range of dates.
e.g.: 1/1/2016,1/1/2019
5. CODE – validates the Boolean returned by performing an eval on the code listed in the xml element value.
PARMS: (An optional, comma-delimitated list of parameters used for PROC Type validations)
6. Variables from the inItem object that match stored procedure variable names.
e.g.: PARMS=’inItem.Status’
7. Rename an inItem object variable to a different stored procedure variable name.
e.g.: PARMS=’VendStatus=inItem.Status’
8. Hardcoded Stored procedure variable values.
e.g.: PARMS=’Active=1’
Most of the CTAPI Web Services are modeled after a counterpart SL client screen and intended to replicate its functionality.
The class path of these services matches the hierarchy and path to the screen in SL:
e.g.: ctDynamicsSL.financial.accountsPayable.maintenance.vendorMaintenance

About the screen() object:
With this model in mind, all such services have a screen() object designed to match the schema of the comparable SL screen. E.g., In the Vendor Maintenance (03.270.00) SL screen, there is one SQL table referenced for reading and editing (Vendor). This is represented by the myVendor variable of type ctDynamicsSL.Vendor inside the screen. Also included is one read-only calculated object myBalances of type ctDynamicsSL.AP_Balances.

Note: All object/table names and property/field names will match for both capitalization and naming.
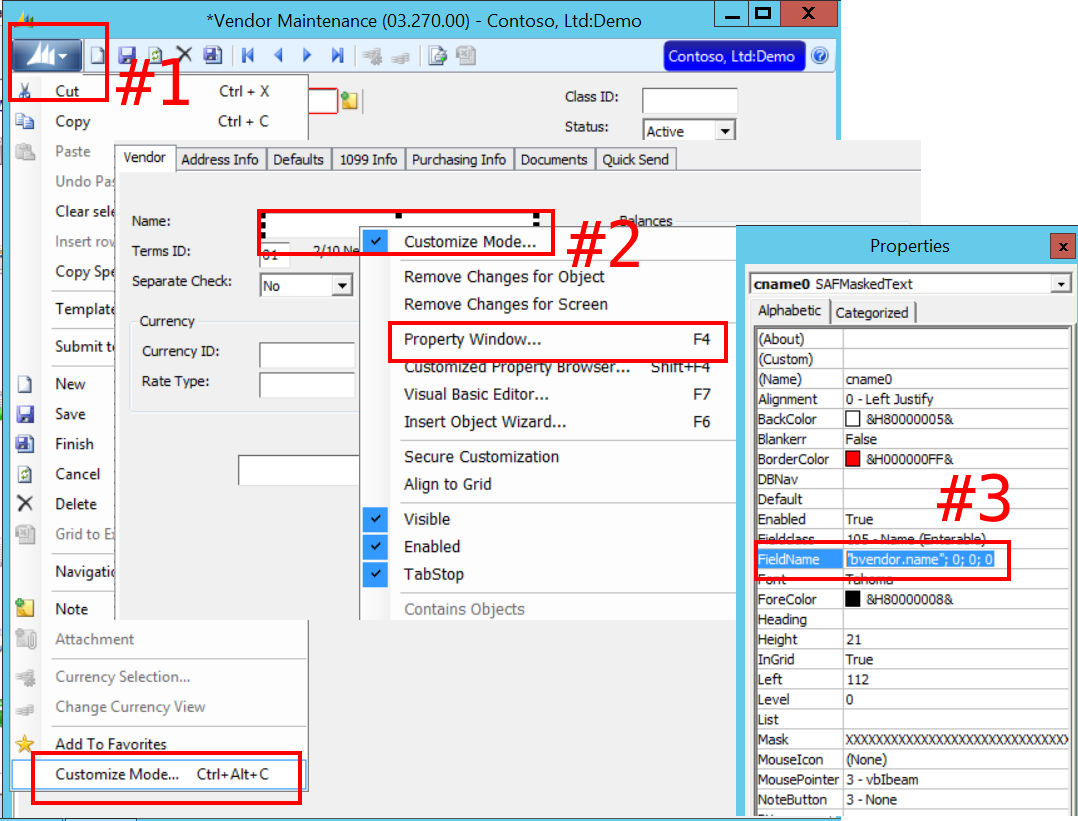
![]() Pro-tip: If you need to know which field to populate in the SL screen() objects, you only need to pull up Customization Mode in SL (Ctrl + Alt + C), locate the field and its name in the Property Window (F4), then find the FieldName. This FieldName correlates directly to a Table.Field and Object.Property in the screen() object.
Pro-tip: If you need to know which field to populate in the SL screen() objects, you only need to pull up Customization Mode in SL (Ctrl + Alt + C), locate the field and its name in the Property Window (F4), then find the FieldName. This FieldName correlates directly to a Table.Field and Object.Property in the screen() object.
e.g.: The following SL screen field correlates to:
ctDynamicsSL.financial.accountsPayable.maintenance.vendorMaintenance.screen.myVendor.Name
In addition to the SL fields, all objects contain: public String errorMessage.
The errorMessage field defaults to a blank String “” and if populated, means that the system ran into an error during processing.
Note: when editing a screen object, any errors editing contained objects will bubble up to the screen level so it is only necessary to check the top object.
e.g.: if (!String.IsNullOrWhiteSpace(myScreen.errorMessage)){/*we ran into an error*/}
Populating a screen object with defaults:
Every web service with a screen() object contains a public screen getNewscreen(screen inTemplate) call. This call will take the passed screen() object and return a copy with all default fields populated/overwritten.
Note: you can pass a null to get a completely new defaulted object.
e.g.: var myScreen = myVendorsService.getNewscreen(null);
![]() Pro-tip: Some defaulted fields require other fields to be populated in order to get the right default value. E.g., CpnyID and CustID are common such fields; so it is recommend that you populate all non-defaulting fields before calling getNewscreen().
Pro-tip: Some defaulted fields require other fields to be populated in order to get the right default value. E.g., CpnyID and CustID are common such fields; so it is recommend that you populate all non-defaulting fields before calling getNewscreen().
e.g.:
var myScreen = new ctDynamicsSL.financial.accountsReceivable.input.invoiceAndMemo.screen();
myScreen.myBatch = new ctDynamicsSL.financial.accountsReceivable.input.invoiceAndMemo.Batch();
myScreen.myBatch.CpnyID = “0060”;
myScreen = myIMObj.getNewscreen(myScreen); //loads defaults that depend on CpnyID
editScreen:
Every web service with a screen() object contains a public screen editScreen(String actionType, screen inScreen) call. This call is the workhouse used for Validations, Adding, Updating, or Deleting data.
The actionType parameter is standardized with: VALIDATEONLY, ADD, UPDATE, or DELETE.
Note: you can leave actionType blank “” and the system will default to ADD if the primary keys do not already exist in the table, or UPDATE if they do. For best practices, always specify ADD or UPDATE.
e.g.:
//validate all my data before attempting to save:
var validateScreen = myVendorsService.editScreen(“VALIDATEONLY”, myScreen);
if (!String.IsNullOrWhiteSpace(validateScreen.errorMessage))
{
MessageBox.Show(“Error: ” + validateScreen.errorMessage);
return;
}
//add our new vendor entry
var add = myVendorsService.editScreen(“ADD”, myScreen);
if (!String.IsNullOrWhiteSpace(add.errorMessage))
{
MessageBox.Show(“Error: ” + add.errorMessage);
return;
}
else
{
//added our vendor, lets get the auto generated VendId
tbVendID.Text = add.myVendor.VendId.Trim();
}
//save our vendor screen updates
var update = myVendorsService.editScreen(“UPDATE”, myScreen);
if (!String.IsNullOrWhiteSpace(update.errorMessage))
{
MessageBox.Show(“Error: ” + update.errorMessage);
}
else
{
MessageBox.Show(“Save complete!”);
}

We are now posting our Catalina API for Dynamics SL sample client code to GitHub(under a MIT license. Which means that you can use the sample client code for your own purposes).
I am posting the SOAP based sample clients here: https://github.com/CatalinaTechnology/ctAPIClientExamples
I just put up one for customer maintenance. I will be posting more throughout the week (as I get them ready for consumption). If you have any questions, feel free to Contact us. Also, if you are a current Catalina API for Dynamics SL user and have any sample code that you would like to share with others, feel free to forward and we will see if we can get it out there for you.