Create an APRS iGate on a Raspberry Pi
Not everything we do here at Catalina Technology deals with system integration. We have other hobbies as well. Using ham radio to communicate globally, without the internet is a pretty interesting skill and has come in handy during recent outages of cellular coverage, power outages, etc. Below is a quick overview of how to setup an APRS iGate on a raspberry pi. APRS is a form of packet radio that allows you to send data over a radio to other radios that can receive and repeat your message. You can send messages as well as location. An iGate is a gateway that will then send your packets to the internet.
1. Install Linux on your Raspberry Pi
2. Get the accessories for your Pi
I used this USB sound card for the pi: https://www.amazon.com/gp/product/B00IRVQ0F8/ref=ppx_yo_dt_b_search_asin_title?ie=UTF8&psc=1
I used this sound cable: https://www.amazon.com/gp/product/B00PYZ2BT4/ref=ppx_yo_dt_b_asin_title_o00_s00?ie=UTF8&th=1
and since I either use a baofeng or my kenwood HT for this, I use this cable: https://www.amazon.com/gp/product/B01LMIBAZW/ref=ppx_yo_dt_b_search_asin_title?ie=UTF8&psc=1
3. Install Direwolf
First, I would make sure that everything is up to date:
sudo apt-get update && sudo apt-get upgrade -y
Then I would install direwolf (This way, you don’t have to compile it. It just installs the latest version):
sudo apt-get install direwolf
4. Edit your direwolf.conf file
Set the device of the card
aplay -l
arecord -l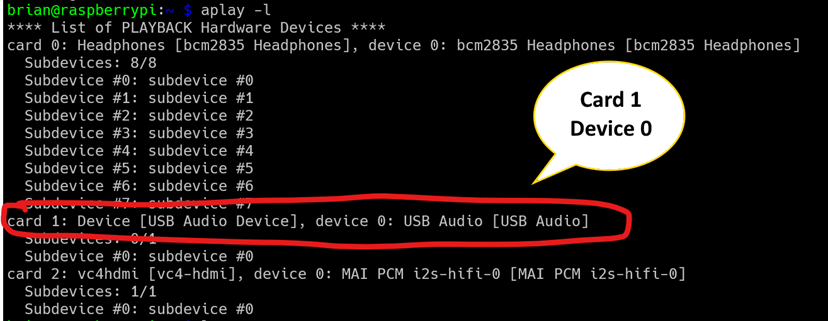
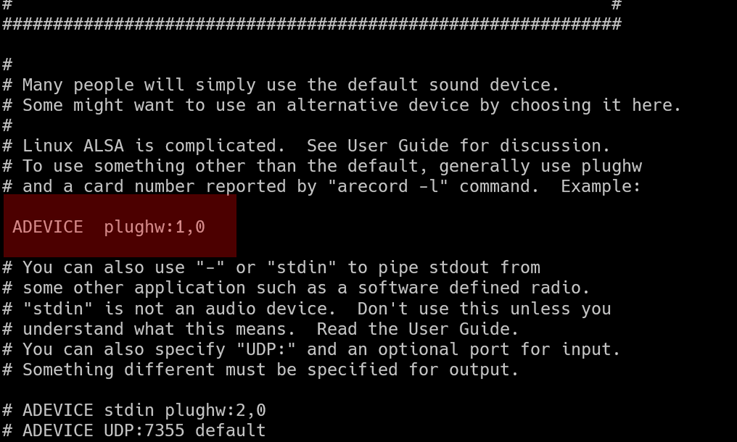
Line 86 (NOTE: it may not be line 86 if the version has changed. Just look for the ADEVICE plughw keyword)
Line 86 will appear similar to
#ADEVICE plughw:0,0
You will need to update this to match your device. In this example with Card 2 Device 0, the line will change to
ADEVICE plughw:2,0
This is what it looks like in my config file:
Set the callsign
Line 141 You will want to change the callsign. A fresh direwolf.conf file will look similar to this on line 141
MYCALL N0CALL
Change to your callsign and ssid.
This is what it looks like on my machine:

Set your lat/long: I look at aprs.fi and hover where I want to get a location. I am hovering over Scotch Bonnet to get lat/long
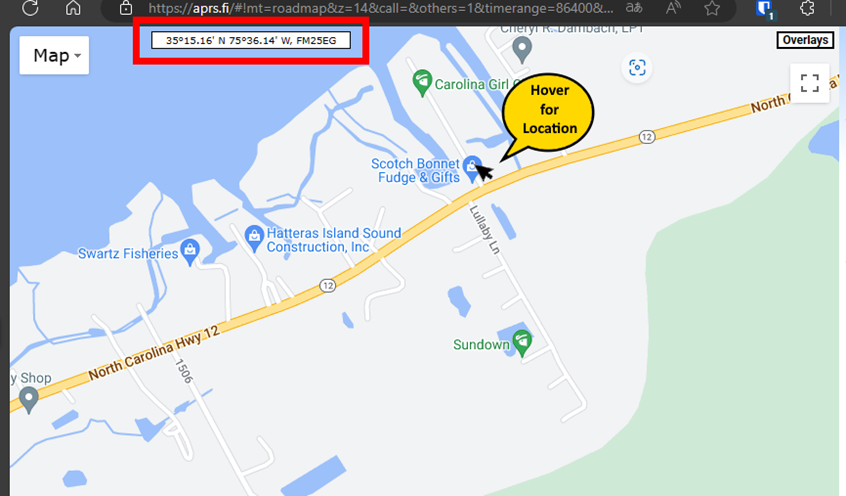
Once you get your location, change every lat/long in the direwolf.conf
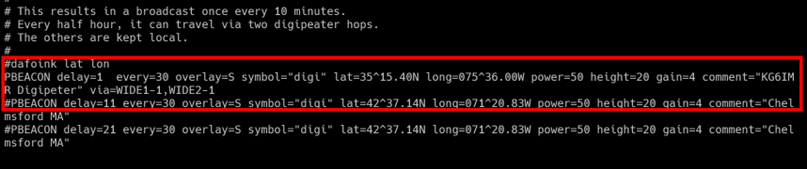
This is my location for PBEACON. Also note that I am setting a comment that I want associated with my digipeater. You will want to change this to. You only have to change the item that is not commented out with a #
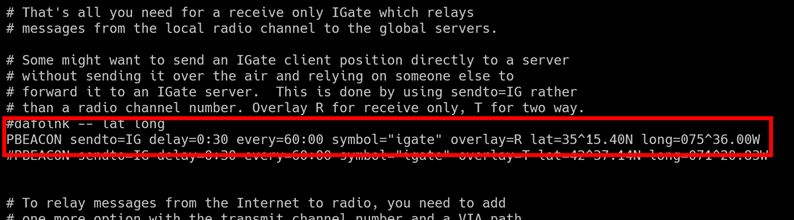
Here is where I am beaconing to the IGate.
Just search through the file to make sure that all callsign and lat/long have been changed besides these. I think I have them all in this doc. But just be sure 😊
5. Set dirwolf to autostart at boot
On the pi you have just installed direwolf run the following command to install tmux
sudo apt install tmux
Create a system unit by creating the following file
/etc/systemd/system/direwolf.service
NOTE: you will probably have to sudo your editor to do this since this is a privileged location. I use vi as my editor (I am old school), so I would create my file doing this:
sudo vi /etc/systemd/system/direwolf.service
You would insert the following in your newly created file
| [Unit] Description=Direwolf After=network.target [Service] Type=forking #Modify the end of the line below to fit your own needs i.e path to your configuration file ExecStart=/usr/bin/tmux new-session -d -s direwolf ‘/usr/local/bin/direwolf -c /home/YOURCALL/direwolf.conf’ Restart=always [Install] WantedBy=default.target |
NOTE: make sure that the path to the direwolf.conf exists (i.e. I am assuming that you will have this in the /home/youruser directory.)
Then save your file
Enable the service by typing the following command
sudo systemctl enable direwolf.service
- If everything went ok, you can now try to start the service by the following command (You can use this any time you want to start the service manually – i.e. if you stopped it manually or if it has crashed or something)
sudo systemctl start direwolf.service
- You can check the status of the service by the following command
sudo systemctl status direwolf.service
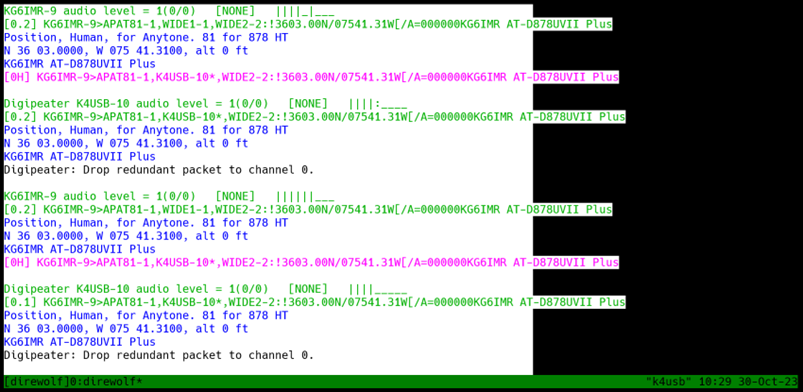
If the direwolf service is healthy, it should look similar to this (<ctrl>+c will escape you out):

You can stop the service by the following command
sudo systemctl stop direwolf.service
If you want to attach to the service and have direwolf output display to your terminal session:
sudo tmux attach -t direwolf
Should look similar to this (you can see output — <ctrl>+c will escape you out):