Retrieving Data in SL using Quick Query via Catalina’s SOAP Web Services

It is easy to retrieve most any data from SL using Catalina’s API for Quick Query. Below is an example of how you can use SOAP and .NET to do this. This example shows yow you can retrieve subaccounts

First, you can also call the QuickQuery API via Postman (using the RESTful API) via below (NOTE: this should bring back all sub accounts since we arent filtering for anything.

curl --location --request POST 'http://YourServer.com/ctDynamicsSL/api/quickQuery/QQ_SubAccount' \
--header 'Accept: application/json' \
--header 'Authorization: Basic YOURAUTHORIZATION' \
--header 'CpnyID: YOURCPNYID' \
--header 'SiteID: YOURSITEID' \
--header 'Content-Type: application/json' \
--data-raw '{
    "filters": [
    ]    
}'

Below is .NET code using SOAP. I had registered the SOAP web service quickQuery.ASMX and named it ctAPI.QuickQuery. This code shows you how you can retrieve subaccounts in 2 different ways

  • The first one just brings back all sub accounts
  • The second call brings back just sub accounts that contain the word “admin” in the Description
public void RunIt()
{
       // call the web service, requesting the “QQ_SubAccount” quick query to be run. We will pass an empty filter array so that it will get everything
       var returnWithoutFiltering = QuickQueryService.getScreen("QQ_SubAccount", new ctAPI.QuickQuery.queryFilter[0]);
       {
              // I like to convert to a JArray so that I can do other things with it.  but lets loop through each row
              Newtonsoft.Json.Linq.JArray myArry = Newtonsoft.Json.Linq.JArray.FromObject(returnWithoutFiltering.myQueryResults.Tables[0]);
              foreach (var myVal in myArry)
              {
                     Console.WriteLine($"SubAcct: {myVal["Subaccount"].ToString().Trim()}, Descr: {myVal["Description"].ToString().Trim()}");
              }
       }
       Console.WriteLine();
       // lets filter all sub accounts that contain the word "admin" in the description
       var myFilters = new List<ctAPI.QuickQuery.queryFilter>
       {
              new ctAPI.QuickQuery.queryFilter {name = "Description", comparisonType = "LIKE", value="%admin%" }
       };
       // call the web service, requesting the “QQ_SubAccount” quick query to be run. Passing the myFilters array for filtering
       var returnWithFiltering = QuickQueryService.getScreen("QQ_SubAccount", myFilters.ToArray());
       {
              // I like to convert to a JArray so that I can do other things with it.  but lets loop through each row
              Newtonsoft.Json.Linq.JArray myArry = Newtonsoft.Json.Linq.JArray.FromObject(returnWithFiltering.myQueryResults.Tables[0]);
              foreach (var myVal in myArry)
              {
                     Console.WriteLine($"SubAcct: {myVal["Subaccount"].ToString().Trim()}, Descr: {myVal["Description"].ToString().Trim()}");
              }
       }
}


private ctAPI.QuickQuery.quickQuery _quickQueryService = null;
public ctAPI.QuickQuery.quickQuery QuickQueryService
{
       get
       {
              if (this._quickQueryService == null)
              {
                     this._quickQueryService = new ctAPI.QuickQuery.quickQuery
                     {
                           Timeout = 300000,
                           ctDynamicsSLHeaderValue = new ctAPI.QuickQuery.ctDynamicsSLHeader
                           {
                                  siteID = "YOURSITEID",
                                  cpnyID = "YOURCPNYID",
                                  licenseKey = "YOURLICENSEKEY",
                                  licenseName = "YOUR LICENSE NAME",
                                  licenseExpiration = "1/1/1900",
                                  siteKey = "YOURSITEKEY",
                                  softwareName = "CTAPI"
                           }
                     };
              }
              return this._quickQueryService;
       }
       set
       {
              this._quickQueryService = value;
       }
}

Below here is the data structure of a subaccount from the Quick Query QQ_SubAccount

{
	"counter": 2,
	"Subaccount": "01000CD00001            ",
	"Description": "Administration-Canada         ",
	"Subaccount Status": 1,
	"Consolidation Subaccount": "01000CD00001            ",
	"Create Date": "1998-09-12T00:00:00",
	"Create Program": "01270   ",
	"Create User": "SYSADMIN  ",
	"Last Update Date": "1998-09-12T00:00:00",
	"Last Update Program": "01270   ",
	"Last Update User": "SYSADMIN  ",
	"NoteID": 0,
	"User1": "                              ",
	"User2": "                              ",
	"User3": 0.0,
	"User4": 0.0,
	"User5": "          ",
	"User6": "          ",
	"User7": "1900-01-01T00:00:00",
	"User8": "1900-01-01T00:00:00",
	"totalEntries": 40,
	"totalPages": 1,
	"errorMessage": null
}
Example of building a Form Client to use the Catalina Quick Query SOAP Web Service

This is an example of how to use Quick Query as a data delivery tool for external systems using Catalina’s API for Dynamics SL.  This example is for those who want to use a SOAP based interface.

For an example on how to retrieve Quick Query data through a REST interface, check out this article: Dynamics SL Quick Query through Catalina’s RESTful API

1.     In Visual Studio, we select the Visual C# Template for a Windows Form Application. Our client will be named: client.ctDynamicsSL.quickQuery.

ss1

Note: you can call the Catalina web services from any type of client that is able to make http/https calls, but for this example, we will use a Form Application.

2.     Add a reference to our Quick Query Web Service
a.     Right click on “References” and select “Add Service Reference” 

ss2

b.     On the “Add Service Reference” screen, click the “Advanced” button in the bottom left. (Image: qqcclient3.png)

c.      On the “Service Reference Settings” screen, click the “Add Web Reference” button. (Image: qqcclient4.png)

d.     On the “Add Web Reference” screen, enter in the URL to the web service. 

E.g.: http://localhost/ctDynamicsSL/quickQuery.asmx

Click the arrow button to discover the web service schema.

After the service definition loads, enter in a name to refer to this service in your client.

E.g.: ctDynamicsSL.quickQuery

ss3

e.     Click the “Add Reference” button.

f.       The new web reference will show up in your project.

ss4


3.     Create code to instantiate an object referencing our web service.

a.     I like to store values that are required in the Soap Header in the app.config file using System.Configuration, so we will first add a reference to the System.Configuration assembly. References -> Add Reference -> System.Configuration

ss5

b.     Create a private variable to store the actual object and a property to auto create the instance if the variable is null. This get{} property will pull the required header values from the app.config

ss6

Now whenever we want to call a function in the web service, we just reference it like so: myQQObj.functionName().

4.     Add the necessary elements for our main Form.

a.     TextBox for typing in a QueryViewName (tbQueryViewName)

b.     Button for a QueryViewName search (btnSearch)

c.      Button for executing our search (btnGetQuery)

d.     DataGridView for holding our search parameters (dgvFilters)

e.     ss7DataGridView for holding our search results (dgvQueryResults)


5.     Add a popup form for QueryViewName searches.

a.     The QueryViewName is the root of the Quick Query Service; they are names of SQL Views built in to SL. This is a required element, so let’s build an easy way to lookup them up.

b.     Add another Form object to the project: queryViewsPopup.cs

ss8.png

c.      Add a DataGridView to the new Form object.

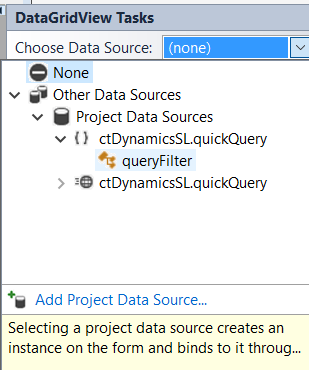
d.     Click on the little arrow at the top right of the Grid and add ctDynamicsSL.quickQuery.vs_qvcatalog as the Data Source.

ss9.png

e.     For ease of use, edit the DataGridView Columns.

  • Move the QueryViewName column to the first position.
  • Change Name to “QueryViewName” we will use this to reference the cell later.

ss10

f.       On our main Form, tie an EventHandler to open this form.

g.      Add a CellDoubleClick Event Handler, to take the selected row and return the QueryViewName back to the tbQueryViewName on the main Form.

ss11.png

6.     Setup Filters DataGridView 

a.     The Quick Query Service getScreen call requires 2 parameters: queryViewName, filters[]. The filters parameter is of type: ctDynamicsSL.quickQuery.queryFilter.  

b.     The Filters is an array of triplets holding 3 required fields:

  • name – This must match the name of a column in the query view)
  • value – This is the value we are to filter/compare against)
  • comparisonType – This is any valid SQL comparison operator. E.g.: =, <, >, LIKE, IN, NOT IN

c.      Select the Data Source as ctDynamicsSL.quickQuery.queryFilter

ss12

7.     The Quick Query Service, is a V2 service by Catalina Technology and by design uses a screen() object for most calls that replicate the SL screen. Create a private variable to hold an instance of the screen object for all of our subsequent calls to the service.

ss13

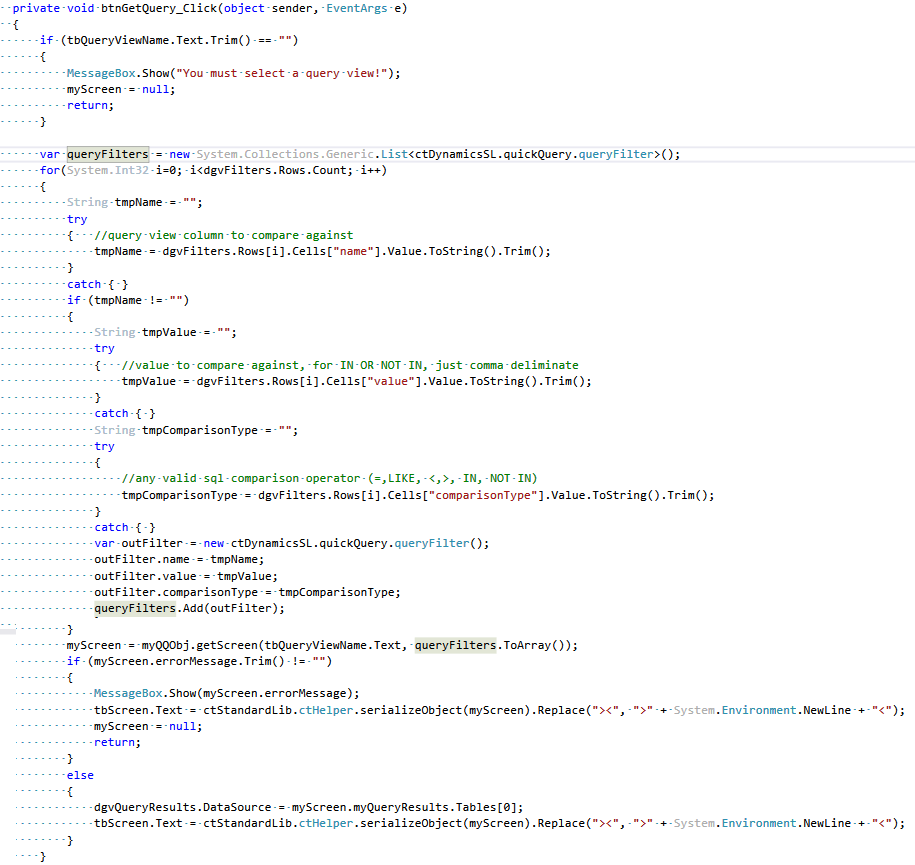
8.     Write the code to call the web service, pass the parameters and tie the results to the Result DataGridView (dgvQueryResults)

ss14.png

9.     Test our Web Service Client:

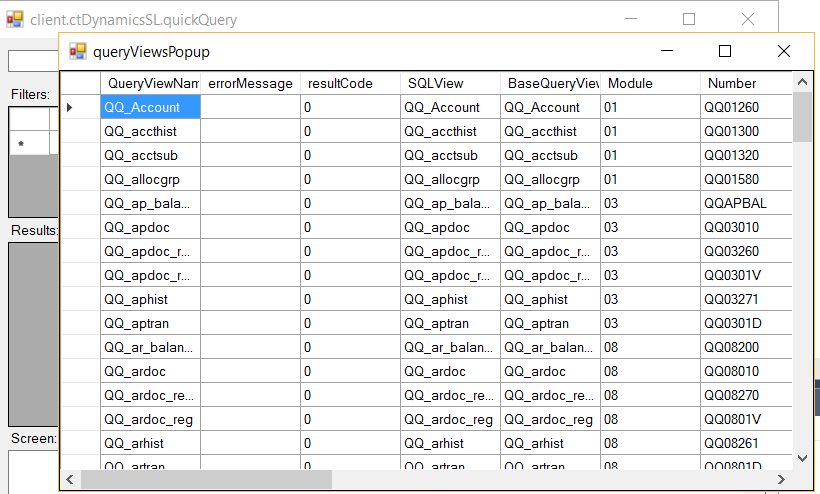
a.     Find a Query View with our popup.

ss15

b.     Enter in some filters then Search and View the Results

ss16.png

 Note:     You can download the sample client Visual Studio Project at the following link: https://github.com/CatalinaTechnology/ctAPIClientExamples/tree/master/client.quickQuery


Catalina’s Queue Engine

Catalina has a simple queuing engine that allows you to track changes on any table in SQL server. There is then an API that allows you to retrieve items that have been queued so that you can take action on them.  This is mostly done when you need to send Dynamics SL data, that has changed, to an outside system.

Example: A customer in Dynamics SL is modified in the SL Customer Maintenance Screen. You want to make sure that the customer terms, class, and other information makes it out to Salesforce.com (or other CRM system). Continue Reading