Often, there is a problem when accessing the DMG’s, in Solomon, where you get an error “Missing Database information.” This is generally caused by a missing or invalid Solomon.ini file.
Step 1:
Validate that you have a good solomon.ini. Contact Catalina for a good solomon.ini file.
Looking at this, there are several things that are important
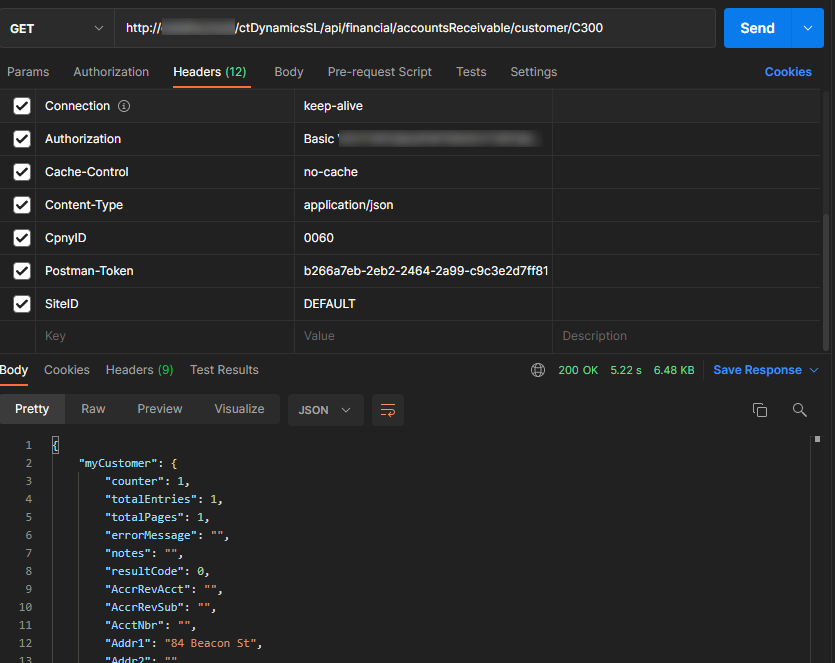
Retrieving a customer is quite simple. You would perform a GET from Catalina’s API (REST) using the following endpoint: /api/financial/accountsReceivable/customer/{CustID}
Example, if you wanted to retrieve customer C300, you would use this endpoint: /api/financial/accountsReceivable/customer/C300
To do this retrieve in Postman, it would look similar to this:
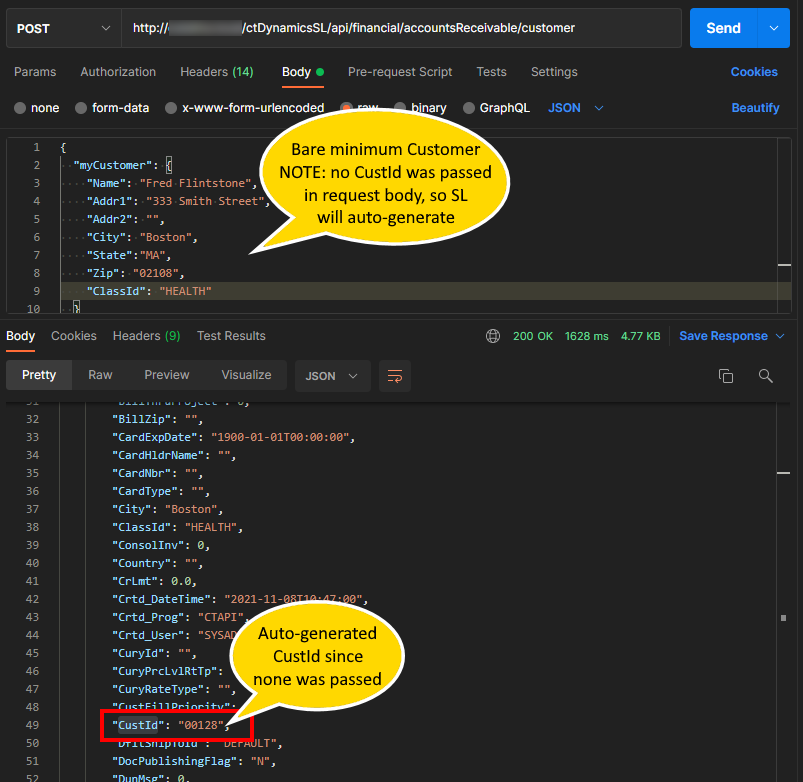
Saving a New Customer
If you want to save a new customer, you would perform a POST to the following endpoint: /api/financial/accountsReceivable/customer (NOTE: you would NOT post a custID in the URL of the endpoint)
Below is a minimum curl POST that will create a customer. NOTE: if you do not pass a CustID in the request body, SL will automatically select a CustID for you. Also NOTE that if you try to do a POST and pass a CustID in the request body that already exists, the system will give you an error stating that you cant create a new customer with an existing CustID.
If the POST is successful, the API will pass back the newly saved customer. In the response body, you will see the field myCustomer.CustId. That will be the CustID saved (if you passed a valid CustID or if the system automatically set the CustID if you didn’t pass one in the request body)
It would like like this in Postman:
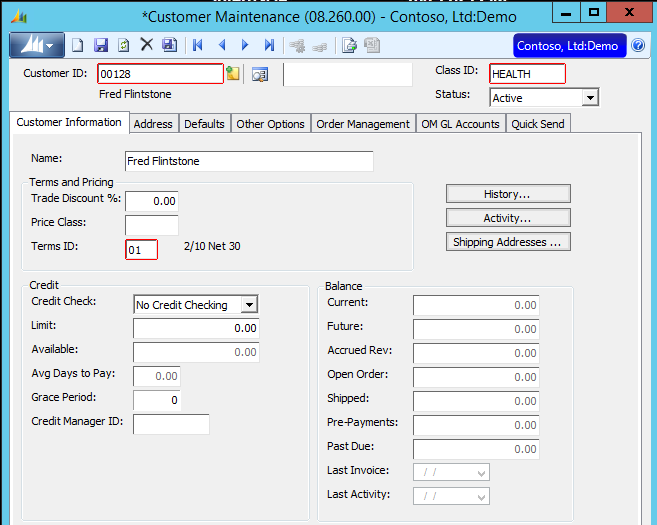
The customer can now be viewed in the SL Customer Maintenance (08.260.00) Screen.
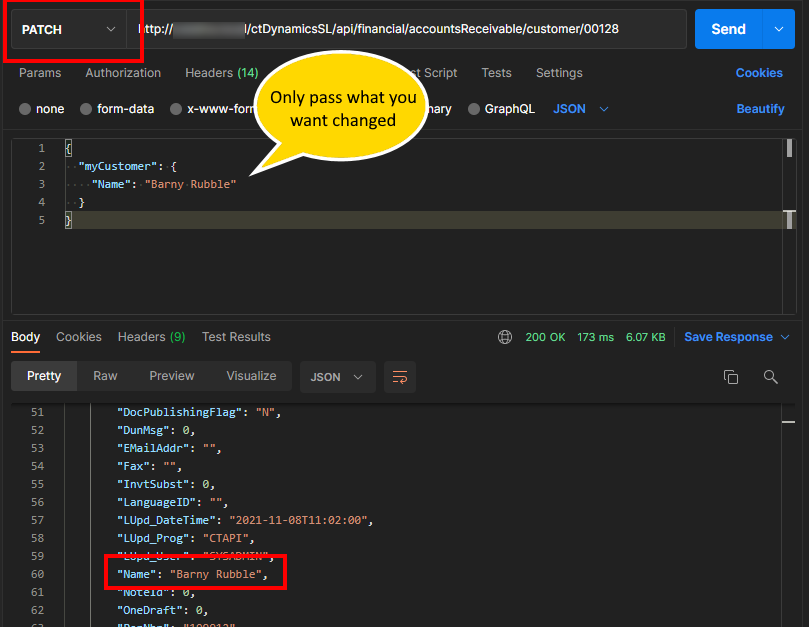
Updating a Customer
If you want to change a customer, you would make a PATCH call to the following endpoint: /api/financial/accountsReceivable/customer/{CustID}
NOTE: you would replace {CustID}, in the URL, with the Customer ID you want to update. So, if you want to update customer 00128, the endpoint would look like this: /api/financial/accountsReceivable/customer/00128
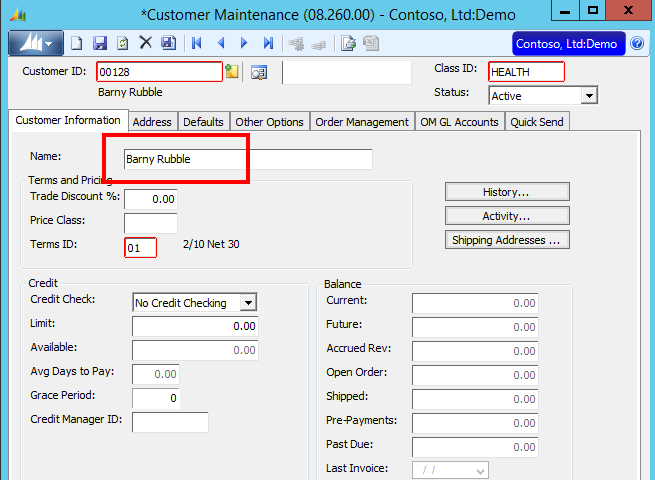
Regarding the request body, you would only pass the fields you want changed. If you want to change the customer’s name, but you don’t want to change anything else, then only pass the Name field with the value you want to change. So, if I wanted to change customer 00128 to have the customer name of “Barny Rubble” instead of “Fred Flintstone,” I would do a call something like this:
For developers, our SOAP version has the definition of this in the WSDL here (NOTE: we have it separated by function/module depending on what you need to do):
Many are starting to use dotnet core as a development environment for many reasons. It is compact, you can easily deploy to Docker containers, you can run cross platform, and many other reasons.
We get a lot of questions on how to use our API, for Dynamics SL, in a dotnet core environment.
If you want to be able to do something with our REST API or SOAP Web services, you may need to have a place to start. If you check out our github dotNETCore repository, you can see examples of both. You can clone the repository using the git client:
It is easy to retrieve most any data from SL using Catalina’s API for Quick Query. Below is an example of how you can use SOAP and .NET to do this. This example shows yow you can retrieve subaccounts
First, you can also call the QuickQuery API via Postman (using the RESTful API) via below (NOTE: this should bring back all sub accounts since we arent filtering for anything.
Below is .NET code using SOAP. I had registered the SOAP web service quickQuery.ASMX and named it ctAPI.QuickQuery. This code shows you how you can retrieve subaccounts in 2 different ways
The first one just brings back all sub accounts
The second call brings back just sub accounts that contain the word “admin” in the Description
public void RunIt()
{
       // call the web service, requesting the “QQ_SubAccount” quick query to be run. We will pass an empty filter array so that it will get everything
       var returnWithoutFiltering = QuickQueryService.getScreen("QQ_SubAccount", new ctAPI.QuickQuery.queryFilter[0]);
       {
              // I like to convert to a JArray so that I can do other things with it.  but lets loop through each row
              Newtonsoft.Json.Linq.JArray myArry = Newtonsoft.Json.Linq.JArray.FromObject(returnWithoutFiltering.myQueryResults.Tables[0]);
              foreach (var myVal in myArry)
              {
                     Console.WriteLine($"SubAcct: {myVal["Subaccount"].ToString().Trim()}, Descr: {myVal["Description"].ToString().Trim()}");
              }
       }
       Console.WriteLine();
       // lets filter all sub accounts that contain the word "admin" in the description
       var myFilters = new List<ctAPI.QuickQuery.queryFilter>
       {
              new ctAPI.QuickQuery.queryFilter {name = "Description", comparisonType = "LIKE", value="%admin%" }
       };
       // call the web service, requesting the “QQ_SubAccount” quick query to be run. Passing the myFilters array for filtering
       var returnWithFiltering = QuickQueryService.getScreen("QQ_SubAccount", myFilters.ToArray());
       {
              // I like to convert to a JArray so that I can do other things with it.  but lets loop through each row
              Newtonsoft.Json.Linq.JArray myArry = Newtonsoft.Json.Linq.JArray.FromObject(returnWithFiltering.myQueryResults.Tables[0]);
              foreach (var myVal in myArry)
              {
                     Console.WriteLine($"SubAcct: {myVal["Subaccount"].ToString().Trim()}, Descr: {myVal["Description"].ToString().Trim()}");
              }
       }
}


private ctAPI.QuickQuery.quickQuery _quickQueryService = null;
public ctAPI.QuickQuery.quickQuery QuickQueryService
{
       get
       {
              if (this._quickQueryService == null)
              {
                     this._quickQueryService = new ctAPI.QuickQuery.quickQuery
                     {
                           Timeout = 300000,
                           ctDynamicsSLHeaderValue = new ctAPI.QuickQuery.ctDynamicsSLHeader
                           {
                                  siteID = "YOURSITEID",
                                  cpnyID = "YOURCPNYID",
                                  licenseKey = "YOURLICENSEKEY",
                                  licenseName = "YOUR LICENSE NAME",
                                  licenseExpiration = "1/1/1900",
                                  siteKey = "YOURSITEKEY",
                                  softwareName = "CTAPI"
                           }
                     };
              }
              return this._quickQueryService;
       }
       set
       {
              this._quickQueryService = value;
       }
}
Below here is the data structure of a subaccount from the Quick Query QQ_SubAccount
When creating a purchase order using Catalina’s API for Dynamics SL and you get the following error:
“The create voucher flag cannot be changed once the document has been changed”
This is getting fired off because of a business rule violation. There is a work around. If you look in your DSLCONFIGFILE.xml, you should look for the following.
Make sure that the value of that CONFIGITEM is “TRUE”. If you don’t have this CONFIGITEM, add it to the site you are using via the SiteID. If you still have the problem after making this change, contact Catalina support to see if there is an update for your version of the API.
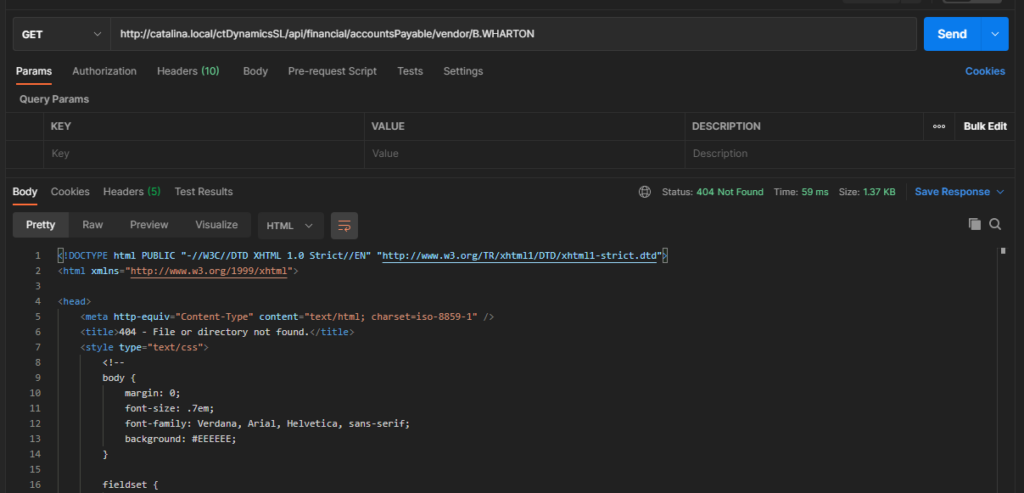
What happens if you are using Catalina’s API for Dynamics SL and your ID you are searching for (example a CustID, Vendor ID, etc) has a period in it? It will fail with standard installation. This is because the .NET web application is looking for a period in the final parameter so that it can route.
You will get a return that looks something like this with a 404 status and HTML coming back:
This can be solved by changing the web.config.
NOTE: if you make this change, then you wont be able to run SOAP and REST in the same application. SOAP will stop working and you would need to install a separate instance with it’s won web.config to make this work.
If you look in the Web.config, you will see the following line:
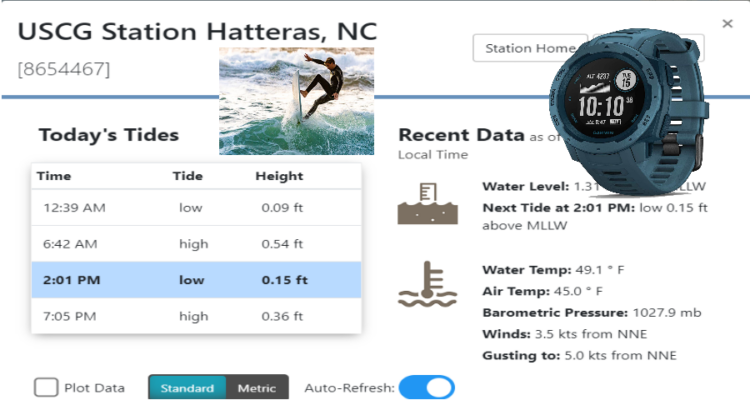
We aren’t just business here on the blog. We often work on other projects for fun and to keep our programming skills tight. This one is to help us predict the best time to go surfing.
If anybody has the standard Garmin Instinct watch and wants Tide information on their watch is out of luck since Garmin wants you to spend twice as much to buy the fancy expensive Surf edition watch.
There is kinda a workaround by importing data into a Google Calendar with data from NOAA that will schedule events for the predicted tides. So, I decided to write a .NET Core app that goes out to NOAA and pulls back tide predictions, for a station ID that you specify, and a date range to get the predictions. It will then write that information to a CSV file that you can upload to a google map and then sync to your watch.
The .NET Core app will run on most any machine that has .NET Core installed (Windows, Mac, Linux). It will allow you to pass parameters for beginDate, endDate, station ID (from NOAA) and a filename to output the CSV to. What I did is just run it from 1/1/2021 through 12/31/2021 so that I can populate data for the entire year.
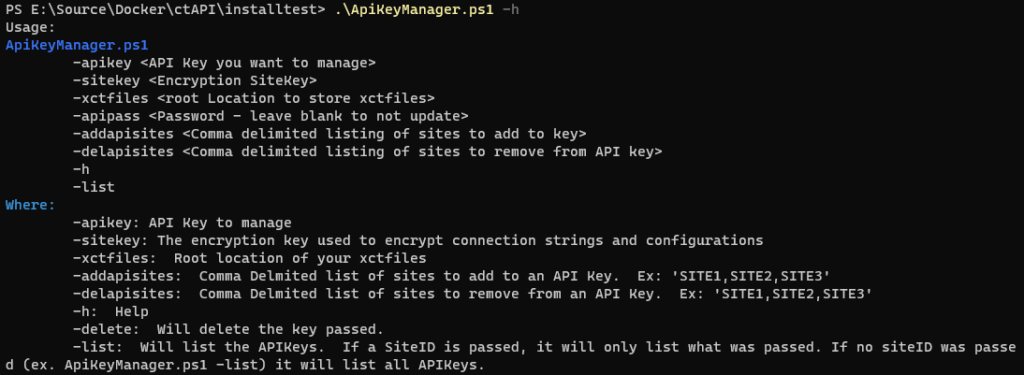
I did a demo on how to manage API Keys, for our RESTful API for Dynamics SL, using PowerScript. We are rolling out PowerScript management and installation tools for our products. Please contact us ([email protected]) if you are interested in receiving an early release.
sitekey: The encryption key used to encrypt connection strings and configurations
xctfiles: Root location of your xctfiles
addapisites: Comma Delmited list of sites to add to an API Key. Ex: ‘SITE1,SITE2,SITE3’
delapisites: Comma Delmited list of sites to remove from an API Key. Ex: ‘SITE1,SITE2,SITE3’
h: Help
delete: Will delete the key passed.
list: Will list the APIKeys. If a SiteID is passed, it will only list what was passed. If no siteID was passed (ex. ApiKeyManager.ps1 -list) it will list all APIKeys.
Examples
If you want to get a listing, you would enter: ./ApiKeyManager.ps1 -h
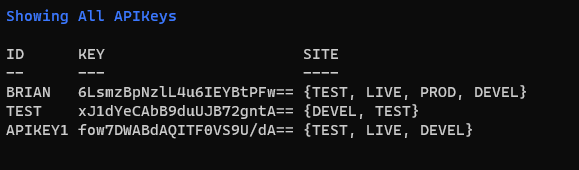
Passing the -list parameter will get you something similar to this
If you want to create a new API Key with the username = “APIKEY1”, password = “Passw0rd1”, give access to 3 sites (“TEST”, “LIVE”, “DEVEL”), your SiteKey (encryption key) is “1234567”, and the location of your xctfiles is c:\inetpub\xctFiles, you would enter the below: