Not everything we do here at Catalina Technology deals with system integration. We have other hobbies as well. Using ham radio to communicate globally, without the internet is a pretty interesting skill and has come in handy during recent outages of cellular coverage, power outages, etc. Below is a quick overview of how to setup an APRS iGate on a raspberry pi. APRS is a form of packet radio that allows you to send data over a radio to other radios that can receive and repeat your message. You can send messages as well as location. An iGate is a gateway that will then send your packets to the internet.
First, I would make sure that everything is up to date:
sudo apt-get update && sudo apt-get upgrade -y
Then I would install direwolf (This way, you don’t have to compile it. It just installs the latest version):
sudo apt-get install direwolf
4. Edit your direwolf.conf file
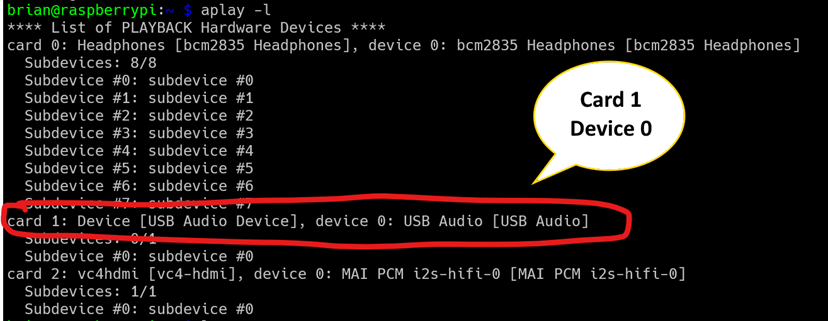
Set the device of the card
aplay -l
arecord -l
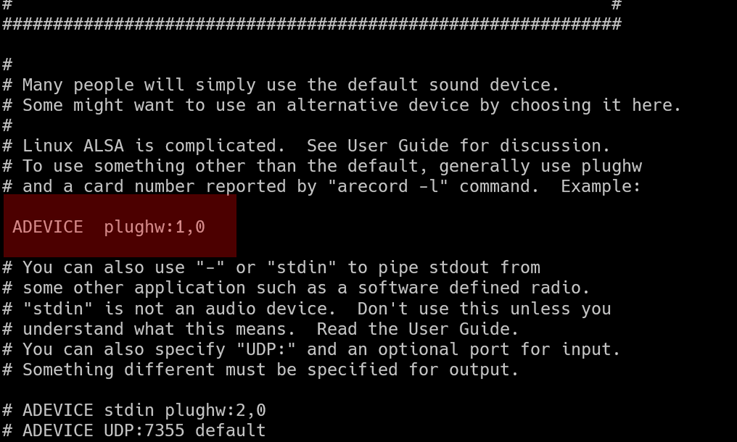
Line 86 (NOTE: it may not be line 86 if the version has changed. Just look for the ADEVICE plughw keyword)
Line 86 will appear similar to
#ADEVICE plughw:0,0
You will need to update this to match your device. In this example with Card 2 Device 0, the line will change to
ADEVICE plughw:2,0
This is what it looks like in my config file:
Set the callsign
Line 141 You will want to change the callsign. A fresh direwolf.conf file will look similar to this on line 141
MYCALL N0CALL
Change to your callsign and ssid.
This is what it looks like on my machine:
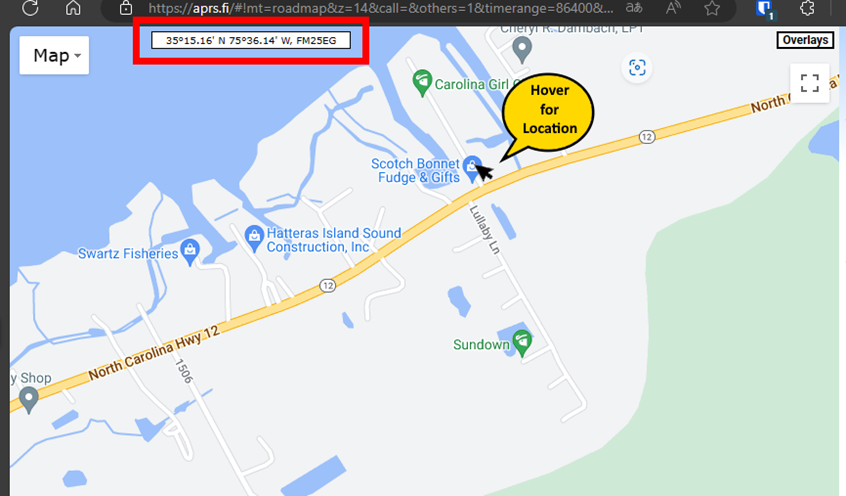
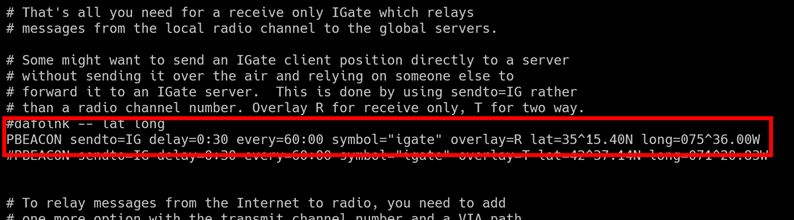
Set your lat/long: I look at aprs.fi and hover where I want to get a location. I am hovering over Scotch Bonnet to get lat/long
Once you get your location, change every lat/long in the direwolf.conf
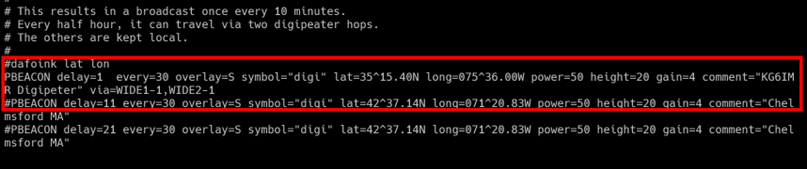
This is my location for PBEACON. Also note that I am setting a comment that I want associated with my digipeater. You will want to change this to. You only have to change the item that is not commented out with a #
Here is where I am beaconing to the IGate.
Just search through the file to make sure that all callsign and lat/long have been changed besides these. I think I have them all in this doc. But just be sure 😊
5. Set dirwolf to autostart at boot
On the pi you have just installed direwolf run the following command to install tmux
sudo apt install tmux
Create a system unit by creating the following file
/etc/systemd/system/direwolf.service
NOTE: you will probably have to sudo your editor to do this since this is a privileged location. I use vi as my editor (I am old school), so I would create my file doing this:
sudo vi /etc/systemd/system/direwolf.service
You would insert the following in your newly created file
[Unit] Description=Direwolf After=network.target [Service] Type=forking #Modify the end of the line below to fit your own needs i.e path to your configuration file ExecStart=/usr/bin/tmux new-session -d -s direwolf ‘/usr/local/bin/direwolf -c /home/YOURCALL/direwolf.conf’ Restart=always [Install] WantedBy=default.target
NOTE: make sure that the path to the direwolf.conf exists (i.e. I am assuming that you will have this in the /home/youruser directory.)
Then save your file
Enable the service by typing the following command
sudo systemctl enable direwolf.service
If everything went ok, you can now try to start the service by the following command (You can use this any time you want to start the service manually – i.e. if you stopped it manually or if it has crashed or something)
sudo systemctl start direwolf.service
You can check the status of the service by the following command
sudo systemctl status direwolf.service
If the direwolf service is healthy, it should look similar to this (<ctrl>+c will escape you out):
You can stop the service by the following command
sudo systemctl stop direwolf.service
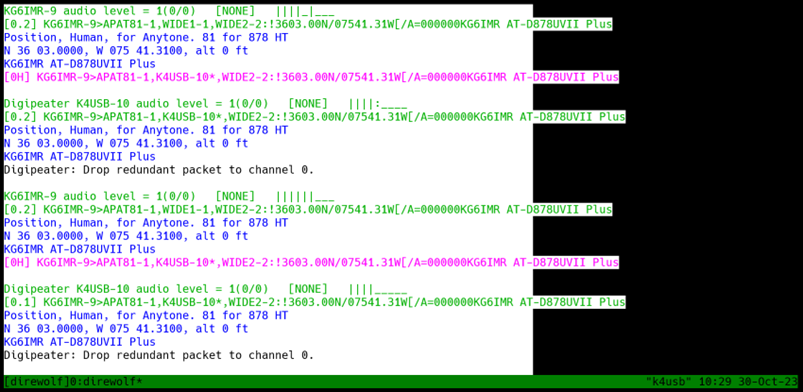
If you want to attach to the service and have direwolf output display to your terminal session:
sudo tmux attach -t direwolf
Should look similar to this (you can see output — <ctrl>+c will escape you out):
If you are getting a timeout from the server (not the client) when calling Catalina’s APIs, what we generally recommend for our services is leaving the webservice debug flag set.
Often, there is a problem when accessing the DMG’s, in Solomon, where you get an error “Missing Database information.” This is generally caused by a missing or invalid Solomon.ini file.
Step 1:
Validate that you have a good solomon.ini. Contact Catalina for a good solomon.ini file.
Looking at this, there are several things that are important
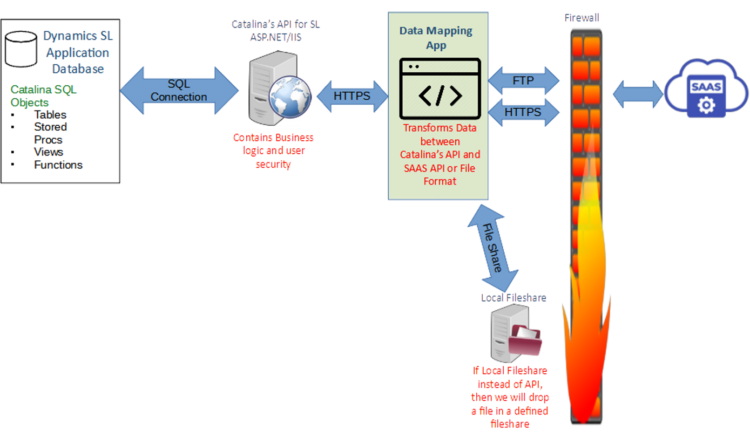
Normally, Catalina will develop a Data Mapping App which will pull from one system, transform the data pulled, then push into the other system. This creates a situation where a hole is not needed to be opened in the firewall for outside systems to communicate in.
There are several ways that the Data Mapping App could communicate with the external SAAS system:
FTP: The app could send and receive data via an FTP, SFTP file share.
An API: The app could communicate via an API by posting and retrieving data through some type of web based API or Web Service
File Share: Some SAAS systems will communicate simply with files saved in a local fileshare.
The Data Mapping APP will communicate to Dynamics SL through Catalina’s API for SL (either via the SOAP based web services or the RESTful API. The Catalina API would reside inside the firewall on a Windows IIS server. The Catalina API will then communicate with the Dynamics SL database via a SQL Connection.
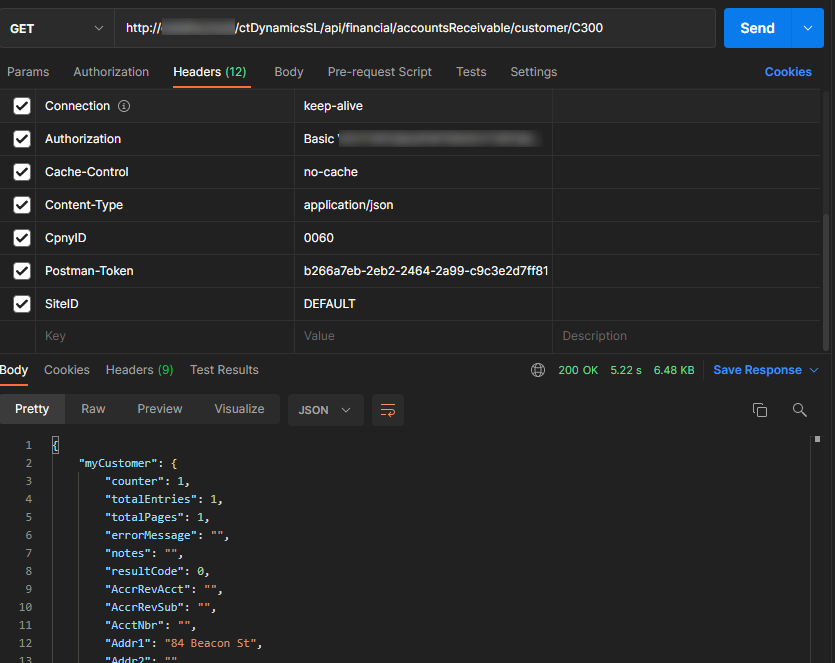
Retrieving a customer is quite simple. You would perform a GET from Catalina’s API (REST) using the following endpoint: /api/financial/accountsReceivable/customer/{CustID}
Example, if you wanted to retrieve customer C300, you would use this endpoint: /api/financial/accountsReceivable/customer/C300
To do this retrieve in Postman, it would look similar to this:
Saving a New Customer
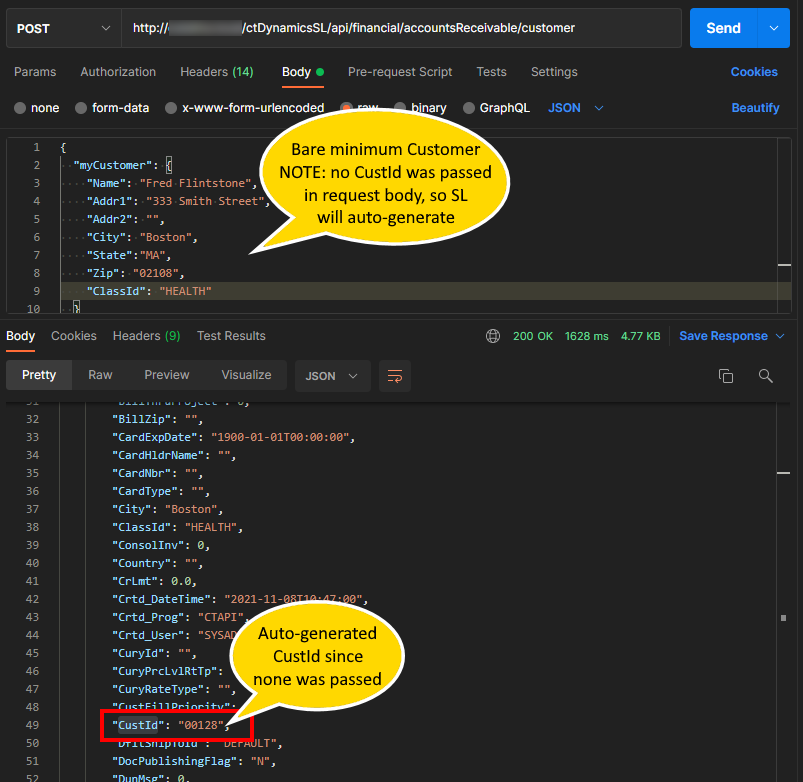
If you want to save a new customer, you would perform a POST to the following endpoint: /api/financial/accountsReceivable/customer (NOTE: you would NOT post a custID in the URL of the endpoint)
Below is a minimum curl POST that will create a customer. NOTE: if you do not pass a CustID in the request body, SL will automatically select a CustID for you. Also NOTE that if you try to do a POST and pass a CustID in the request body that already exists, the system will give you an error stating that you cant create a new customer with an existing CustID.
If the POST is successful, the API will pass back the newly saved customer. In the response body, you will see the field myCustomer.CustId. That will be the CustID saved (if you passed a valid CustID or if the system automatically set the CustID if you didn’t pass one in the request body)
It would like like this in Postman:
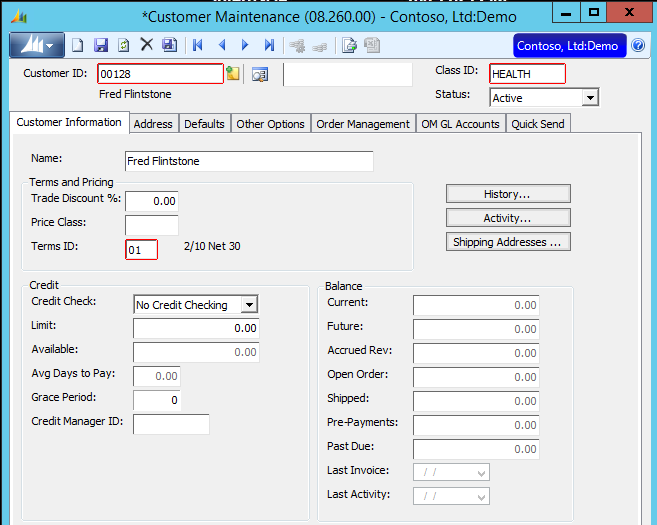
The customer can now be viewed in the SL Customer Maintenance (08.260.00) Screen.
Updating a Customer
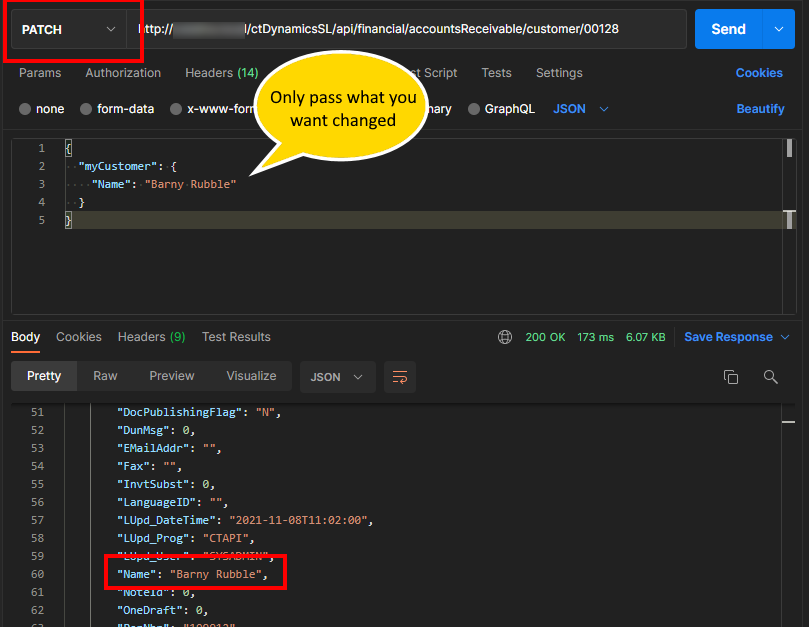
If you want to change a customer, you would make a PATCH call to the following endpoint: /api/financial/accountsReceivable/customer/{CustID}
NOTE: you would replace {CustID}, in the URL, with the Customer ID you want to update. So, if you want to update customer 00128, the endpoint would look like this: /api/financial/accountsReceivable/customer/00128
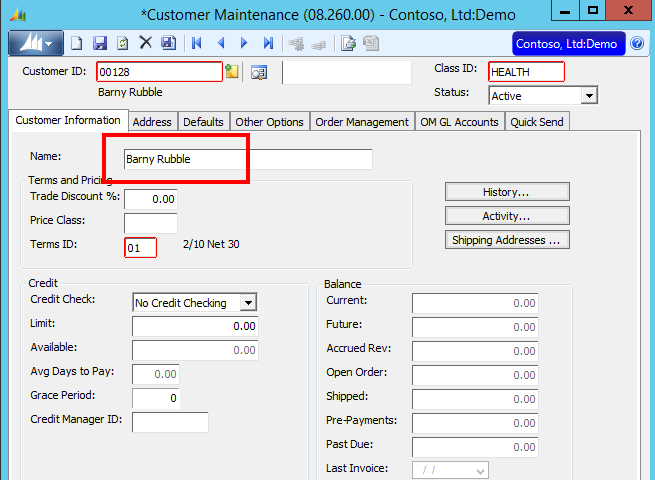
Regarding the request body, you would only pass the fields you want changed. If you want to change the customer’s name, but you don’t want to change anything else, then only pass the Name field with the value you want to change. So, if I wanted to change customer 00128 to have the customer name of “Barny Rubble” instead of “Fred Flintstone,” I would do a call something like this:
For developers, our SOAP version has the definition of this in the WSDL here (NOTE: we have it separated by function/module depending on what you need to do):
Many are starting to use dotnet core as a development environment for many reasons. It is compact, you can easily deploy to Docker containers, you can run cross platform, and many other reasons.
We get a lot of questions on how to use our API, for Dynamics SL, in a dotnet core environment.
If you want to be able to do something with our REST API or SOAP Web services, you may need to have a place to start. If you check out our github dotNETCore repository, you can see examples of both. You can clone the repository using the git client:
This is because Catalina’s API has security where you need to create a hash and pass that hash of the name of the stored procedure (using the same APIKey setup in ctDynamicsSL) so that when the API retrieves your request for the SQL call, it is using the same shared key for the hash encryption.
If you don’t want to do this, you can look at your DSLConfigFile.xml file. Look in the XML block denoted by the SiteID you are using in your header and make sure that this line is there (with the value = TRUE — All Caps). This will disable that checksum check.